| Category | Issue | Workaround |
|---|---|---|
| Installation and Upgrade:
Windows |
After upgrading from Ephesoft Transact 2019.1 to version 2019.2 on a Windows system, the Windows Service account for Ephesoft Transact reverts back to the Local System account, and not to the Transact Windows Service. | The workaround for this issue is to run the Upgrade Wizard for Ephesoft Transact 2019.2, then manually add again the Transact Windows Service on this Windows system.
For additional information, refer to the following documents: |
| Installation and Upgrade: Windows, Silent |
The Windows Silent Install Wizard fails to configure logon information for the Ephesoft Transact service. | This issue is observed after installation. Windows displays the following error message:
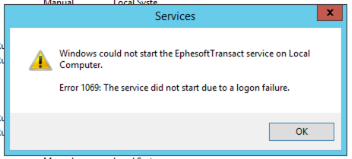 To resolve this issue, edit the Logon field manually from the Services console. The user should avoid using symbols such as % (percent) in the logon password. |
| Installation and Upgrade:
CentOS |
When installing Ephesoft Transact on a CentOS system with IP tables (iptables) configured as part of the firewall rules, the installer incorrectly changes the IP tables. This issue pertains to the following versions:
Ephesoft Transact 4.5 Ephesoft Transact 2019.1 Ephesoft Transact 2019.2 |
This issue will be resolved with an upcoming software release.
To resolve this issue in Ephesoft Transact 4.5, 2019.1 or 2019.2, perform these steps: 1. Determine if the /etc/sysconfig/iptables file exists. 2. If this file exists, edit the file to move the following rule in it above any REJECT rule: -A INPUT -m state –state NEW -m tcp -p tcp –dport 8080 -j ACCEPT 3. Run the following command: sudo iptables -L 4. Check to verify if the following rule is defined after a REJECT rule: ACCEPT tcp – anywhere anywhere state NEW tcp dpt:http-alt 5. If this is the case, perform the following additional steps. a. Run the following command: sudo iptables -L –line-numbers b. Check the number in front of the following rule: ACCEPT tcp – anywhere anywhere state NEW tcp dpt:http-alt c. Run the following command, where the <number found in above step> is the number shown after performing step 5b: sudo iptables -D INPUT <number found in above step> for example, sudo iptables -D INPUT 5 d. Run the following command: sudo iptables -I INPUT -m state –state NEW -m tcp -p tcp –dport 8080 -j ACCEPT e. Run the following commands: sudo service iptables save sudo service iptables restart |
| Installation and Upgrade:
SAML SSO Configuration During Upgrade (Infor) |
The SAML-SSO bean entry is not updated when upgrading to Ephesoft Transact 2019.2. | Resolve this issue by performing the following steps:
1. Back up the original applicationContext-security.xml file (<Ephesoft Installation Directory>\Application\WEB-INF\classes\META-INF) before performing the upgrade from previous version of Ephesoft Transact. 2. Complete the upgrade to Ephesoft Transact 2019.2. 3. After the upgrade is complete, manually add the metadata bean entry from the original applicationContext-security.xml file into the current applicationContext-security.xml file. 4. Restart the Ephesoft Transact server. |
| Installation and Upgrade:
Server Startup Failure after Upgrade (Infor) |
The Ephesoft Transact server fails startup after upgrading to version 2019.2. Note that this issue occurs specifically with the Infor Auto_SSO_9 installer. | Prevent this issue by performing the following steps:
1. After installing any earlier version of Transact, uncomment the line for configuring HTTPS in the server.xml file (<Ephesoft Installation Directory>\JavaAppServer\conf) as shown below. <Connector port=”8443″ protocol=”org.apache.coyote.http11.Http11Protocol” maxThreads=”150″ SSLEnabled=”true” scheme=”https” secure=”true” keystoreFile=”C:\Ephesoft\servercert.jks” keystorePass=”xxxxxxx” clientAuth=”false” sslProtocol=”TLS” maxPostSize=”4194304″ /> 2. Perform the upgrade to Ephesoft Transact 2019.2 using the 2019_2_Infor_Auto-SSO_9 installer. During this step, you will observe that the server startup fails. 3. Manually change the protocol attribute value in the server.xml file to org.apache.coyote.http11.Http11NioProtocol. As a result, the Connector appears as follows: <Connector port=”8443″ protocol=”org.apache.coyote.http11.Http11NioProtocol” maxThreads=”150″ SSLEnabled=”true” scheme=”https” secure=”true” keystoreFile=”C:\Ephesoft\servercert.jks” keystorePass=”xxxxxxx” clientAuth=”false” sslProtocol=”TLS” maxPostSize=”4194304″ /> 4. Start the Ephesoft Transact server. |
| Installation and Upgrade:
LibreOffice |
After installing Ephesoft Transact 2019.2, the Transact server fails at start-up due to soffice.bin application error. | The issue occurs as some LibreOffice files are not being copied by the installer during installation. To fix this problem, download libreoffice.zip file, unzip and place the folder in the Ephesoft Transact installation directory. |
| Batch Class Management | After a few days of heavy document processing, the Ephesoft Transact Pickup service stops picking up batches. | To resolve this issue, perform the following steps:
1. Disable JNotify on all servers. Adjust the following setting to be as shown: foldermonitor.jnotify_switch=false 2. Enable INFO-level logging on all the servers. 3. Restart the entire cluster. |
| Batch Instance Management | When the Session Expiration dialog appears during batch class operations, the dialog is locked in the background. As a result, the user cannot click Continue and the work may be lost. | There are two workarounds for this issue, as follows:
1. For environments that typically have large processing tasks, the Administrator can increase the screen timeout period. Additional information about adjusting the timeout period is available in the following document: 2. When the issue occurs, open another browser tab and open any Transact screen (such as the Batch Instance Management screen). This approach ensures that the session continues. The Session Expiration popup dialog on the initial screen will also disappear. |
| Review-Validate | If two document types share the same Index Field property name (name and description), and the Sticky Index Field Switch is enabled (set to ON), then when the user changes document type, the index values for the previous document type persist with the new document type. | The workaround for this issue, when using the Sticky Index Field Switch under the VALIDATE_DOCUMENT plugin, is to create index fields for each document type to have a different name and description. |
| Review-Validate:
Keyboard Shortcuts |
When performing validation in a batch instance that contains two or more documents with tables, the screen may freeze when using the Ctrl + Shift + M keyboard shortcut to change from the current document’s table view to the previous document’s table view. | To prevent this issue from occurring, when there are two or more documents with tables in the batch instance, use the Field View and Table View buttons on the Validation screen to display the table view for any document. |
| Review-Validate:
Zoom Overlay |
When enabling or disabling the Zoom Overlay feature in the Review-Validate screen, alternating between the shortcut of Ctrl + Shift + X and the Image icon does not function as expected. | The workaround for this issue is to use only one method to enable and disable the Zoom Overlay feature. Either use the image icon, or the Ctrl + Shift + X keyboard shortcut, but not a combination of the two. |
| Review-Validate:
Zoom Overlay |
The image icon does not function properly for Zoom Overlay, such as zoom in or out, pop-out, fit-to-size, or rotate. | To avoid this issue, use keyboard shortcuts to make use of other functionalities with Zoom Overlay feature. |
| Review-Validate:
Zoom Overlay |
An overlay appears on an expanded, “popped-out” image if Zoom Overlay is enabled. | The workaround for this issue is to disable Zoom Overlay, then directly click on a pop-out image icon. With this approach, the overlay does not appear on the image. |
| Review-Validate:
Fuzzy DB |
On the Validation screen, when attempting to search using the Fuzzy Search feature, the Cancel button does not operate in the FuzzyDB pop-up dialog. | As a workaround, instead of using the Close button, click the X icon at the top of the browser window to close the pop-up dialog. |
| Plugins:
Cloud HyperExtender |
“All Validated Documents” option of the Expedite Export feature does not work correctly with the Cloud HyperExtender plugin leaving some of the validated documents un-exported in the batch and requiring manual validation. | The resolution for this issue is to export each document type in the batch instance individually. Perform these steps:
1. Process the batch instance and prepare for export. 2. When exporting the batch instance, export only one document type at a time. The All Validated Documents button operates in this method. |
| Plugins:
Cloud HyperExtender |
When a batch class uses the Ephesoft Cloud HyperExtender plugin, batch instances experience an error if configured to perform image classification. | The resolution to this issue is to configure the CREATE_THUMBNAILS plugin as follows:
1. Log in to Ephesoft Transact as Administrator, and go to the Batch Class Management screen. 2. Open the batch class that contains the issue, which has the Ephesoft Cloud HyperExtender plugin configured. 3. Open the Page Process module. Configure and position the CREATE_THUMBNAILS plugin to be before the CLASSIFY_IMAGES plugin. 4. Save and deploy the changes to restart the batch. Batch instances should now perform image classification without error. |
| Plugins:
CREATEMULTIPAGE_FILES |
When importing batch classes from older versions of Transact to Transact 2019.2, the PDF Optimization Parameters in the CREATEMULTIPAGE_FILES plugin get changed and batch export fails. | To resolve the issue, make sure to change the first word of the PDF Optimization Parameters to: -dQUIET
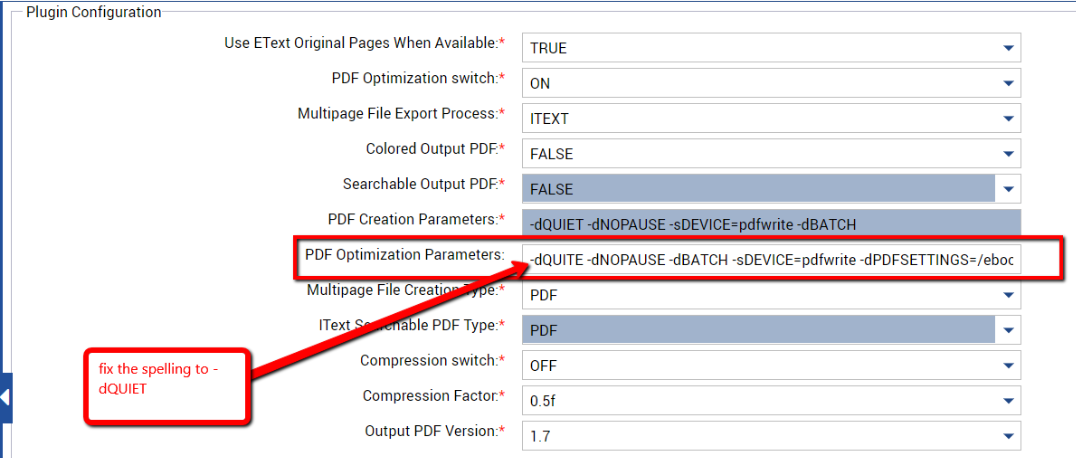
|
| Web Scanner:
Image Conversion |
The GraphicsMagick component in Ephesoft Transact is not able to rotate images on the server side. The issue is caused by a non-standard installation location for GraphicsMagick. | The workaround for this issue resolves a non-standard installation location for GraphicsMagick 1.3.22.
By default, Ephesoft Transact installs GraphicsMagick 1.3.22 in the following location: /usr/local/bin If GraphicsMagick 1.3.2.2 or another version has been installed in an alternate location, the administrator must create a soft link to the alternate location. Use the following command to create a soft link to a non-standard location for GhostMagick. ln -s /usr/bin/gm /usr/local/bin/gm In this command example: /usr/bin/gm — This is the non-standard location for GhostMagick, as an example. Your location may differ. /usr/local/bin/gm — This is the default GhostMagick location in a standard installation of Ephesoft Transact. |
| EText:
ZIP files |
An exception error may occur while processing zip files with EText feature. | The issue is observed if the input files are first placed in a folder and then zipped.
To avoid EText processing errors, zip the files directly, without placing them in the folder before compression. Alternatively, the files/folder can be unzipped before processing. |
| LIM:
Table views on Oracle |
LIM query results generate a mis-formatted table view. | When using query with Line Item Matching (LIM), the table view returns mis-formatted results. This issue occurs only with the Oracle database.
If the user experiences corrupted table views on Oracle, contact Ephesoft Support, who will provide information about the schemaname.tablename for the PO-TABLE. |
| Custom Export:
Ubuntu 16.04 with Ghostscript |
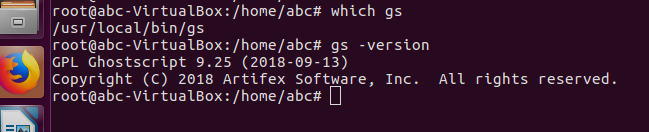
The Custom Export plugin creates a Ghostscript error on Linux Ubuntu 16.04. | This issue is observed if the higher version of Ghostscript has been installed on the server than supported by Ephesoft Transact.
To resolve this, the Ghostscript needs to be downgraded to version 9.25 which comes bundled with the Transact installer by default. The workaround steps are described below. 1. Remove Ghostscript: apt-get remove -y ghostscript 2. Install the supported Ghostscript version by performing the following steps: Download Ghostscript version 9.25 Q8 (it is recommended to use the Ephesoft_2019.2.tar.gz, navigate to the Ephesoft/Dependencies folder and search ghostscript.tar.gz) Extract the tar file with the following commands: Tar -xvzf ghostscript.tar.gz Go to Ghostscript extracted folder: cd ghostscript-9.25 Run the ./configure command
Run the following command: make -s
Run the following command: checkinstall -y
Run the following command: checkinstall -R -y -install –exclude=/selinux,/selinux/context
Run the following command: ldconfig /usr/local/bin
Verify the path and version of Ghostscript. Use the following commands: which gs gs -version
If needed, additional information about when a user may experience this issue is available from Ephesoft Support. |
| Expedite Export | When moving a validated part of the batch forward in the processing workflow using the Expedite Export functionality, the validated part does split from the original batch, however fails to export as configured. | This issue is observed only for searchable PDF when using IText-Searchable tool. To resolve this problem, Recostar tool can be used to generate searchable PDF. |
| JExplorer on Windows | Launching the JExplorer.bat file does not bring up JExplorer. | Ensure that java path is correct in the Environment Variables. For that:
– On the Control Panel, select System – On the System screen, click Advanced system settings – Select Environment Variables… – Edit the JAVA_HOME variable value to show the correct path (<Ephesoft Installation Directory>\\Dependencies\\jdk\\) – Check that there is the %JAVA_HOME%\bin path under the System variables: 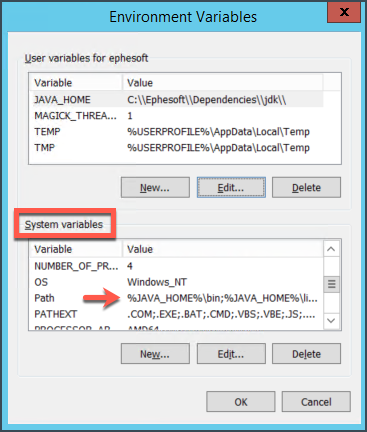 – Check the java version by opening Command Prompt and running the following command: java -version |
| Format Conversion | Date format conversion is not working when the values are entered in capital letters. | To resolve this issue, enter the values in the lower-case letters, for example, mm/dd/yyyy. |
| JAVA | The tool used to read fuzzy index to debug issues is not opening (<Ephesoft Installation Directory>\Dependencies\luke.bat). | This problem can be observed when the JAVA_HOME environment variable is not set correctly after installation. To fix the issue, reboot the machine and check if the JAVA_HOME variable is set correctly by launching the Admin Command Prompt and typing java -version. This should give you the java version. Now, you can run the luke.bat file (<Ephesoft Installation Directory>\Dependencies\luke.bat) and access the tool UI. |
| Web Services | The error is returned when trying to use ocrClassifyExtracV2 and OcrClassifyExtractBase64V2 web services for machine learning based extraction. | When configuring the batch class, use SearchClassification or MultiDimensionalClassification method instead of the default OneDocumentClassification in the DOCUMENT_ASSEMBLER plugin. |
| Other | When trying to stop the Ephesoft Transact service, it hangs. | To stop the Transact service, open the Windows Task Manager and end the “tomcat9” task manually. |
| FuzzyDB Extraction Configuration | When mapping a certain index field to a database field, the following error message displays: Unable to Learn databases. An issue in learning occurs when the primary key column mapped in the document fuzzy is used in mapping fields and is marked as searchable. | To resolve this issue, deploy the hotfix provided in this article. |