Available: on-premises, cloud
Introduction
This document describes how to configure the Ephesoft Cloud HyperExtender plugin for Ephesoft Transact, how to register for an Ephesoft Cloud account that is specific to the Ephesoft Cloud HyperExtender, and how to configure Ephesoft Transact to connect to that Ephesoft Cloud account.
The plugin addresses the heaviest processing needs of the Ephesoft Transact workflow by offloading document splitting and optical character recognition (OCR) processing to the Ephesoft Cloud. This allows the customer to manage temporary spikes in workload without having to add new hardware to on-premises or cloud-computing environments.
The plugin allows you to process up to 1,000 pages per month free of charge for the first 12 months after registration. If a batch fails during the execution of the plugin, the images in that failed batch will not be consumed from the free quota of 1,000 images. For further image processing needs per month please contact our sales team at sales@ephesoft.com.
Prerequisites
Ensure that the following prerequisites are completed to configure the Ephesoft Cloud HyperExtender plugin with Ephesoft Transact:
- You have Ephesoft Transact with a version of 2019.1 and above.
- You are logged into Ephesoft Transact as a Super Administrator to complete cloud configuration.
- You are logged into Ephesoft Transact as a Batch Class Administrator to configure the Ephesoft Cloud HyperExtender Plugin.
- Your Ephesoft Transact and Ephesoft Cloud accounts creation are complete with proper licensing.
Technical Limitations
Below are key technical notes and feature limitations for the Ephesoft Cloud HyperExtender plugin:
- The plugin does not support eText extraction.
- If your Ephesoft Transact license is based on page count, ensure that it has enough page count to accommodate the block of Ephesoft Cloud HyperExtender plugin pages that you acquired. Although the Cloud HyperExtender plugin replaces the OCR processing in the standard Ephesoft Transact workflow, Ephesoft Transact still needs to perform classification and extraction when the files are returned from the Ephesoft Cloud HyperExtender plugin.
- The plugin is available only to customers in the United States. Contact your sales representative to inquire about future availability in other regions.
- PDF and TIFF files are the only document formats supported.
- Web services such as uploadBatch and advancedUploadBatch can be used to upload batches into batch classes that have been configured to use the plugin. However, web services that directly communicate with the OCR process (such as OcrClassify, OcrClassifyExtract, v2/ocrClassifyExtract, and v2/ocrClassifyExtractBase64, etc.) cannot interact with a batch class that has been configured to use the plugin. For additional information about Ephesoft Transact web services, refer to Web Service Definitions and Code Samples.
- The plugin only supports Oracle 11g (11.2.0) and 12c (12.1.0). Configurations must be made to the property file for Oracle to work as expected. Refer to Using Cloud HyperExtender Plugin with Oracle 11g and 12c to perform this workaround.
- Although the plugin configuration setting displays a list of languages under OCR Languages, the plugin only supports English documents for OCR processing.
- The plugin only supports file sizes up to 250MB.
- The plugin is compatible with Ephesoft Transact servers that are configured with HTTPS when manually configured for Ephesoft Transact. Refer to HTTPS Not Applied to Property Files.
- If you’re importing a Cloud HyperExtender batch class after you’ve imported it, you must then return to the Cloud HyperExtender plugin and resave your settings.
- The plugin only supports the following PDF types from an import workflow perspective:
- Searchable
- Tabbed
- PDF/A-1B
- PDF/A-2b
- PDF/E
- PDF/X-4
Registering for and Configuring Ephesoft Cloud
This section describes how to register for an account with Ephesoft Cloud, and how to configure Ephesoft Transact to use the Ephesoft Cloud.
An Ephesoft Cloud account is required to use the Ephesoft Cloud HyperExtender plugin. Only one Ephesoft Cloud account can be associated with an Ephesoft Transact environment, but that same Ephesoft Cloud account can be used for multiple batch classes.
As an Administrator, perform the following steps to configure Ephesoft Transact to use the Ephesoft Cloud HyperExtender plugin:
- In Ephesoft Transact, hover over the floating menu on the left side of the application. The Administrator menu displays.
![]()
Figure 1: Floating Menu
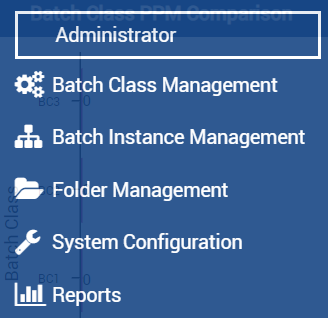
Figure 1: Administrator Menu in the Navigation Pane
- Select System Configuration > Ephesoft Cloud > Register.
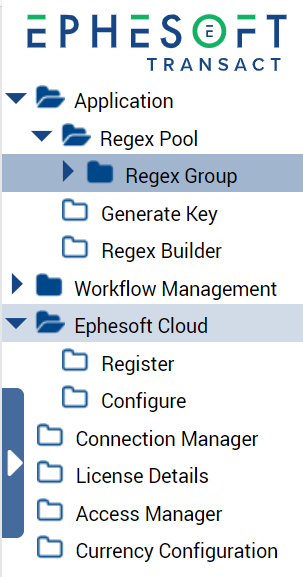
Figure 3: Ephesoft Cloud Components
The Registration screen displays.

Figure 4: Ephesoft Cloud Registration Screen
- Complete the following fields on the Registration screen:
-
- First Name — Enter your first name.
- Last Name — Enter your last name.
- Email Address — Enter your email address.
Note: An email address can only be registered once for an account. - Company Name — Enter the company name on record with Ephesoft.
- Click Register. An email containing a temporary password will be sent to you.
a. Note the temporary password in the email and click the Complete Registration link.
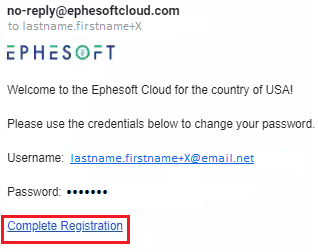
Figure 5: Temporary Password Email
b. Follow the instructions to set a new password using the temporary password from step 4.a.
Note: Your new password must be at least 10 characters long, include both uppercase and lowercase letters, include at least one digit, and one special character (i.e., ^ $ * . [ ] { } ( ) ? – ” ! @ # % & / \ , > < ‘ : ; | _ ~ `).
c. Verify that you received an email that contains all the information necessary to configure your connection to the Ephesoft Cloud:

Figure 6: Account ID, User Name and Application Key Dialog
Configuring the Ephesoft Cloud Connection
Once you have received your Ephesoft Cloud credentials, perform the following steps to configure Ephesoft Transact to communicate with Ephesoft Cloud.
- In Ephesoft Transact, hover over the floating menu on the left side of the application and select System Configuration > Ephesoft Cloud > Configure. The Cloud Connection Details screen displays.
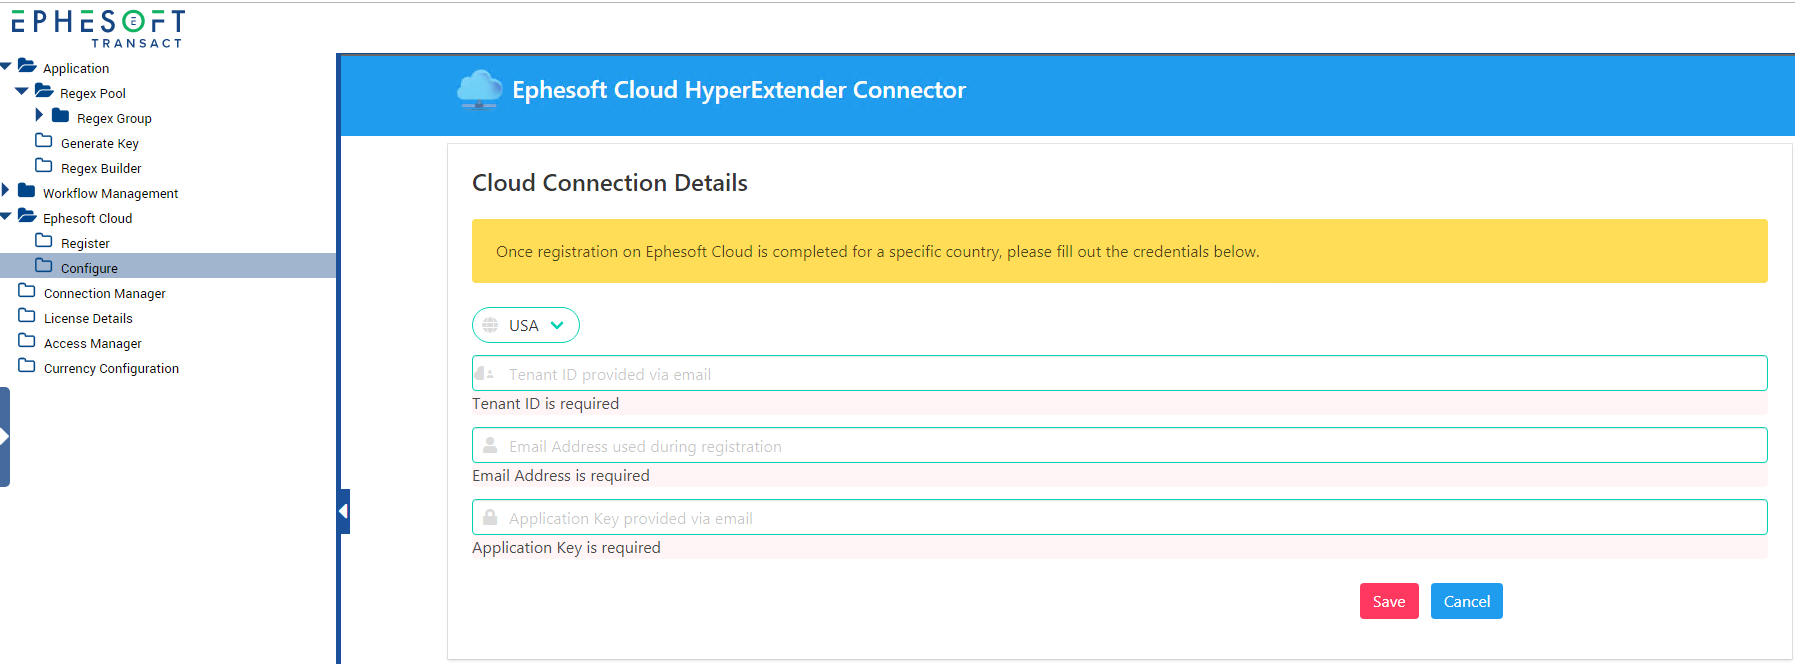
Figure 7: Ephesoft Cloud HyperExtender Connector Screen
a. Complete the fields in the Cloud Connection Details screen using the credentials (tenant ID, email address, and application key) that were sent to you via email in the previous step.
Important: The Tenant ID may be referred to as Account ID in the email that was sent.
b. Click Save.
c. Click Edit if additional changes are needed.
Configuring Ephesoft Transact to use the Ephesoft Cloud HyperExtender Plugin
Once you have used your Ephesoft Cloud credentials to configure your Ephesoft Transact instance to communicate with Ephesoft Cloud, you can configure Transact to use the Ephesoft Cloud HyperExtender plugin.
Important: All document types, index fields, and extraction rule configurations must be completed with the existing plugins before you configure the batch class to use the Ephesoft Cloud HyperExtender plugin.
If you want to configure additional document types, index fields, or extraction rules after the Ephesoft Cloud HyperExtender plugin has been configured for a batch class, you must turn off the Ephesoft Cloud HyperExtender plugin from your batch class and replace the original plugins before doing any additional document type, index field, or extraction rule configuration.
The Cloud HyperExtender plugin is placed in the Folder Import module and replaces the functionality from several existing plugins in the Folder Import and Page Processing modules. To configure a batch class to use the Cloud HyperExtender plugin, remove those existing plugins and replace them with the new Ephesoft Cloud HyperExtender plugin.
Perform the following steps to configure your batch class to work with the Ephesoft Cloud HyperExtender plugin:
- Log in to Ephesoft Transact and go to the Batch Class Management screen.
- Open the desired batch class for editing.
- Edit the Folder Import and Page Process modules as follows:
a. Remove the following two plugins from the Folder Import module:
-
-
- IMPORT_MULTIPAGE_FILES
- IMPORT_BATCH_FOLDER
-

Figure 8: Folder Import Module Plugins
b. Remove the following plugins from the Page Process module:
-
-
- CREATE_OCR_INPUT
- RECOSTAR_HOCR, NUANCE_HOCR or TESSERACT_HOCR (your OCR engine plugin will depend on your operating system and how your batch class is configured)
- CREATE_DISPLAY_IMAGE
- CREATE_THUMBNAILS
-

Figure 9: Page Process Module Plugins
c. Add the CLOUD_HYPEREXTENDER_PLUGIN to the Folder Import module.
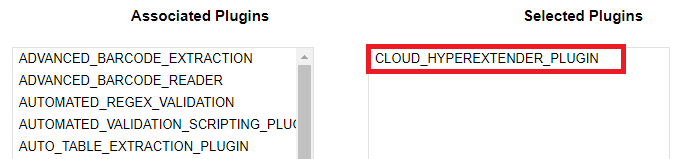
Figure 10: CLOUD_HYPEREXTENDER_PLUGIN
d. Click Deploy to apply and deploy your changes.
e. Expand the CLOUD_HYPEREXTENDER_PLUGIN component and click Configure. The Ephesoft Cloud HyperExtender configuration screen displays.
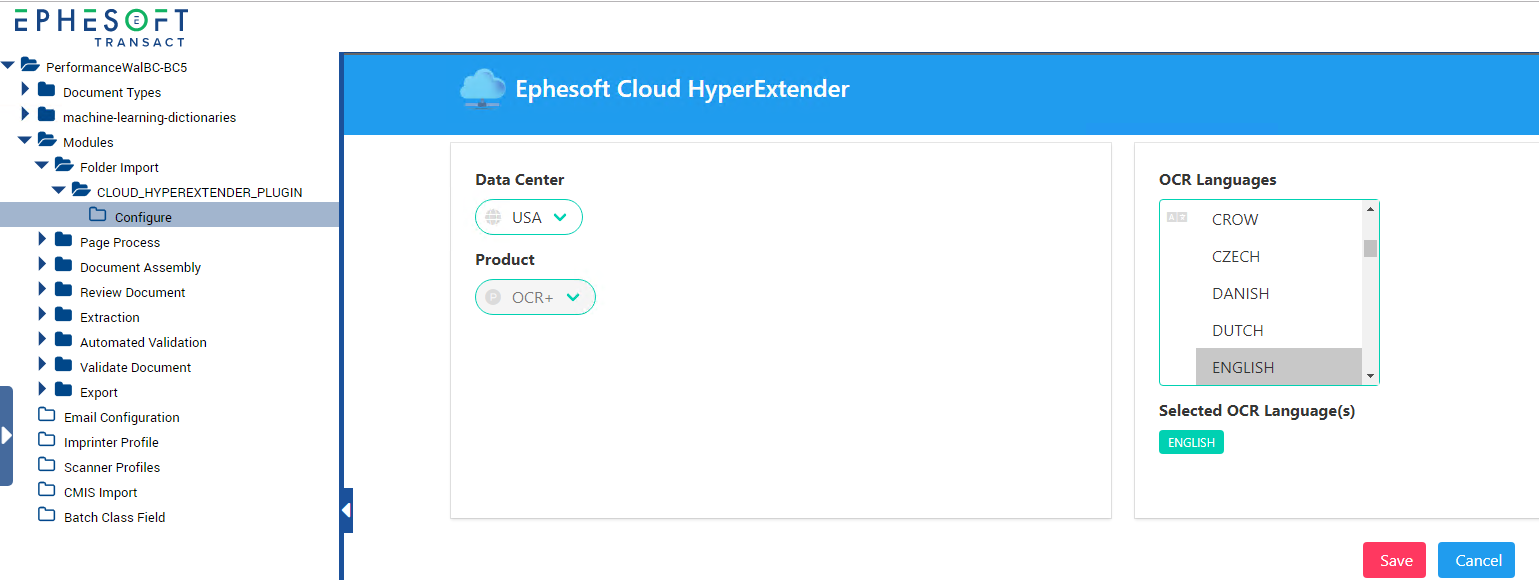
Figure 11: Ephesoft Cloud HyperExtender > Configure screen
USA is the only option available in the Data Center list, and OCR+ is the only option available in the Product list.
English is selected by default in the OCR Languages list and is the only language supported for OCR processing despite the other languages that are displayed in this list. Once English is selected, click Save.
Note: The plugin auto-rotates images upon importing to a batch class.
Your batch class is now ready to process documents using the Ephesoft Cloud HyperExtender plugin. Create a batch instance using this batch class and verify that the batch is processed successfully.
Additional Configuration
This section describes the how to configure additional features of Ephesoft Cloud HyperExtender.
Single Sign-on
To use Cloud HyperExtender in an environment that is configured to use single sign-on (SSO) follow these steps below:
- Stop the Ephesoft Transact service.
- Go to <Ephesoft installation folder>/Application|WEB-INF/Classes/META-INF and open the applicationContext-security.xml file for editing.
- Add the following rule to the XML file from step 2: <security:http pattern=”/ws/hybridplugin/status/notify” security=”none” />
- Restart the Ephesoft Transact service.
Bring Your Own Key
The Bring Your Own Key (BYOK) feature allows customers to decrypt their own encrypted files. This feature is especially beneficial for on-premises users. This provides increased security protection as it ensures that these encrypted files cannot be decrypted by anyone else but the customer. To enable this feature, contact the Ephesoft sales team at sales@ephesoft.com.
Important:
- Once the BYOK feature is enabled, the feature cannot be disabled. This means that the option to have Ephesoft provide a key is no longer an option.
- DO NOT lose the encryption key. If the encryption key is lost, you cannot decrypt your files. Ephesoft will NOT have the ability to decrypt files on your behalf.
- Use an AES-256 encryption key and ensure that is encoded as a BASE64 string.
The Ephesoft Cloud HyperExtender plugin in Ephesoft Transact also tracks the page count when you use an encryption key with the BYOK feature. Once this feature is enabled and users are registered for the Ephesoft Cloud, the page count tracking added with the BYOK feature will be added to the previously allotted 1,000 pages per month for 12 months. Ephesoft will continue to provide customers with an accurate monthly page count.
To Enable the Bring Your Own Key Feature
- Contact the Ephesoft sales team at sales@ephesoft.com to enable the feature.
- Generate an AES 256-bit security key.
- Go to the <Ephesoft installation folder>/JavaAppServer/webapps/ephesoft-cloud-client/WEB-INF/classes folder, and open the application.properties file to edit. If you have a clustered Ephesoft Transact environment with multiple processing servers, ensure that you edit this file on every processing server.
- Enter the security key from step 2 in this string of text after the equal (=) sign:
cloud.workflow.encryption-key=<your security key>
Note: If the encryption key is not entered, batches will not run. - Restart the Ephesoft Transact service.
Optimizing Property Files
The following two properties files in Ephesoft Transact contain settings that can be adjusted to achieve higher performance and increase throughput. If you have a clustered Ephesoft Transact environment with multiple processing servers, ensure that you edit the properties file on every processing server.
Important: If you make any changes to either of the following two properties files, you must restart the Ephesoft Transact service.
dcma-workflows.properties File
This file is in the following path:
<Installation Directory>/Application/WEB-INF/classes/META-INF/dcma-workflows/dcma-workflows.properties
This file contains properties that allow you to increase the number of parallel batch processing for optimizing cloud operations:
- #server.instance.max.process.capacity.mode: This governs the calculation of server.instance.max.process.capacity value.
- #0: This means the calculation will be dynamic and depends on system configurations and results of performance testing.
- #1: This means the calculation will be static and the value will be picked from the property server.instance.max.process.capacity.
- Changing the server.instance.max.process.capacity.mode from 0 (default) to 1 and setting the service.instance.max.process.capacity can increase the number of parallel batches processing that can occur. See the example below:
- server.instance.max.process.capacity.mode=0
- server.instance.max.process.capacity=5
application.properties File
This file is in the following path:
<Ephesoft installation folder>/JavaAppServer/webapps/ephesoft-cloud-client/WEB-INF/classes/application.properties
Note: Ephesoft Transact contains two files by the name of application.properties. This document only discusses the application.properties file for the Ephesoft Cloud HyperExtender plugin.
This properties file has the following configuration that can improve performance in cloud operations:
# Upload/Download Action
cloud.action.upload-download.thread-count=10
This value can be used to increase or decrease the number of files that can be downloaded or uploaded at a time, from the cloud onto a Transact instance. Contact Ephesoft Support at tickets@ephesoft.com if you have performance inquiries.
Ephesoft Cloud Portal
You can log in to the Ephesoft Cloud portal (https://transact.us.ephesoftcloud.com) to view how many images you have processed with the Ephesoft Cloud HyperExtender plugin.
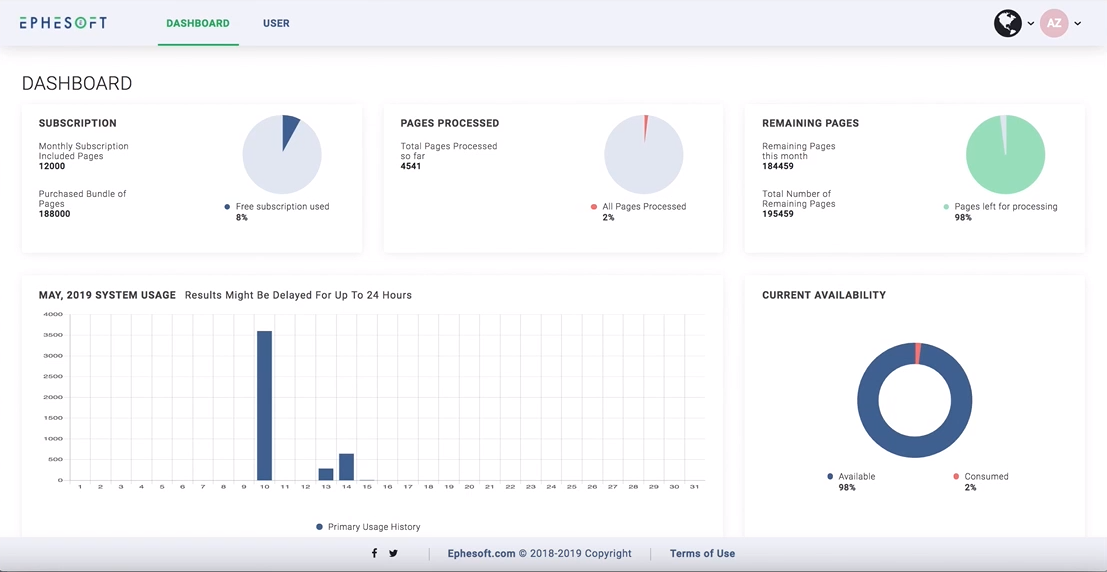
Figure 12: Ephesoft Cloud Portal
Conclusion
See the links below for additional information and support for the Ephesoft Cloud HyperExtender plugin:
Troubleshooting
Log File
The log file for the Ephesoft Cloud HyperExtender plugin is available in the following location:
<Ephesoft Installation Folder>JavaAppServer/webapps/ephesoft-cloud-client/WEB-INF/classes/log/cloud-client.log
Incomplete Registration
If you attempt to configure the Ephesoft Cloud HyperExtender plugin with invalid connection details, the error message, “Ephesoft Cloud registration is incomplete. Please ask your system administrator to register first.” displays.
If this error occurs, contact your Ephesoft Transact system administrator.
Test Classification and Extraction
When the Ephesoft Cloud HyperExtender plugin is configured and enabled within a batch class, the Test Classification and Test Extraction actions will not work in that batch class. As a result, the error message, “Error occurred while breaking multipage tiff or pdf.” displays.
This error is expected, as these actions are not supported in batch classes that are configured to use the Ephesoft Cloud HyperExtender plugin.
Saving the Ephesoft Cloud HyperExtender Configuration
If a cloud-enabled batch fails, ensure that you have saved the Ephesoft Cloud HyperExtender configuration in the respective batch class.
- Open the batch class.
- Expand Modules > Folder Import > CLOUD_HYPEREXTENDER_PLUGIN, and select Configure. The Ephesoft Cloud HyperExtender configuration screen displays.

Figure 13. Ephesoft Cloud HyperExtender > Configure screen
3. Ensure that the plugin is configured and enabled. Click Save.
HTTPS Not Applied to Property Files
If your Cloud HyperExtender batches fail with error message, “I/O error on POST request for “http://…” (via the Batch Execution details pane in the Batch Instance screen), and Ephesoft Transact is installed as HTTPS, perform the workaround below to correct the error and change the property files. The same error can be seen in greater detail in the dcma-all.log (located in the following path:<Transact-Installation-Folder>/Application/logs/).
- Open the application.properties file in the following path:
<Transact Installation Folder>/JavaAppServer/webapps/ephesoft-cloud-client/WEB-INF/classes
- Locate the following property: cloud.notification.transact-hybrid url.
- Change the property from http://localhost:8080/dcma/ws/hybridplugin/status/notify to https://localhost:<port number>/dcma/ws/hybridplugin/status/notify.
- Open the cloud-plugin.properties file in the following path:
<Transact Installation Folder>/Application/WEB-INF/classes/META-INF/cloud-plugin/
- Locate the following property: cloud.client.url
- Change the property from http://localhost:8080/ephesoft-cloud-client to https://localhost:<port number>/ephesoft-cloud-client.
- Restart the Ephesoft Transact service.
- If you have a multi-server environment, repeat steps 1 – 7 for all Ephesoft Transact nodes in your cluster.
Using Cloud HyperExtender Plugin with Oracle 11g and 12c
To use Cloud HyperExtender Plugin with Oracle 11g and 12c, follow the steps below to configure the applications.properties file so that the plugin works as expected.
- Open the application.properties file in the following path:
<Ephesoft_Installation_Directory>/JavaAppServer/webapps/ephesoft-cloud-client/WEB-INF/classes/application.properties
- Under the ## Data Source configurations section, make the following changes for the options below:
-
- spring.jpa.properties.javax.persistence.schema-generation.create-source=metadata
- spring.jpa.properties.javax.persistence.schema-generation.scripts.action=create
- spring.jpa.properties.javax.persistence.schema-generation.scripts.create-target=${EPHESOFT_HOME}/JavaAppServer/webapps/ephesoft-cloud-client/WEB-INF/classes/schema.sql
- spring.datasource.initialization-mode=always
- spring.datasource.continue-on-error=true
- Restart the Ephesoft Transact service.
- If you have a multi-server environment, repeat steps 1 – 3 for all Ephesoft Transact nodes in your cluster.