This tutorial is intended to familiarize new users with the primary operations in the Ephesoft Transact workflow. In this article you will learn how to create batch classes, document types, index fields and key-value extraction rules, all of which are used to classify documents and extract data. We will cover how to export the desired data from the documents you have uploaded.
Prerequisites
To complete this tutorial, download the Tutorial Helper. This includes the following files:
- Tutorial images
- Three files for batch instance processing:
- W-2.pdf
- Insurance Form.tif
- Bank Statement.pdf
Essential Operations in Ephesoft Transact
The following sections outline the basic processes to set up a workflow in Ephesoft Transact.
Creating a Batch Class
In Ephesoft Transact, a Batch Class is a collection of document types, index fields, extraction rules and workflow processes that are used to capture data from uploaded documents. To create a batch class, follow the below instructions.
- Enter the following URL to navigate to the Ephesoft Transact home screen:
http://<Server-Name>:8080/dcma - Click Administrator > Batch Class Management.
- Log in with your user credentials.
- Click Add.
- The following fields display on the Add Batch Class screen:
| Field | Description |
| Name | Title your batch class. If multiple words are needed, ensure no spaces are used. Each batch class name must be unique. |
| Description | Create a description for the batch class. Spaces are allowed. |
| Priority | Set the priority level for this batch class. When there are multiple batch classes, priority level will determine the order in which each batch class is processed. |
| Drop Folder | Desired folder path (local or network) for all files associated with this batch class. |
For this tutorial, fill in the fields as shown below.
| Field | Value |
| Name | FinancialDocumentTutorial |
| Description | Financial Document Tutorial |
| Priority | 1 |
| Drop Folder | C:\Ephesoft\SharedFolders\WATCH\Financial Document Tutorial |
- Click OK to create the batch class.
This completes the steps required to create a batch class.
Creating and Training Document Types
Once a batch class is created, the next step in the Ephesoft Transact workflow is creating the document types. Each document type uses an algorithm to classify and organize files into pre-configured categories, based on commonalities between those documents.
Creating a Document Type
To create a document type, follow the instructions below.
- Navigate to the Batch Class Management screen.
- Double-click the FinancialDocumentTutorial batch class to open it. Alternatively, highlight the batch class name and click Open.
- Click the Document Types folder.
- Click Doc Type > Create New, located in the top toolbar. A new document type row will be added. Enter a name and description. For this example, use the following:
Name: W-2
Description: W-2
Note: As a best practice, document type names should not include any spaces.
- Click Apply to save the document type.
- Repeat steps 2-4 to create two more document types for Insurance Forms and Bank Statements.
Training the Document Type
Once the Document Type is created, it can be trained to recognize similar documents with a representative set of files.
- Select the W-2 document type created in section 2.1.
- Drag the W-2 sample file into the Upload Learn File(s) section. This action will prompt the document type to distinguish W-2 files from other documents.
- Repeat steps 1-2 for the Insurance Form.pdf and Bank Statement.pdf files for their respective document types.
Test Classification
The Test Classification feature ensures each document type is properly trained to classify and separate multiple pages or multiple documents within a single uploaded file. To test Document Types, follow the steps below.
- Drag all three sets of files into the Upload Test Classification File(s) section.
- Click Test Classification. A screen that provides the classification results displays.
- Click the Classify button.
- Review the results to verify that each document type has been separated correctly. Click Close to exit the classification testing interface.
This completes document type setup and configuration. Continue to Creating Index Fields to create Index Fields for document data capture.
Creating Index Fields
Once the document types have been successfully trained, the next step is to create index fields to extract data from uploaded documents. For simplicity, the following instructions will focus on the W-2 document type.
- Navigate to Batch Class Management. Select the FinancialDocumentTutorial batch class.
- Expand the Document Types tree to display all three categories. Expand the W-2 document type and select Index Fields.
- Click Add to insert a new index field row, and complete the fields below:
Name: EmployeeNames
Description: Employee Names
- Under the Additional Configurations column, expand the drop-down menu for your selected index field and check Force Validation to ensure the data is reviewed in the validation screen.
Note: Selecting Force Validation is recommended here for demo purposes. In production, this is typically left unchecked unless there is a field that an operator must review on every document.
- Click Apply to save the index field row.
- Click Add to insert a second row, and complete the fields below:
Name: SSN
Description: Social Security Number
- Click Apply to save the index field row.
- Repeat steps 2-7 to create the same index fields for the Insurance Form and Bank Statement.
The index field is now ready for key-value extraction rules.
Key-Value Extraction Rules
Once index fields are generated, the next step is to create an extraction rule to populate those fields defined within Ephesoft Transact with the data extracted from each page within a document. The key-value (KV) extraction rule is the most common way to build out extraction logic, but there are other extraction rule types that can be created.
Creating and Defining a KV Extraction Rule
Follow the steps below to create a KV Extraction Rule and define the data to be extracted.
- Navigate to Batch Class Management. Select the FinancialDocumentTutorial batch class.
- On the left drop-down menu, expand Document Types to display all three document type categories. Expand the W-2 document type.
- Expand Index Fields and select SSN > KV Extraction Rule.

Figure 1. KV Extraction Rule
- On the top menu bar, click Add to create a new key-value extraction rule.
- Locate the W-2.pdf file included in the TutorialImages.zip file. Under Advance KV Test at the bottom of the page, drag and drop the PDF file or click Select Files to upload the W-2.pdf document.
- Move and resize the Key (“Employee’s social security number,” highlighted in green) and Value (corresponding numeric value to be recognized by the regex, highlighted in red) zones as shown below to build a relationship between the key and the value.
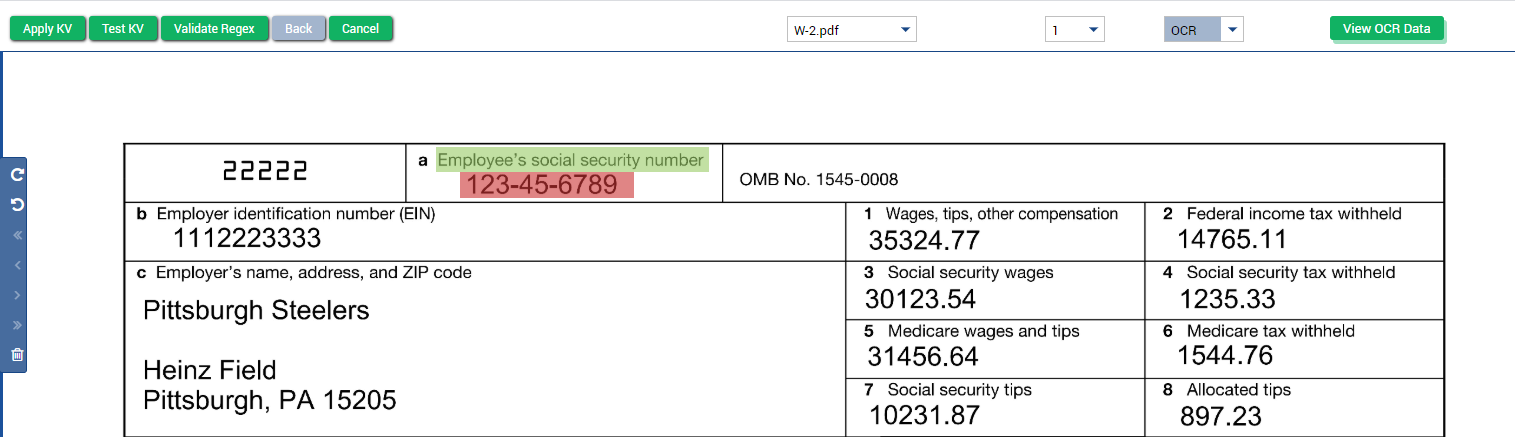
Figure 2. Build Relationship Between Key and Value
Note: Steps 7-11 define the KV extraction rule using automatic data recognition in Ephesoft Transact. This is the simplest method. To manually define a KV extraction rule, select Regex Builder and complete the fields in the screen shown below.
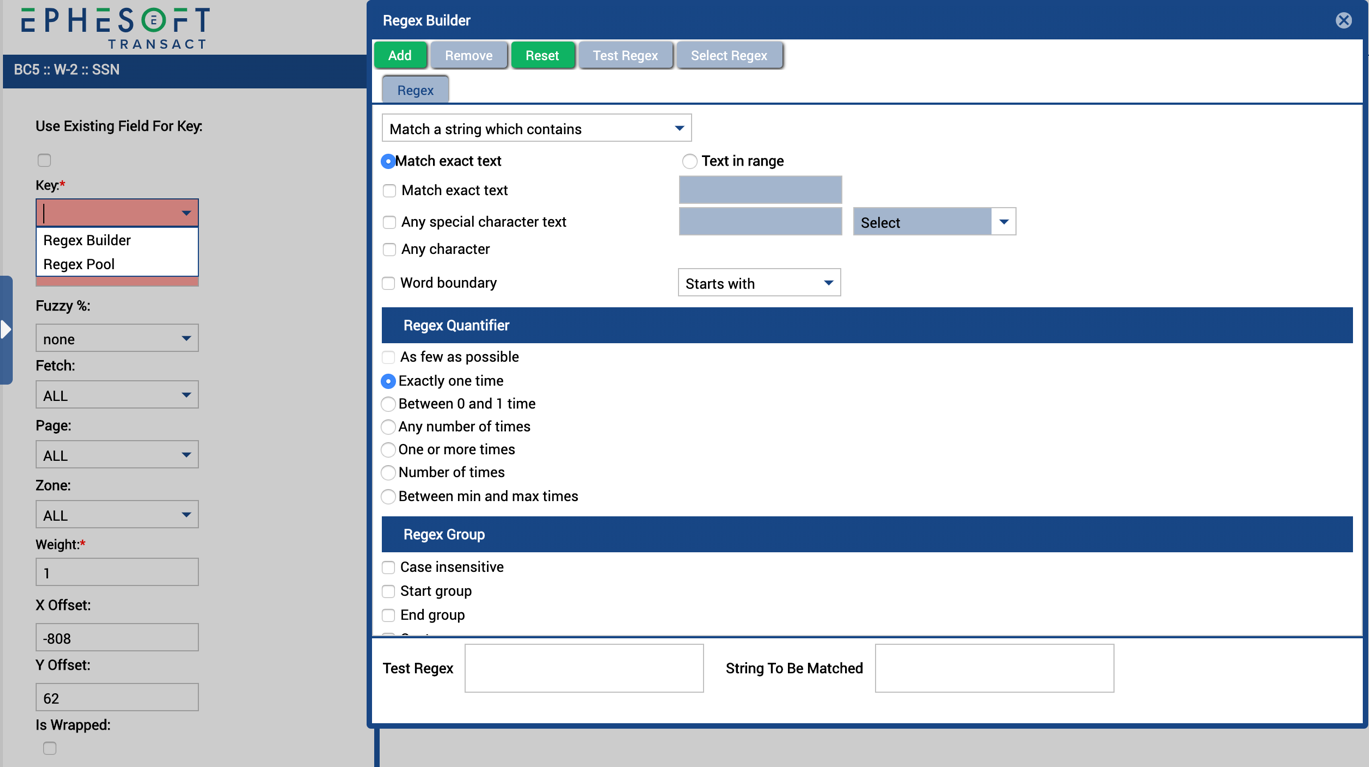
Figure 3. Define KV Extraction Rule
- Click in the Key zone. A menu will appear to define regular expressions (regex). In this case, Ephesoft Transact automatically reads the data in the Key zone.
- Select OK.
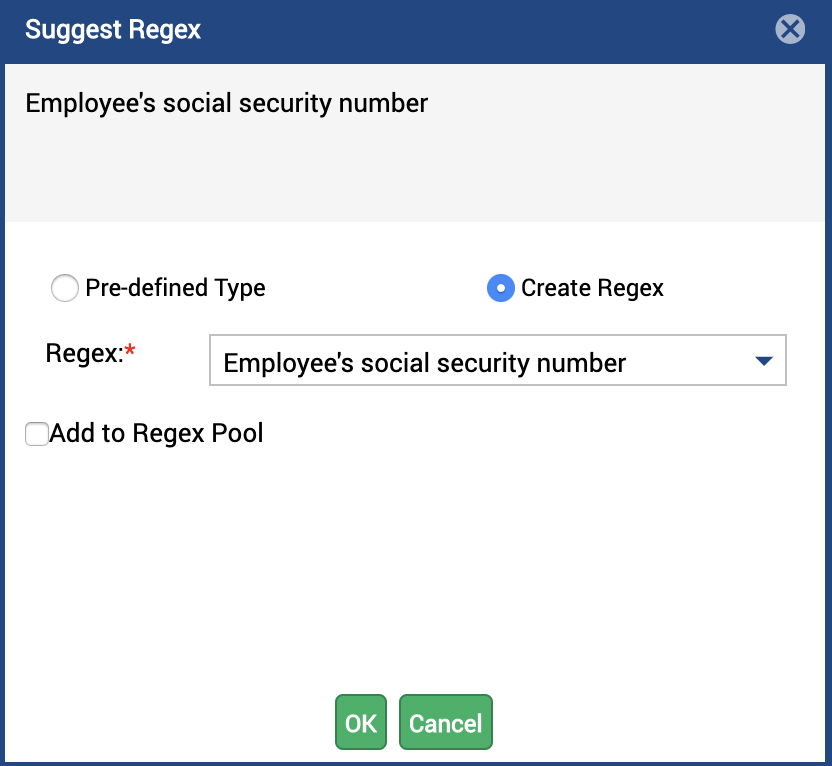
Figure 4. Key Suggest Regex Dialog Box
- Click in the Value zone. The Value field requires a visual pattern to identify for the key. In this case, Ephesoft Transact has automatically recognized that the pattern for this field follows a social security number: XXX-XX-XXXX.
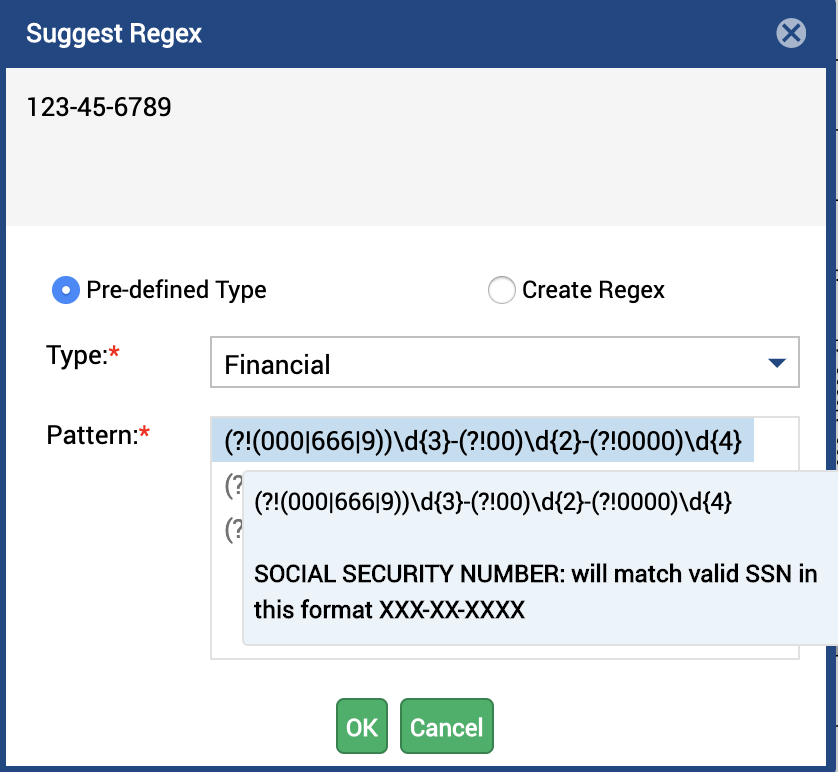
Figure 5. Value Suggest Regex Dialog Box
- Select OK.
- Select Test KV to test the extraction rule and ensure data is extracting correctly. A new panel displays below the document with the extracted values.
- Click Apply KV to save the extraction rule.
- Click Apply to commit the extraction rule to the SSN index field.
The index field now has a KV extraction rule to reference when processing a batch class. The next step is setting up the export module.
Export Setup
Ephesoft Transact processes batches of documents simultaneously in the form of batch instances. Users can configure batch classes to export the documents and extracted data to a specified destination.
Complete the following instructions to set up the Export module.
- Navigate to Batch Class Management. Select the FinancialDocumentTutorial batch class as created in step 1.
- On the left drop-down menu, expand Modules.
- Expand the Export folder and select the COPY_BATCH_XML plugin. This plugin is responsible for exporting structured XML files and PDF images to a specified network or local path folder.
- In the Export Document File Name field, enter the following to add the document type to the PDF file export: $DOCUMENT_TYPE & _ & $BATCH_IDENTIFIER & _ & $DOCUMENT_ID
- Select Apply > Deploy.
- Select Close to exit the Plugin Configuration screen.
This completes setup of the Export module. The FinancialDocumentTutorial batch class is now configured and ready to process documents.
Running and Validating a Batch Instance
There are numerous methods to run documents through batch class configurations for data capture. The following describes one of the simplest methods, which uses the Upload Batch screen.
Running a Batch
- Hover over the left-hand navigation panel. Select Upload Batch in the Operator menu.
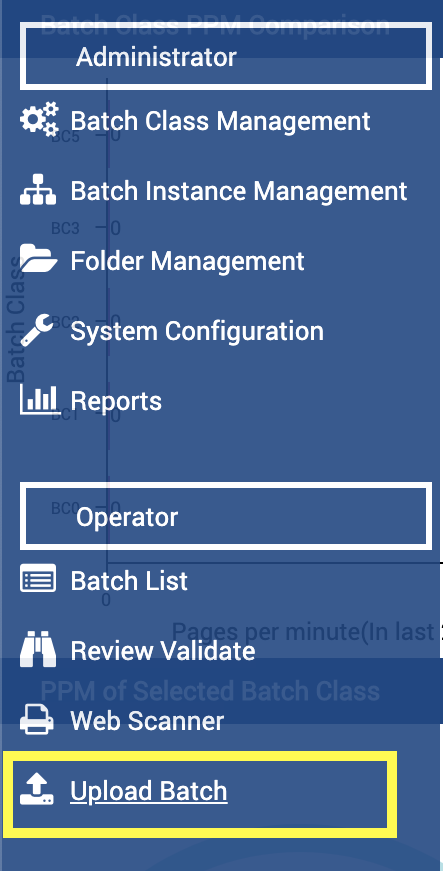
Figure 6. Navigate to Upload Batch
- From the Batch Class drop-down menu at the top of the screen, select the Financial Document batch class for processing.
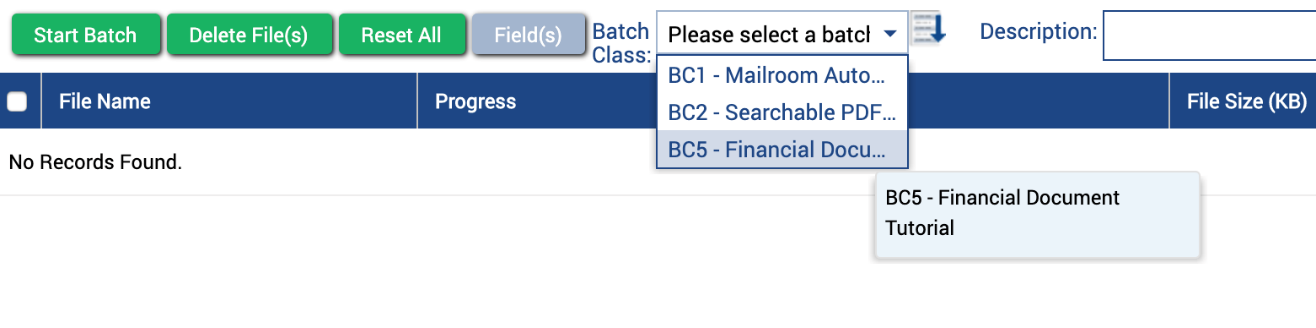
Figure 7. Select Financial Document Batch Class
- Click Select Files or drag and drop the following files into the Upload Files section:
-
- Bank Statement.pdf
- Insurance Form.tif
- W-2.pdf
- Click Start Batch.
Validating a Batch
- Navigate to the Batch Instance Management screen and locate the FinancialDocumentTutorial batch class. As the batch instance is processing through the various stages of the workflow, the status will display as Ready for Review.
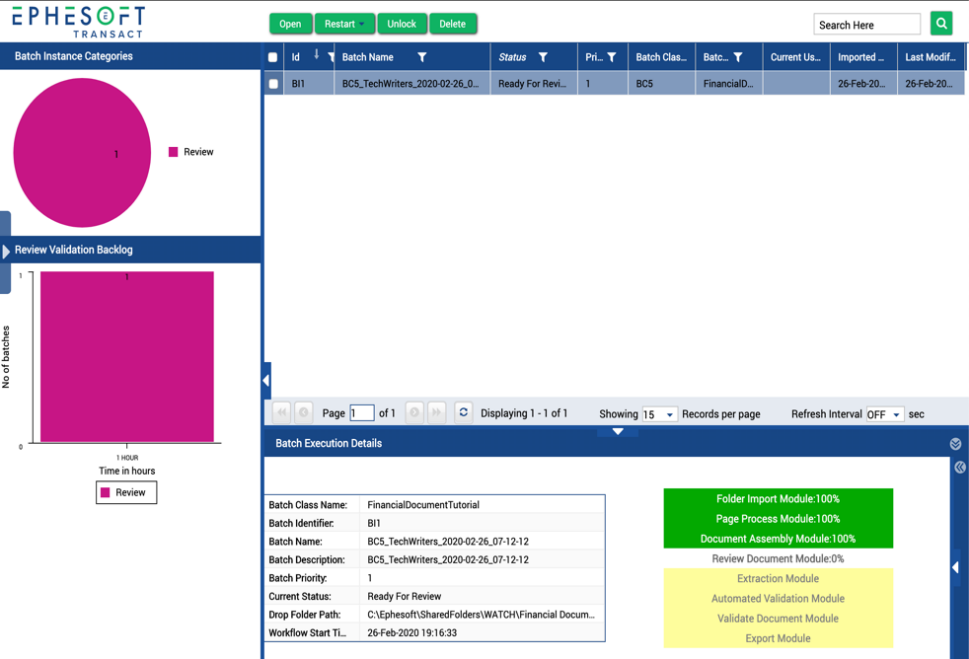
Figure 8. Batch Instance Management Screen
- Select the FinancialDocumentTutorial batch.
- Click Open > OK to view the results in the Review/Validation screen.
Note: Operators use the Validation screen as needed to verify that extracted content is accurate. If an extracted field does not meet the preset minimum confidence level, that field is highlighted red to indicate that those fields require operator review.
- Fill in any fields that return blank. In the example below, Employee Names returned blank and has been manually entered.
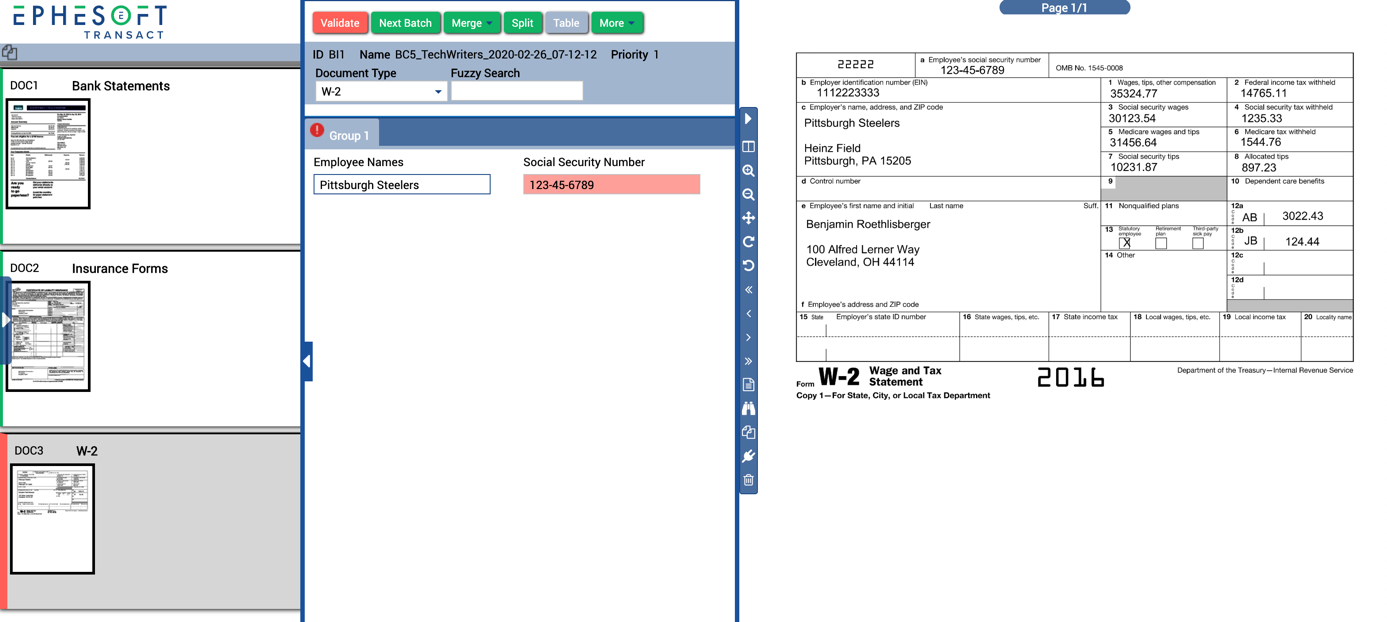
Figure 9. Validation Screen
- Double-click Validate in the top menu. The Validation Done dialog box displays.
- Click OK.
- Once validated, Ephesoft Transact will export the three files in PDF format to the system in the final drop folder that was specified for the FinancialDocumentTutorial batch class. The batch.xml file containing the extracted data will also reside in that folder.
This completes the Ephesoft Transact tutorial. You are now ready to create your own batch classes, define document types and index fields, set up export options and run batches of documents for data capture.