Available: on-premises, cloud
Applies to: Ephesoft Transact 2020.1.02 and above Microsoft and Linux installations
Introduction
This article includes steps on how to configure the S3 Import plugin.
An Amazon Web Services (AWS) S3 bucket operates as an additional ingestion point into Ephesoft Transact. Using the S3 Import plugin, your batch class can be configured to import files from an S3 bucket. Once the plugin is configured, the S3 bucket is monitored every minute for new files. When new files are detected, it uploads the files into your specific batch class. The file is removed from the S3 bucket after processing. The batch class and S3 bucket connection create an efficient processing workflow of large file volumes in Ephesoft Transact.
Note: The plugin applies to batch class level configurations in Ephesoft Transact and should be configured for a one-to-one batch class to S3 configuration. If configuring multiple batch classes for use with the S3 Import plugin, your S3 bucket or S3 bucket and prefix must be unique for each batch class.
Prerequisites
Download the S3 Import plugin from the Customer Support portal Downloads page. Refer to the Release Notes for details about the available plugin versions.
AWS Account Requirements
To use the S3 Import plugin, you will need to provide your AWS Key ID and AWS Key Secret in Configuring the Plugin. We recommend setting the AWS Identity and Access Management (IAM) policy with restricted S3 access to list buckets, read a specific file, and delete an S3 file.
Refer to the following sample IAM policy:
{
	“Version”: “2012-10-17",
	“Statement”: [
		{
			“Sid”: “VisualEditor0”,
			“Effect”: “Allow”,
			“Action”: [
				“s3:GetObject”,
				“s3:ListBucket”,
				“s3:DeleteObject”,
				“s3:HeadBucket”
			],
			“Resource”: “*”
		}
	]
}
For more information about S3 buckets, refer to Working with Amazon S3 Buckets. For more information on working with IAM policies, refer to Identities (Users, Groups and Roles).
Import the S3 Import Plugin
Note: This section only applies to Ephesoft Transact on-premises. For cloud environments, contact tickets@ephesoft.com for help importing the plugin.
Before configuring the S3 Import plugin, you will need to complete the following custom plugin process:
- Navigate to Ephesoft Transact. Go to the System Configuration screen.
- Select Workflow Management.
- Drag and drop the s3-import-plugin.zip file into the Import Plugin section.
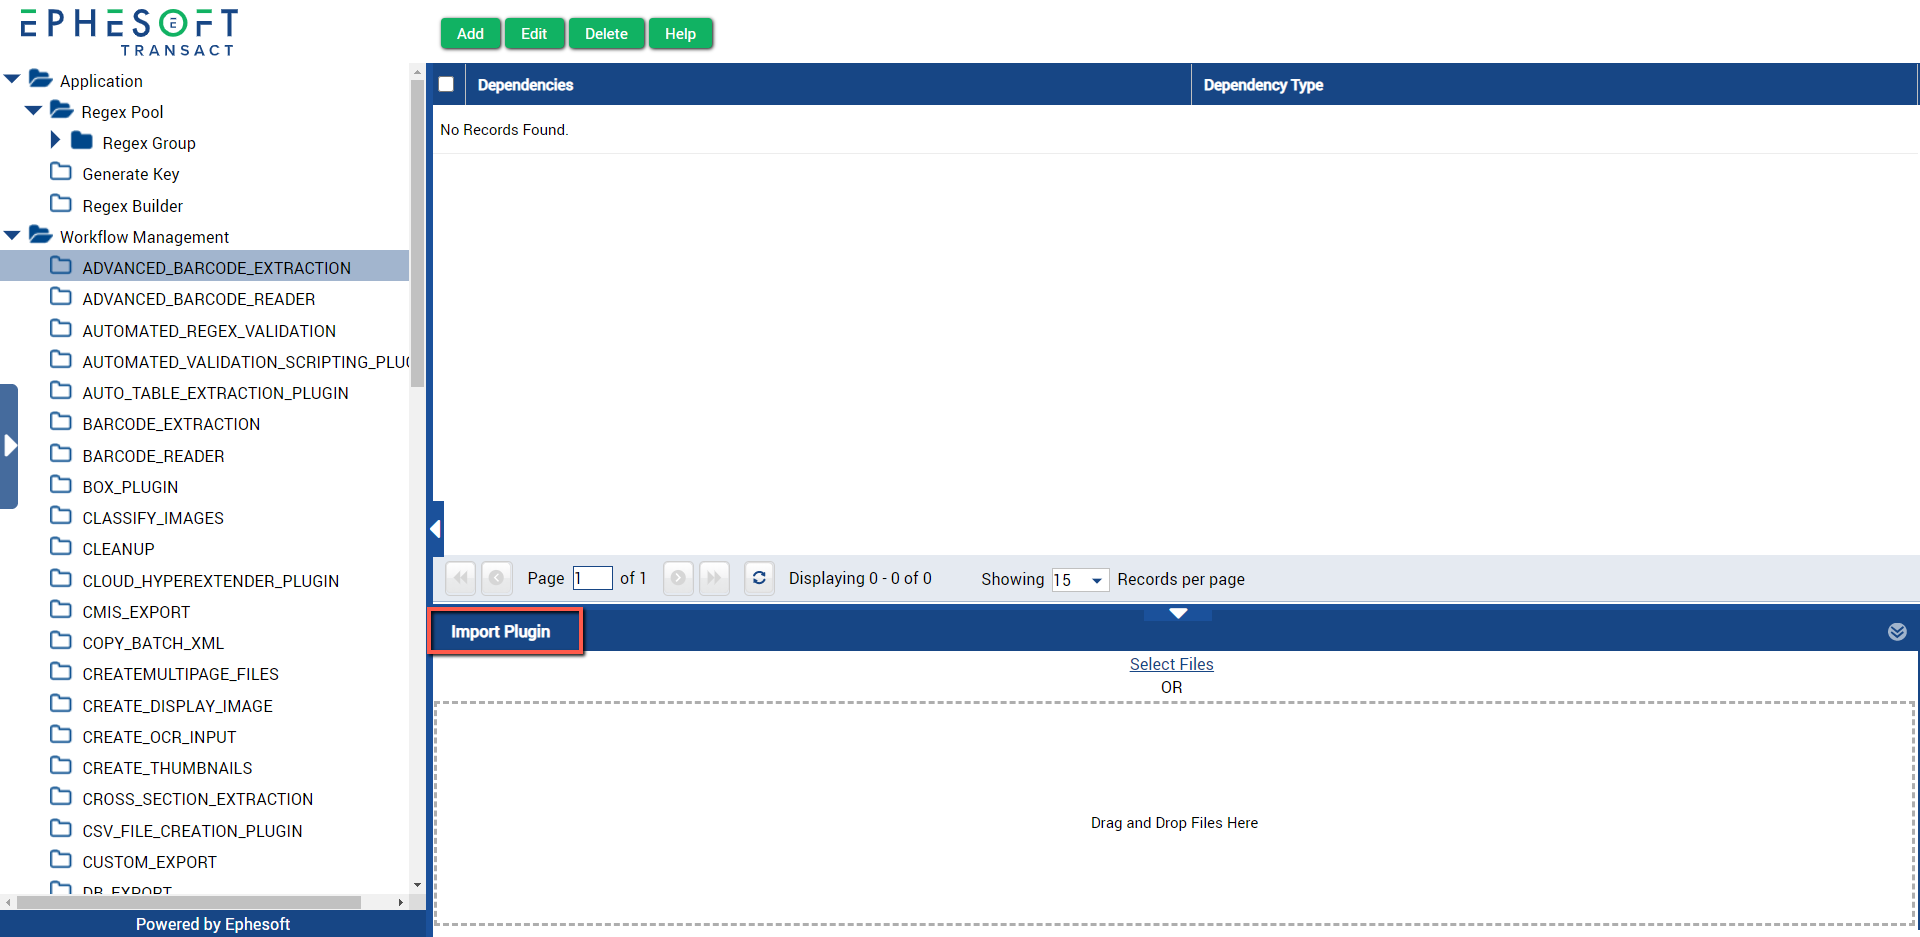
Figure 1. Add Custom Plugin
- Restart Ephesoft Transact to reload into your new .jar file.
The custom plugin is now available for use.
Adding the S3 Import Plugin
Follow the steps below to add the S3 Import plugin to your Ephesoft Transact instance:
- Go to the Batch Class Management screen.
- Double-click and open the batch class.
- Go to Modules > Folder Import.
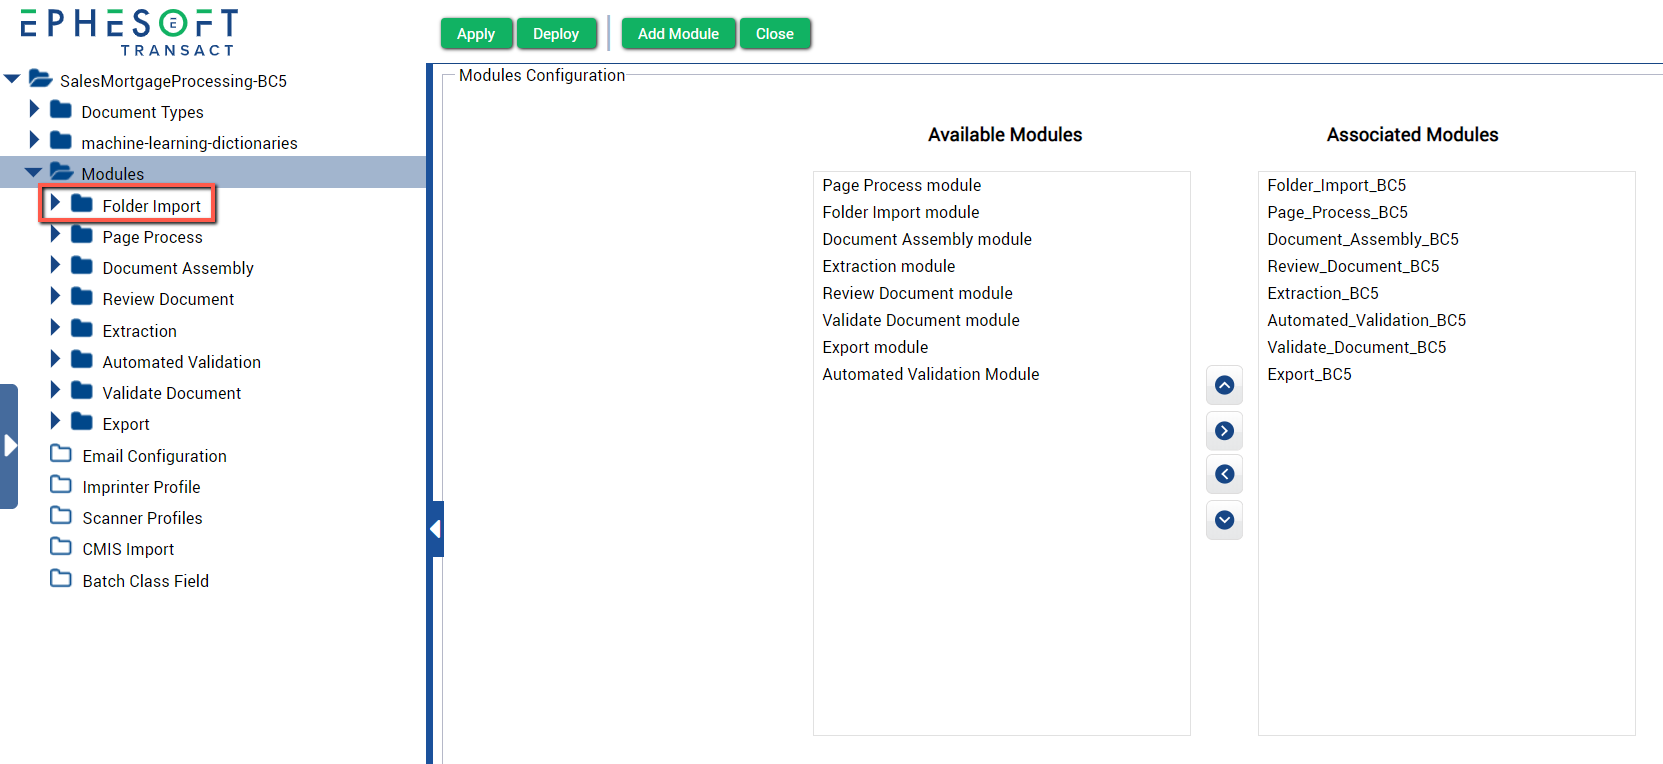
Figure 2. Select Folder Import
- In the Associated Plugins column, select the S3_IMPORT_PLUGIN.
- Click the right arrow icon to add the plugin to the Selected Plugins column. The order of plugins does not matter.

Figure 3. Add S3_IMPORT_PLUGIN
- Click Deploy.
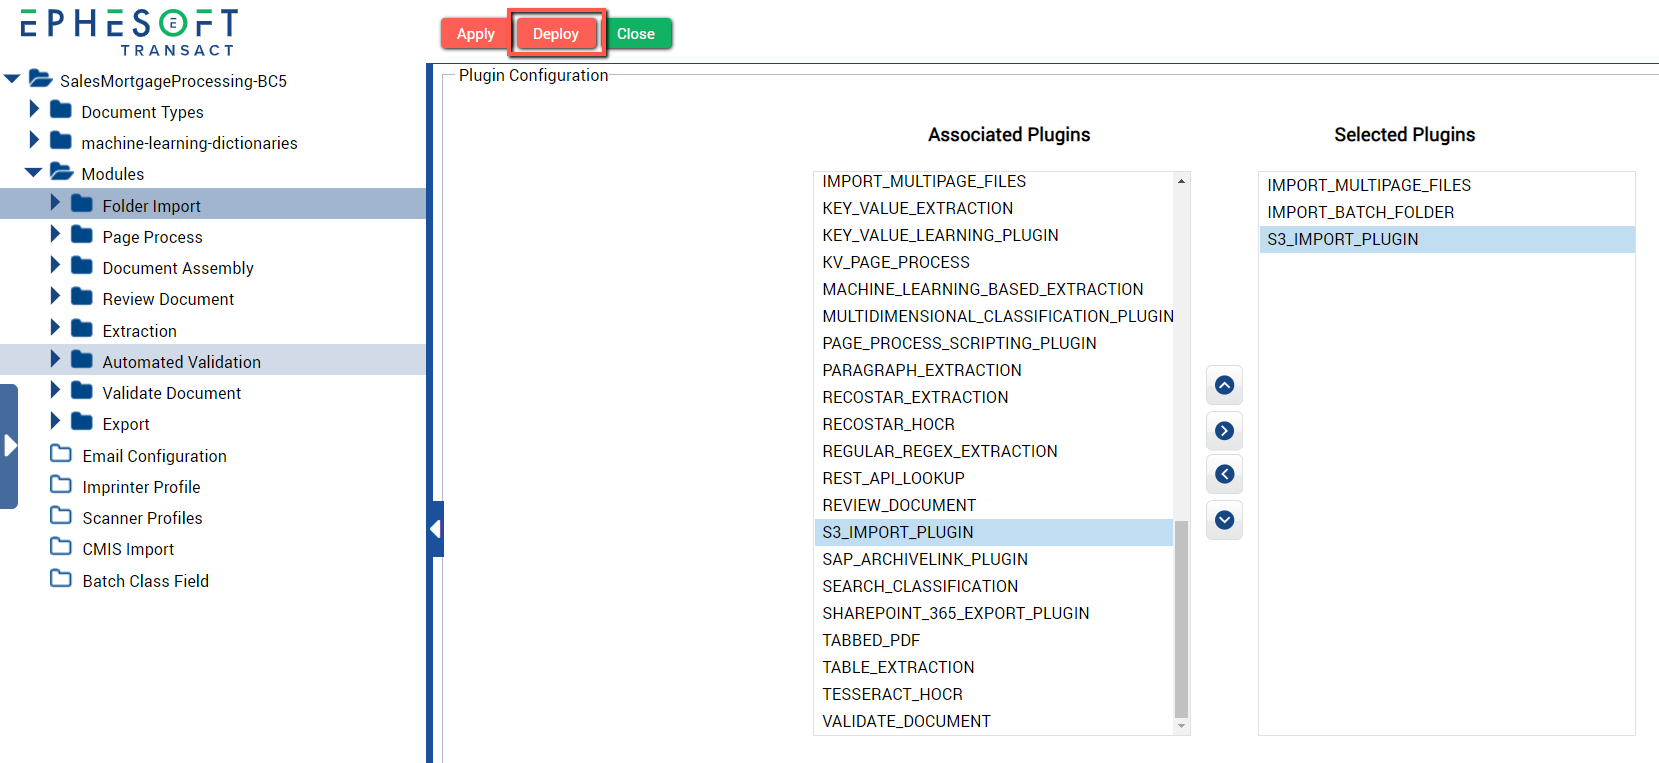
Figure 4. Deploy Plugin to Workflow
You have successfully added the S3 Import plugin.
Configuring the S3 Import Plugin
After adding this plugin, follow the steps below to configure the S3 Import plugin in your batch class.
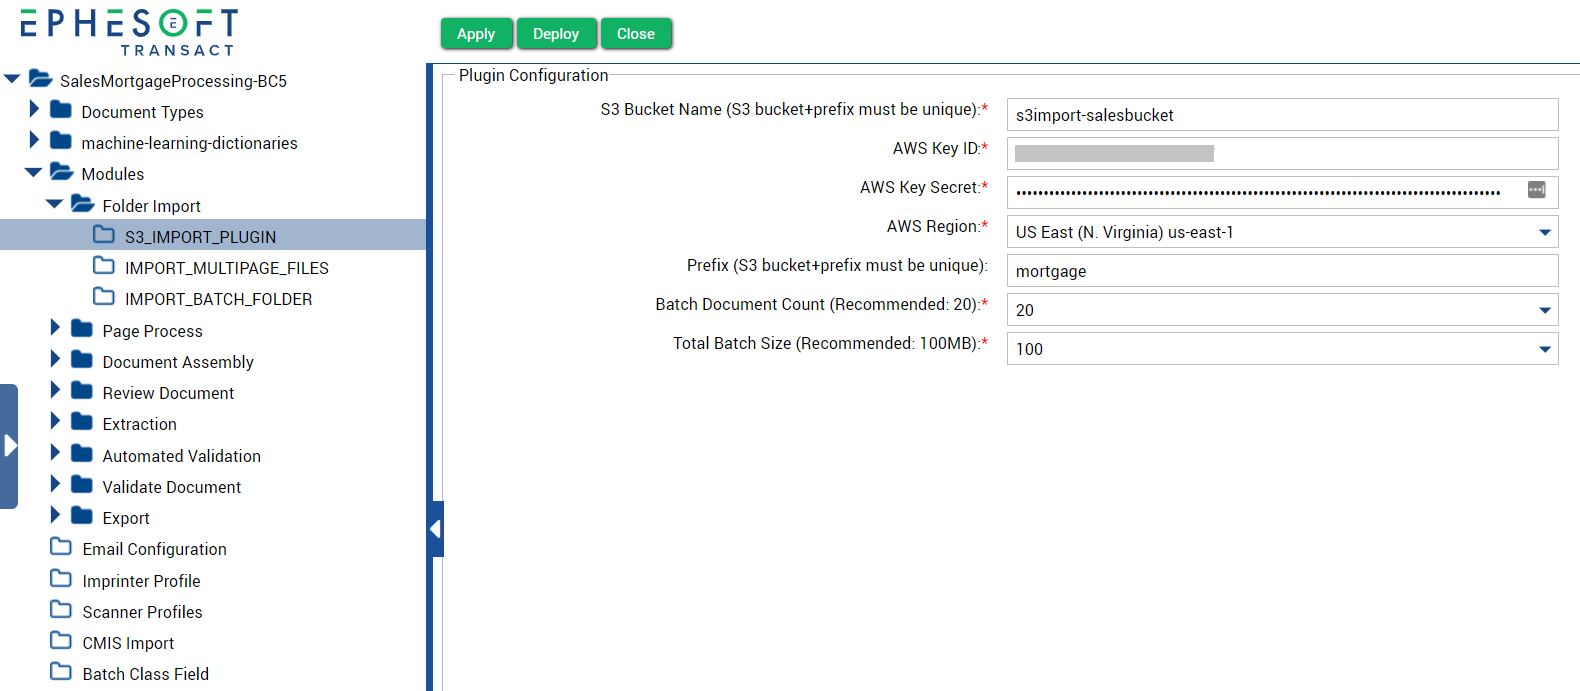
Figure 5. Plugin Configuration Sample
- Go to Modules > Folder Import.
- Select the S3_IMPORT_PLUGIN folder.
- Enter the name of the S3 bucket in S3 Bucket Name. This is a globally unique identifier.
- For AWS Key ID and AWS Key Secret, enter your AWS credentials.
- Select your AWS Region.
- Optional: If using an S3 bucket prefix, enter the prefix in the Prefix field. The S3 bucket name and prefix must be unique per batch class.
- For Batch Document Count, enter the number of documents to be processed in a batch. The recommended amount is 20 documents per batch.
Note: If the average size of the files is less than 440 KB, then it is recommended to increase the batch document count for better performance.
- For Total Batch Size, enter the file size for the batch class. The recommended size is 100 MB.
- Click Apply to update the batch class.
- Click Deploy to deploy the workflow.
You have successfully configured and deployed the S3 Import plugin for your batch class. Your files are now automatically uploaded into your batch class from AWS S3 bucket.
S3 Import Plugin Limitations
Below are functional limitations for the S3 Import plugin:
- Supports bucket encryption SSE-S3 and unencrypted buckets. SSE-KMS and other types of encryption are not supported, therefore are not ingested into Transact.
- Supports ingestion of S3 objects under the root bucket or one level prefix objects. Nested prefix objects are not ingested into Transact.
- When importing or exporting a batch class, the S3 Import plugin configuration will be included. You will need to re-visit the S3 Import plugin configuration to ensure correct setup of the plugin for the batch class.
Refer to Supported File Types for Import Methods for a list of supported file types.
Troubleshooting
For cloud support, refer to the following table. Contact Support for further troubleshooting assistance.
| Issue | Possible Root Cause and Workaround |
| There are missing files from Ephesoft Transact. | This may be due to an overlapping ingestion due to more than one batch class ingesting from the same S3 bucket. Verify and ensure that your S3 bucket and optional prefix are unique to the batch class. Otherwise, ingestion may be occurring in another batch and resulting in files missing from your batch instance. |
| The files are left in the S3 bucket. No ingesting is occurring. No new batch instances are displayed in Transact. | Ensure the following requirements are met:
|
| Batch instances are created, but there are some files that remain in the S3 bucket. | Allow time for files to process as they may be split into multiple batch instances.
If the same files are included in each batch, check the IAM policy rights to ensure that there are permissions to delete items from the S3 bucket. |
For on-premises support, refer to the following list of error messages that may be logged in the dcma-all.log in Ephesoft Transact for S3 bucket and prefix-related issues.
| Error Message | Possible Root Cause and Workaround |
| <Bucketname>:S3 Bucket does not exist for S3 Import Plugin associated with Batch Class :<batch class name>. | This error message displays when the entered bucket name for the batch class does not exist.
Configure a bucket name that exists for the batch class. |
| Wrong bucket name <batch class name> OR prefix <prefix name> for S3 Bucket <bucket name> associated with Batch Class : <batchClassName> | This error message displays when the S3 bucket name or prefix is not valid.
Ensure that the S3 bucket name or prefix is valid and matches your batch class. |
| AWS Access Key ID is invalid for S3 Import Plugin associated with Batch Class:<batch class name>. | This is related to an S3 access issue.
The AWS Access Key ID for the batch class is invalid for the S3 Import plugin associated with the batch class. Enter a valid AWS Access Key ID. |
| AWS Access Key Secret is invalid for S3 Import Plugin associated with Batch Class: <batch class name>. | The AWS Key Secret is invalid with the associated batch class.
Enter a valid AWS Key Secret. |
| Duplicate batch classes:<batch class name> with the same bucket and prefix are configured. | When more than one batch class has the same bucket name and prefix, then this error displays.
Enter a valid S3 bucket name and prefix that is unique to your Ephesoft Transact instance in the other batch classes. |
Release Notes
| Release Versions | Release Date | Release Notes |
| Version 1.0.1 | 7/18/2022 | Fixed log4j security vulnerability. |
| Version 1.0.0 | 7/22/2020 | Certified with Transact 2020.1.02. |