Introduction
This document describes how to install Ephesoft Transact in the following environments:
- Environment types — single and multi-server
- Operating System — Windows®
Important: Steps unique to a multi-server installation are identified where applicable in this document.
Installation Overview
The process of installing Ephesoft Transact follows this general sequence of tasks.
| Installation Task | General Scope of Activity |
| Prerequisites | Prepare for installation by gathering installation resources and verifying that the environment and databases are supported. |
| Obtain and Launch the Install Wizard Package | Launch the Install Wizard with the Windows Command Prompt. Complete all settings and dialogs as prompted. |
| License and Launch Ephesoft Transact 2022.1.01 | License and launch Ephesoft Transact, then log in. Upon completion of this task and document, all authorized administrators and operators can log in for operations. |
Prerequisites
Perform these steps to prepare for a successful software installation and startup:
- Determine if you need to perform a single-server or multi-server installation.
Important: Steps unique to a multi-server environment upgrade are identified where applicable throughout this document. Follow the instructions and adjust as necessary if upgrading on a multi-server environment.
- Verify that Ephesoft Transact 2022.1.01 is supported on your operating system. Refer to Platform Configuration and Third-Party Integrations and reference the 2022.1.00 and Above table for additional information.
- Use the document cited above to confirm and verify that your database version is supported.
- The following database information is required when you run the Install Wizard:
- Username and password
- Database connection parameters
Important Database Notes: The Ephesoft Transact Install Wizard does not install any database management systems (DBMS). You will need to install and configure any relevant DBMS prior to installing Ephesoft Transact. - If you’re installing Ephesoft Transact for the first-time using Maria DB, reference Install and Migrate to MariaDB for Windows for additional information.
- If you’re using Microsoft SQL Server as your database, refer to Prerequisites for Configuring Transact with Microsoft SQL Server and complete the steps before proceeding.
- Verify that internet connectivity is available for this installation.
- Verify or complete .NET 4.5.2 installation on the server before running the Install Wizard. You will not be able to proceed with the installation if the listed requirements are not met. You can download .NET 4.5.2 from Microsoft.
- Confirm the requirements of the SharedFolders directory for this installation.
Note: This directory is used as a shared resource between Ephesoft Transact servers in a multi-server installation. The directory can be installed in one of two locations:
-
- Local Disk: By default, the Install Wizard installs SharedFolders on the local system where the user installs Ephesoft Transact. Choose this location for single-server installations.
- Network File Share Server: Ephesoft recommends installing the SharedFolders directory on a network shared folder, as it allows for future growth and scalability. Choose this location for multi-server installations. If you plan to use SharedFolders from a Network File Share Server, complete the following steps prior to using the Install Wizard:
- Obtain the Universal Naming Convention (UNC) server name for the network server.
- Create a base network path on that server that will host the SharedFolders directory.
Note: The Install Wizard creates the SharedFolders directory on the network server in a later step. The network server and base network path must be online and available when you run the Install Wizard.
Important: All multi-server installations require the SharedFolders to be on a network server.
Installation Instructions
Prepare the Server for Installation
Perform these steps to prepare the server to install Ephesoft Transact.
- Log onto the Windows system and set the User Access Control (UAC) to Never notify. Do the following:Important: This is a temporary setting, and you must re-enable UAC after completing the installation.
-
- From the Windows Start menu, search for User Access Control or UAC. The Windows Control Panel displays the link. Click this link to display the page.
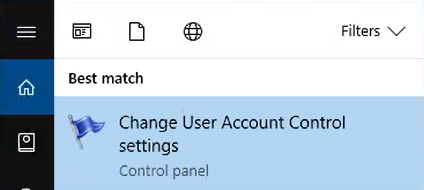
Figure 1. Change User Account Control settings in Windows Control Panel
The User Account Control Settings screen displays.

Figure 2. User Account Control Settings
-
- If the security setting is closer to the Always notify part of the scale, adjust this setting to the lowest position (i.e., Never notify) as shown in figure 2. You will be prompted to confirm this setting.
- Accept the changes.
- Create a Windows service account, or confirm the username and password for an existing Windows service account to be used with Ephesoft Transact.
You are now ready to obtain and launch the Install Wizard.
Multi-Server Installation
If you are installing in a multi-server environment, it is important to follow the instructions outlined in Enter Ephesoft Registration, SharedFolders, and Installation Information. The steps for both single and multi-server environments are similar up to this section where the Ephesoft Registration Information screen is described.
Obtain and Launch the Install Wizard Package
Perform these steps to download and launch the Ephesoft Transact Install Wizard:
- Refer to the Ephesoft Support Portal Downloads page for information on how to obtain the Ephesoft Transact installer.
- Download the Ephesoft Transact Installer. This is a zipped file with the following filename: Ephesoft_Transact_<Version Number>_Windows.zip
- Extract all contents of this .zip file to a temporary location. To extract the file, right-click the file, and from the pop-up menu, click Extract All.

Figure 3. Click Extract All
Important: You must extract all elements of the installer package. The following figure illustrates the contents of the extracted installer package:
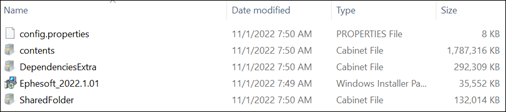
Figure 4. Installer Package Contents
- Open the Windows Command Prompt as an Administrator. Navigate to the directory where you extracted the installer zip file, then execute the following command to install Ephesoft Transact:
msiexec.exe /i Ephesoft_2022.1.01.msi
The following screen displays:
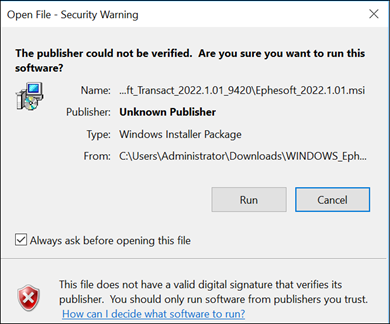
Figure 5. Open File – Security Warning
- Click Run to continue launching the Ephesoft Install Wizard. The Ephesoft Transact 2022.1.01 Setup screen displays.
![]()
Figure 6. The Ephesoft Transact 2022.1.01 Setup Screen
- Click Next. The End-User License Agreement displays.
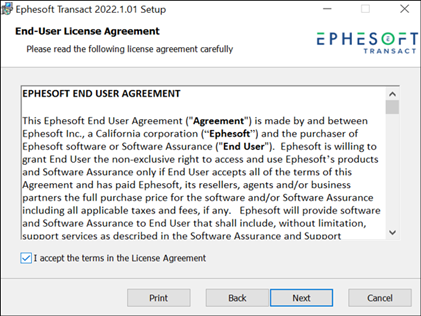
Figure 7. End-User License Agreement
- Read the end-user license agreement, select the check box to accept the terms, and click Next to continue. The Ephesoft Prerequisites Check displays.
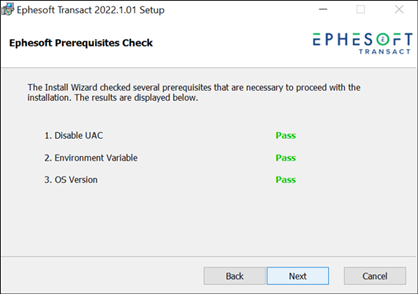
Figure 8. Ephesoft Prerequisites Check
Note: The Install Wizard may take several minutes to perform these prerequisite checks. If a warning displays in the above screen, click Details for more information.
- Click Next when the prerequisites check is acceptable. Continue to .NET Framework 4.5.2 Installation.
.NET Framework 4.5.2 Installation
If prompted to perform .NET Framework installation, follow these instructions.
- Ephesoft Transact performs a check to verify that the .NET Framework 4.5.2 is installed.
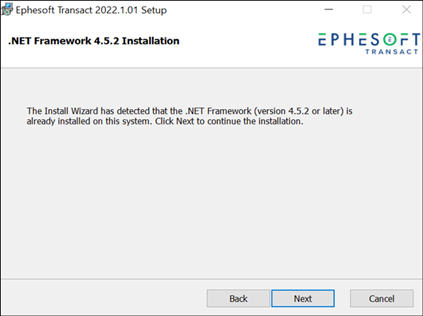
Figure 9. .NET Framework 4.5.2 Installation
Note: The following factors enable or disable the Next button:
-
- The Next button is enabled if the .NET Framework 4.5.2 is installed on the system.
- The Next button is disabled if the .NET Framework 4.5.2 is not installed on the system. A Download button will display. Follow these steps:
- Click Download and go to the appropriate link.
- Download and install the .NET 4.5.2 Framework.
- Follow the instructions in the .NET 4.5.2 Framework installer to complete the installation.
Once you have completed the installation of .NET 4.5.2 Framework, continue to the next step.
- Click Next. The Install Wizard performs a check of Microsoft® Visual C++ Redistributables.

Figure 10. Ephesoft Prerequisites Installation
Refer to the list of Visual C++ redistributables shown in Figure 14 for the required versions of these files.
Note: The Install Wizard may display the following message: “Transact prerequisites are being installed in the background.” Allow time for the background configuration processes to complete. Continue to Define Service Credentials.
Define Service Credentials
If you are running the Ephesoft Transact Server as a Windows service, the Install Wizard prompts you to choose which account to use. Choose the account that complies with your organization’s security policy.
- In most cases, users select Local System Account.
- To use another existing account, select This Account and enter the username and password for an account that has full access permissions to the network SharedFolders path.
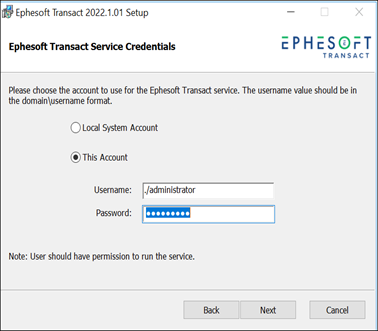
Figure 11. Service Credentials and Account Selection
Note: Use this option with a Windows service account that has access to the SharedFolders component, whether locally or remote. Ephesoft recommends configuring SharedFolders on a network location for future growth and scalability.
- Click Next. Continue to Select and Set Up the Database.
Select and Set Up the Database
The Configure Database screen displays. Perform the steps below to select and set up your database.
- Select the database you want to configure. Click Next.
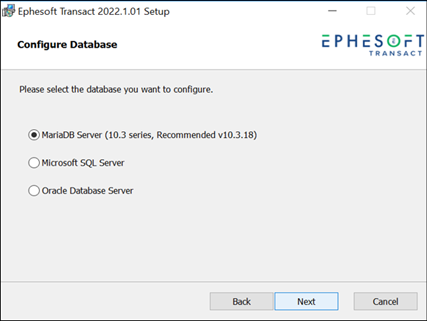
Figure 12. Configure Database Screen
- Follow the instructions for the selected database:
-
- MariaDB Server Configuration — the default selection in the Install Wizard
- Microsoft SQL Server Configuration
- Oracle Database Server Configuration
MariaDB Configuration
Note: The Install Wizard does not install MariaDB as a part of the installation process. You will need to configure the MariaDB server prior to running the Ephesoft Transact Install Wizard. The Install Wizard allows you to connect to an existing MariaDB server during installation of Ephesoft Transact.
For the latest information about MariaDB version support and MariaDB installation, refer to these documents:
- Install and Migrate MariaDB and MySQL for Windows
- Platform Configuration and Third-Party Integrations
To create and connect a database on the MariaDB server for Ephesoft Transact, follow these steps.
- The Ephesoft Transact Install Wizard displays the following screen to start the MariaDB configuration.
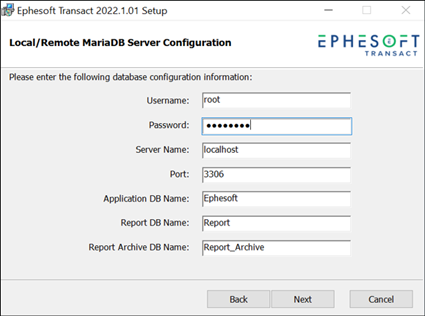
Figure 13. MariaDB Server Configuration
Complete the window as follows:- Enter the user name and password for an account that has the rights to create databases on the MariaDB server.
- Enter the server name or IP address and port for the MariaDB server.
- The Application DB Name, Report DB Name, and Report Archive DB Name fields are prepopulated with the default values shown in the figure above.
- Click Next to display the Database Login Configuration dialog.
Note: The Install Wizard performs a check of the database connectivity. An error message will display if the database is unreachable.
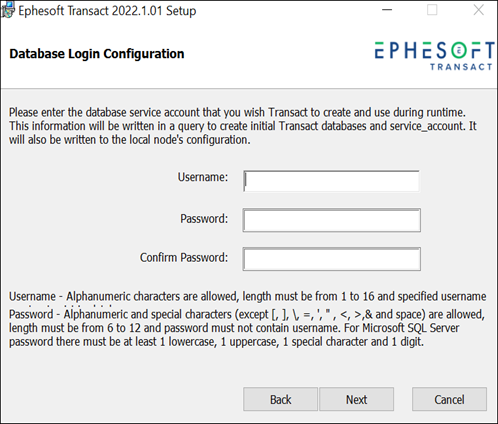
Figure 14. Database Login Configuration- Specify login credentials that will be used as the service account to connect Ephesoft Transact and the databases at runtime.
- Click Next.
- Continue to Configure OpenOffice to proceed with the Install Wizard.
Microsoft SQL Server Configuration
Before you configure Microsoft SQL Server, refer to Prerequisites for Configuring Transact with Microsoft SQL Server, and complete the steps. Then, follow these steps below to configure this database during the installation of Ephesoft Transact.
- Select Microsoft SQL Server on the Configure Database screen, as illustrated below.
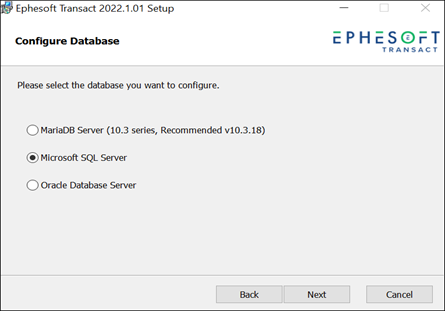
Figure 15. Configure Database Screen: Microsoft SQL Server Option - The following step is optional. Review the following two options when selecting the installation type for Microsoft SQL server and choose only if applicable to your installation process.
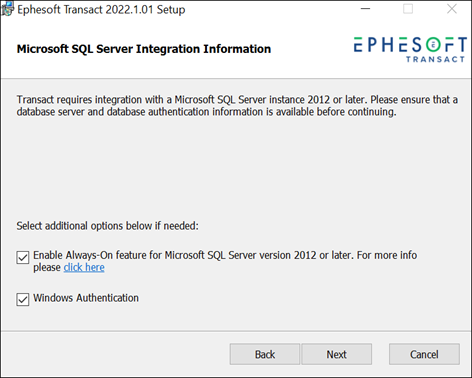
Figure 16. Selecting the Installation Type for Microsoft SQL Server Integration
The Install Wizard does not support the installation of a new instance of Microsoft SQL Server. The only option is to configure an existing Microsoft SQL instance, as illustrated in the following steps.The following screen displays if you select both options: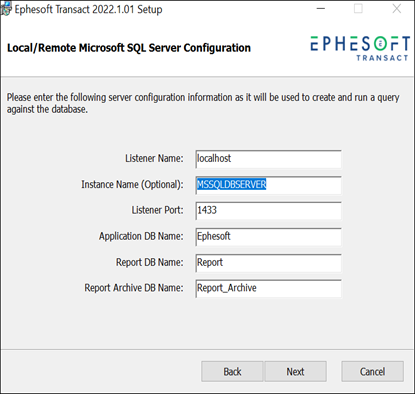
Figure 17. Local/Remote Microsoft SQL Server Configuration Screen - Complete the Local/Remote Microsoft SQL Server Configuration window as follows:
- If Windows Authentication was not selected, enter the user name and password for an account that has the rights to create databases on the Microsoft SQL Server.
- Enter the listener name or IP address and port for the Microsoft SQL Server.
- The Application DB Name, Report DB Name, and Report Archive DB Name fields are prepopulated with the default values shown in the figure above.
- Click Next.
- If Windows Authentication was not selected, the Database Login Configuration dialog will appear. Specify login credentials that will be used as the service account to connect Ephesoft Transact and the databases at runtime. Click Next.Note: The Install Wizard performs a check of the database connectivity. An error message will display if the database is unreachable.
- Continue to Configure OpenOffice to proceed with the Install Wizard.
Oracle Database Configuration
Follow these steps when setting up an Oracle database during the installation of Ephesoft Transact.
- Select Oracle Database Server in the Configure Database screen, as illustrated below:
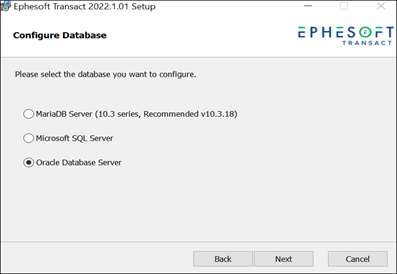
Figure 18. Select Oracle Database Server - The Local/Remote Oracle Server Configuration Information screen displays with the option to create new schema or configure existing Oracle schema. With either of the following two options, a Security Identifier (SID) is required.
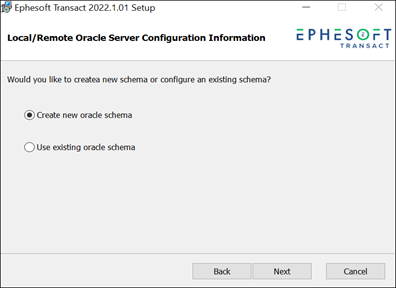
Figure 19. Oracle Schema Selection- First Option: Select the first option to create a new Oracle schema. The following screen displays. Enter the appropriate information in the text fields and click Next.
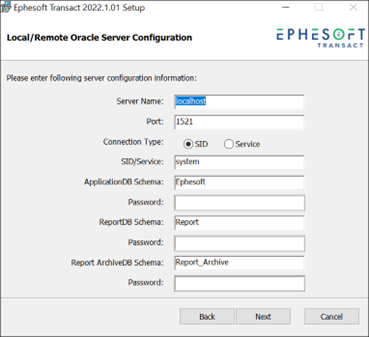
Figure 20. Local/Remote Oracle Server Configuration — Create New Oracle Schema - Second Option: Select the second option to use an existing Oracle schema. The following screen displays. Enter the appropriate information in the text fields for the Oracle database.
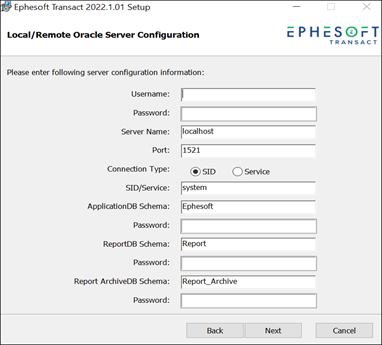
Figure 21. Local/Remote Oracle Server Configuration — Use Existing Oracle Schema
- First Option: Select the first option to create a new Oracle schema. The following screen displays. Enter the appropriate information in the text fields and click Next.
- Click Next. The Oracle database configuration for this installation of Ephesoft Transact is now complete.
- Continue to Configure OpenOffice to proceed with the Install Wizard.
Configure OpenOffice
After completing database setup, the OpenOffice Configuration screen displays.
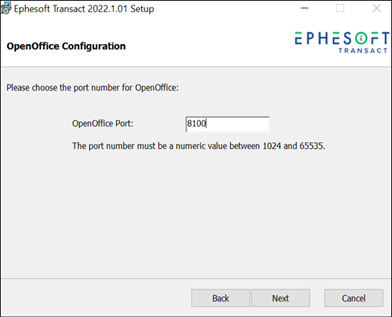
Figure 22. OpenOffice Configuration
- Use the default port number, unless your network specifically requires a different port.
- Click Next to proceed.
Configure Authentication Mode
The Authentication Mode dialog displays, as illustrated below:
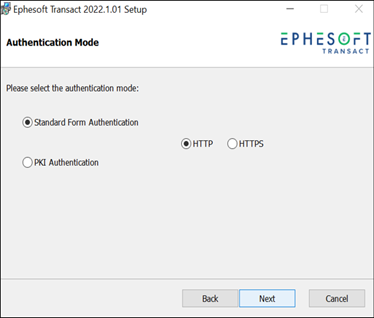
Figure 23. Select an Authentication Mode
Follow the instructions for the authentication mode you select.
Standard Form Authentication
- Select Standard Form Authentication. This is the default option.
- Select either HTTP or HTTPS.
- Click Next.
PKI Authentication
Select the second option for PKI Authentication, and follow the steps listed in Configure PKI Authentication on Windows.
PKI Authentication using HTTP
Follow these steps if using HTTP:
- Click Next. The User Connectivity Settings screen displays with the option to choose one of the following connection types:
- LDAP
Note: If you are performing a fresh installation of Ephesoft Transact and do not have Microsoft Visual C++ 2010 installed, you will need to perform a separate installation of LDAP. Refer to OpenLDAP: Separate Installation for more information. - Active Directory
- Tomcat
- LDAP
- Proceed to Configure User Connectivity Settings for the next step in configuration.
PKI Authentication using HTTPS
Follow these steps if using HTTPS.
- Click Next. The following screen displays, allowing you to choose either Standard Form Authentication or PKI Authentication.Note: If you select PKI Authentication, an additional field displays that allows you to navigate to and select the PKI Property file. Complete this field.
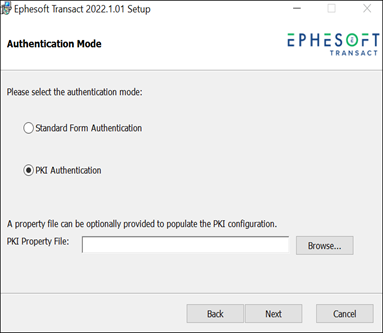
Figure 24. Authentication Mode - Click Next to configure the Certificate Details for PKI.
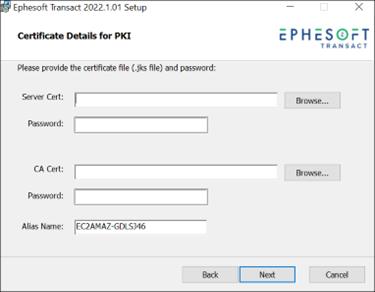
Figure 25. JKS Server Cert and CA Cert Details
Both certificates are defined on the server for this installation.- The Server Cert is a Java Keystore File (JKS) file for the server. Provide the JKS file and password for HTTPS configuration for the server certificate.
- The CA Cert is the certificate file for a client system. Provide the CA Cert, Password, and Alias Name for the client certificate.
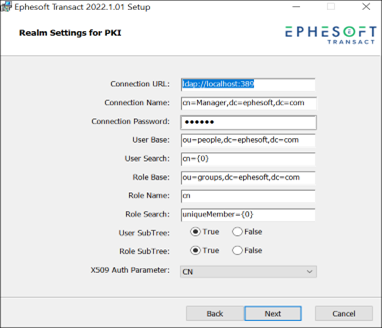
Figure 26. Realm Settings for PKI
- Enter the appropriate information in the text fields and click Next. The Connector Settings for PKI screen displays.
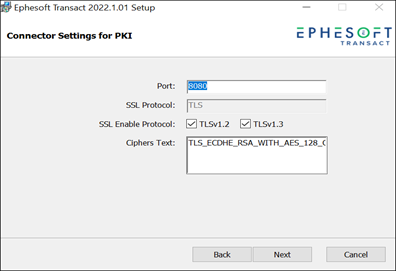
Figure 27. Connector Settings for PKI - Enter the information in the text fields and define the corresponding settings.
- Click Next to complete this configuration for authentication. Proceed to Configure User Connectivity Settings.
Configure User Connectivity Settings
Once you have configured authentication mode and the related screens, the Install Wizard displays the User Connectivity Settings, as illustrated below:
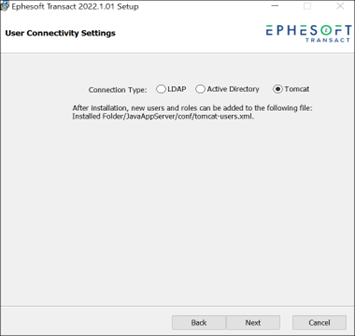
Figure 28. User Connectivity Settings
- Select the connection type, either LDAP, Active Directory or Tomcat (default). Click Next.
- Depending on the type of connection, the following displays:
- LDAP — The User Connectivity Settings window appears. Enter the appropriate information in the fields and click Next.

Figure 29. LDAP Configuration for User Connectivity Settings - Active Directory — The User Connectivity Settings window for Active Directory appears. Enter the appropriate information in the fields and click Next.
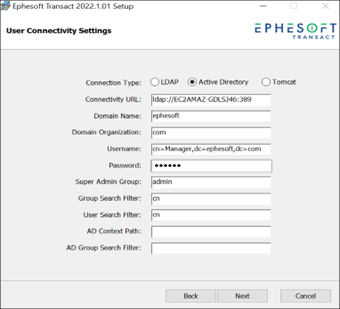
Figure 30. Active Directory Configuration for User Connectivity Settings - Tomcat — No additional configuration is required.
- LDAP — The User Connectivity Settings window appears. Enter the appropriate information in the fields and click Next.
Enter Ephesoft Registration, SharedFolders, and Installation Information
Once you have completed the User Connectivity Settings, the Ephesoft Registration Information screen displays.
- Enter the appropriate information in the text fields and click Next.
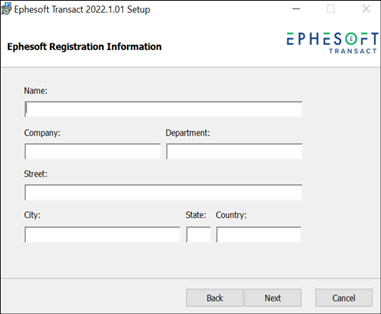
Figure 31. Ephesoft Registration Information Screen
The Shared Folder Configuration screen displays.
Important: With this screen, you define settings for the SharedFolders component, as described in the section titled Prerequisites. It is a requirement to use SharedFolders configured on a network location for multi-server installations.
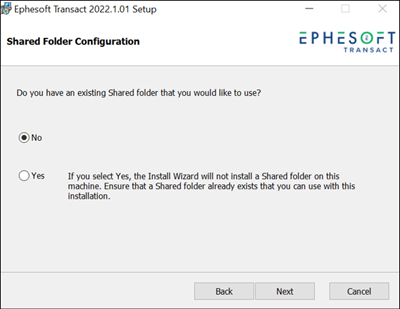
Figure 32. Shared Folder Configuration Screen
Important: All steps up to this point are done regardless of server environment (single or multiple). The following steps vary depending on a single or multi-server installation.
- Configure shared folder options and click Next:
- Select No if you are installing on a single-server environment, or if you are installing the first server in a multi-server environment.
- Select Yes if you are installing the second (third, fourth, etc.) server in a multi-server environment.
Note: For additional information on multi-server environments, refer to Multi-Server Installation.
The Installation Folder screen displays.

Figure 33. Installation Folder Setup Screen
- Optionally, select the checkbox labeled Install Shared folder separately and define the network location (if using SharedFolders on a network for this installation).
Important: For multi-node Transact environments, a network share is recommended. When installing subsequent servers for multi-server deployments, the SharedFolders directory must be installed on a file share that will be accessible by all servers in the cluster. To do so, click Change to provide the network location of a previously installed shared folder.
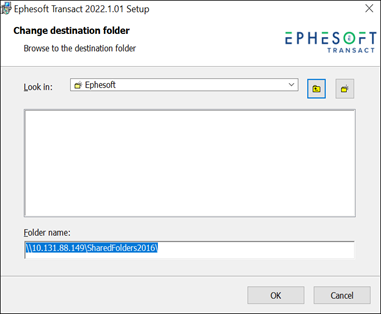
Figure 34. Change Destination Folder
- Click Next in the Installation Folder screen.
Run and Finish the Install Wizard
After you have chosen the folder location, the Ready to Install screen displays.
Note: If needed, click Back to adjust your configurations in previous screens.
- Click Install. The status bar displays.

Figure 35. Ready to Install Screen
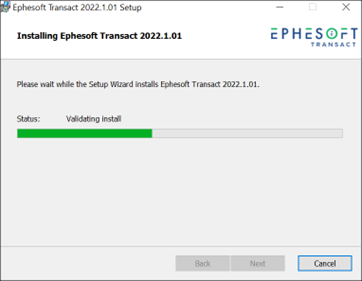
Figure 36. Status Bar of the Install Wizard Progress
Note: This may take some time.
Once the installation is completed, the Post-Installation Instructions screen displays.
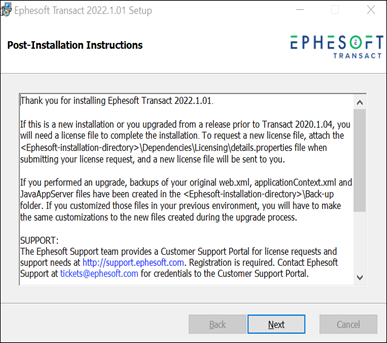
Figure 37. Post-Installation Instructions - Read the post-installation instructions and perform the necessary tasks, then click Next. The following screen displays to confirm that the installation is complete.

Figure 38. Ephesoft Transact 2022.1.01 Setup is Complete Screen
- Select Restart my computer.
Important: A restart is required for Ephesoft Transact to function properly.
- Click Finish.
- When the installation is complete, re-enable the User Access Control (UAC) on this server.Important: This was a temporary setting required when running the Install Wizard in a previous task. This procedure reactivates the UAC after installation.
- From the Windows Start menu, select the User Access Control settings. The Windows Control Panel displays a link. Click this link to display the page.
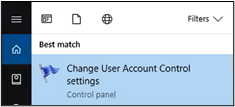
Figure 39. Change User Account Control settings in Windows Control Panel
The User Account Control Settings screen displays.

Figure 40. User Account Control Settings - Adjust this setting to the desired position for normal operations. Your setting may differ from the illustration shown above. The system prompts you to confirm this setting. Accept the changes.
- From the Windows Start menu, select the User Access Control settings. The Windows Control Panel displays a link. Click this link to display the page.
This completes your installation. Continue to License and Launch Ephesoft Transact.
License and Launch Ephesoft Transact
After starting the Ephesoft Transact service, you are ready to launch Ephesoft Transact. Follow the steps below:
Important: Ephesoft recommends restarting the service after your license is installed. For additional information about support for Microsoft SQL Server, refer to Platform Configuration and Third-Party Integrations.
- Follow the steps listed in Licensing Requirements.
- Open a web browser.
- Enter the following Ephesoft Transact URL: http://<server_name>:8080/dcma/home.htmlNote: Allow time for the background configuration processes to complete. The initial startup may require several minutes.
- The Ephesoft Transact home page displays. Select Administrator or Operator to log in.
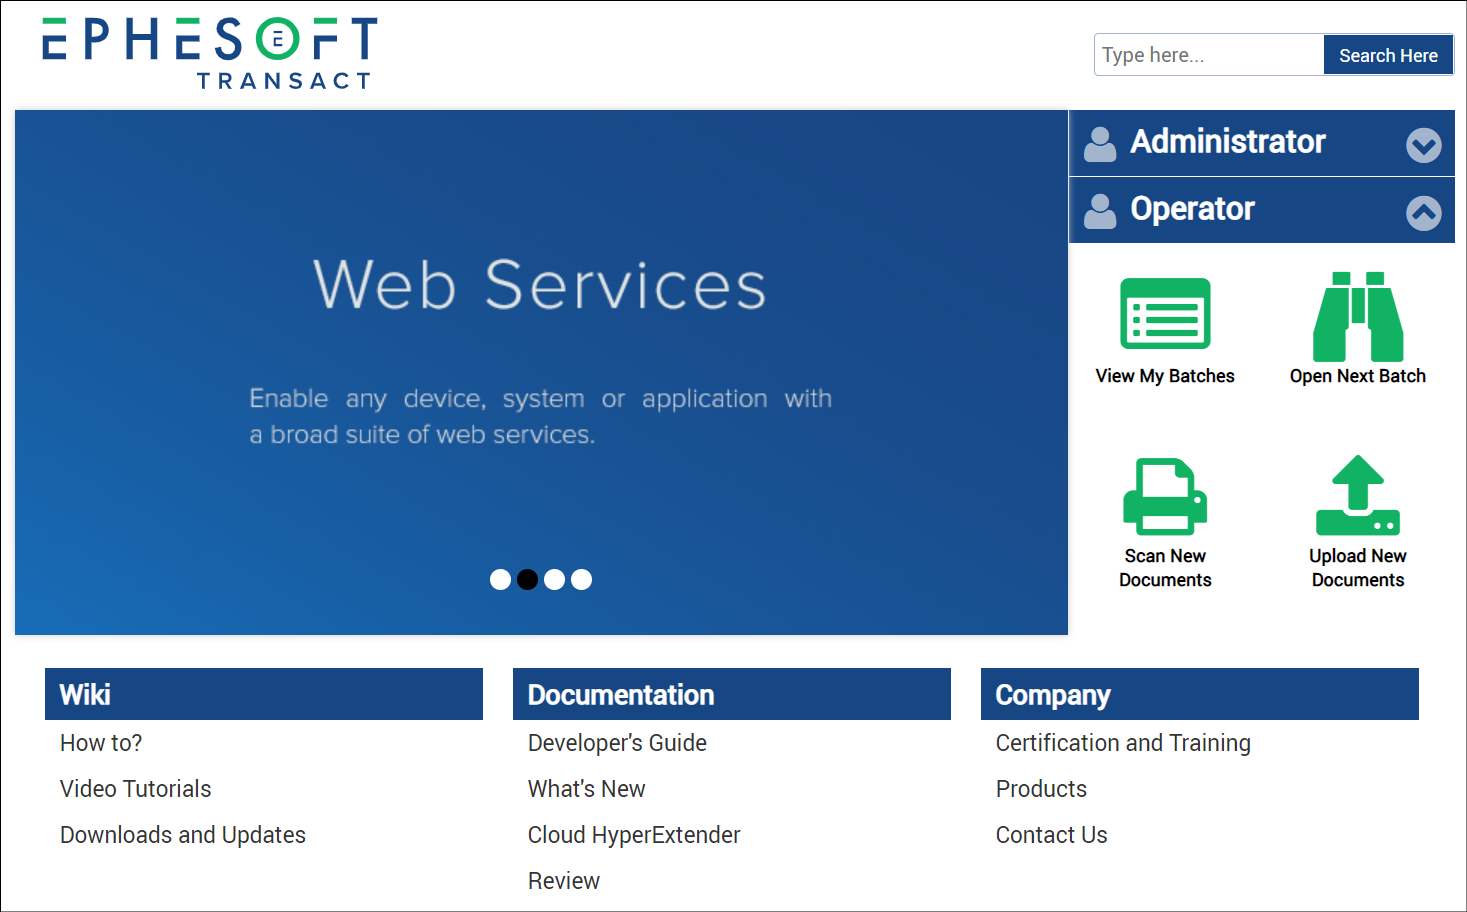
Figure 41. Ephesoft Transact Home Screen - Enter the username and password.

Figure 42. Login Screen
Important: The system may require additional time to complete the initial login.