Introduction
This document describes how to install Ephesoft Transact 2020.1 in the following environments:
- Environment types — single and multi-server
- Operating System — Windows®
- Installation types — normal and silent
Important: Steps unique to a multi-server installation are identified where applicable in this document.
Installation Overview
The process of installing Ephesoft Transact 2020.1 follows this general sequence of tasks.
| Installation Task | General Scope of Activity |
| Prerequisites | Prepare for installation by gathering installation resources and verifying that the environment and databases are supported. |
| Obtain and Launch the Install Wizard Package | Launch the 2020.1 Install Wizard with the Windows Command Prompt. Complete all settings and dialogs as prompted. |
| Select Normal or Silent Installation | Select your preferred installation type. |
| Service Pack Installation | This service pack must be installed immediately after completing the Install Wizard. |
| License and Launch Ephesoft Transact 2020.1 | License and launch Ephesoft Transact, then log in. Upon completion of this task and document, all authorized administrators and operators can log in for operations. |
Prerequisites
Perform these steps to prepare for successful software installation and startup:
- Determine if you need to perform a single-server or multi-server installation.
Note: Steps unique to a multi-server environment upgrade are identified where applicable throughout this document. Follow the instructions and adjust as necessary if upgrading on a multi-server environment.
- Verify that Ephesoft Transact 2020.1 is supported on your operating system. Refer to 2020.1 Platform Configuration and Third-Party Integrations for additional information.
- Use the document cited above to confirm and verify that your database version is supported.
- The following database information is required when you run the Install Wizard:
-
- Username and password
- Database connection parameters
Important Database Notes: The Ephesoft Transact 2020.1 Install Wizard does not install any database management systems (DBMS). You will need to install and configure any relevant DBMS prior to installing Ephesoft Transact 2020.1.
-
- If you’re installing Ephesoft Transact for the first-time using Maria DB, reference Install and Migrate MariaDB or MySQL for Windows for additional information.
- If you’re using Microsoft SQL Server as your database, refer to Configuring Named Instance for Microsoft SQL Server and complete the steps before proceeding.
- Verify that internet connectivity is available for this installation.
- Verify or complete .NET 4.5.2 installation on the server before running the Install Wizard. You will not be able to proceed with the installation if the listed requirements are not met. You can download .NET 4.5.2 from the Microsoft website.
- Confirm the requirements of the SharedFolders directory for this installation.
Note: This directory is used as a shared resource between Ephesoft Transact servers in a multi-server installation. The directory can be installed in one of two locations:
-
- Local Disk: By default, the Install Wizard installs SharedFolders on the local system where the user installs Ephesoft Transact. Choose this location for single-server installations.
- Network File Share Server: Ephesoft recommends installing the SharedFolders directory on a network shared folder, as it allows for future growth and scalability. Choose this location for multi-server installations. If you plan to use SharedFolders from a Network File Share Server, complete the following steps prior to using the Install Wizard:
-
-
-
- Obtain the Universal Naming Convention (UNC) server name for the network server.
- Create a base network path on that server that will host the SharedFolders directory.
-
-
Note: The Install Wizard creates the SharedFolders directory on the network server in a later step. The network server and base network path must be online and available when you run the Install Wizard.
Important: All multi-server installations require the SharedFolders to be on a network server.
Prepare the Server for Installation
Perform these steps to prepare the server to install Ephesoft Transact 2020.1.
- Log onto the Windows system and set the User Access Control (UAC) to Never notify.
Important: This is a temporary setting, and you must re-enable UAC after completing the installation later in this document.
-
- From the Windows Start menu, search for User Access Control or UAC. The Windows Control Panel displays the link. Click this link to display the page.
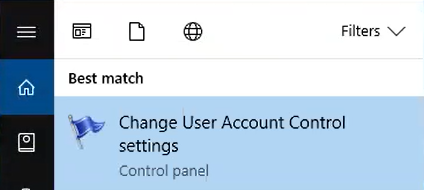
Figure 1. Change User Account Control settings in Windows Control Panel
-
- The User Account Control Settings screen displays.
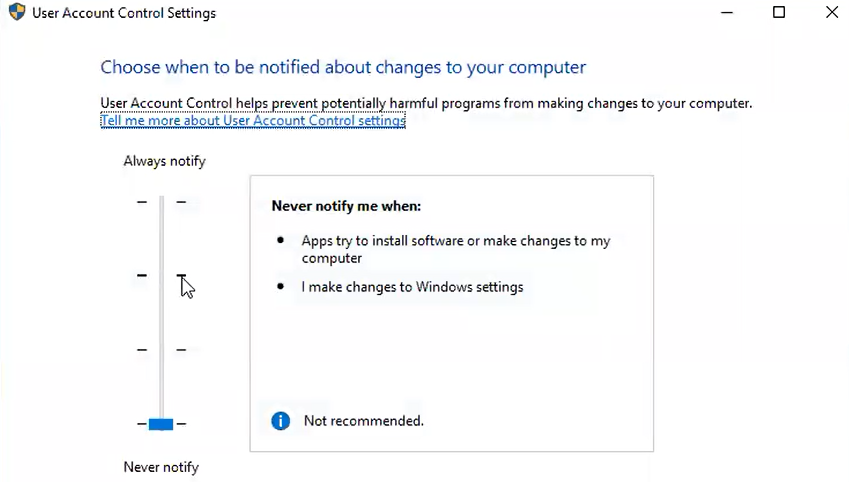
Figure 2. User Account Control Settings
-
- If the security setting is closer to the Always notify part of the scale, adjust this setting to the lowest position (i.e., Never notify) as shown in figure 2. You will be prompted to confirm this setting.
- Disable the IPv6 network protocol on this server. This control is available in the Windows network settings.
- Select Control Panel > Network and Internet > Ethernet.
- From the Ethernet screen, click Change adapter options. A new screen displays one or more networks.
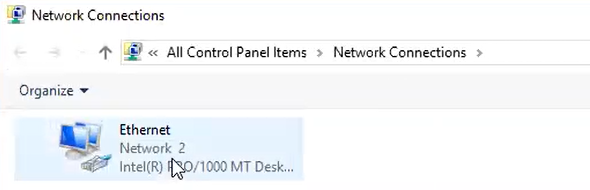
Figure 3. Network Connections Example
-
- Right-click the network on which to disable the IPv6 and click Properties from the pop-up menu.
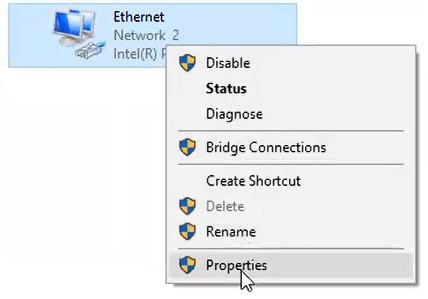
Figure 4. Click Properties to Change IPv6 Settings
The Ethernet Properties screen displays.
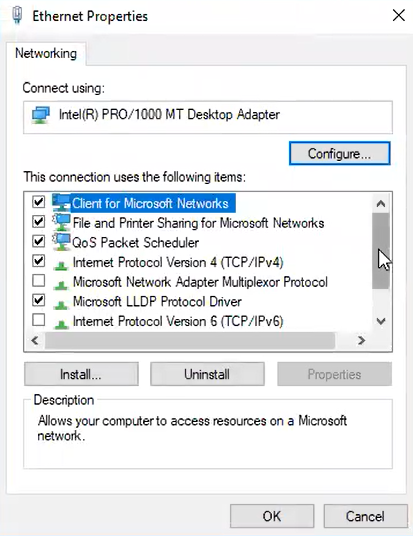
Figure 5. Ethernet Properties Settings
-
- Clear the Internet Protocol Version 6 (TCP/IPv6) checkbox.
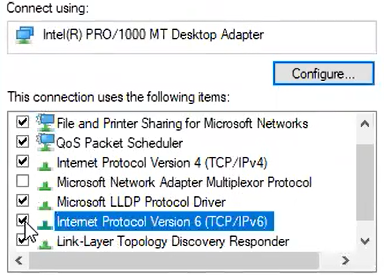
Figure 6. Disable the Internet Protocol Version 6 (TCP/IPv6) Setting
-
- Click OK to save changes. The system returns you to the Ethernet page. Close the Windows Control Panel.
- Create a Windows service account or confirm the username and password for an existing Windows service account to be used with Ephesoft Transact.
You are now ready to obtain and launch the Install Wizard.
Multi-Server Installation
If you are installing in a multi-server environment, it is important to follow the instructions outlined in Enter Ephesoft Registration, SharedFolders, and Installation Information. The steps for both single and multi-server environments are similar up to this section where the Ephesoft Registration Information screen is described.
User Instructions
Perform these steps to download the Transact installer:
- Refer to the Downloads page for information on how to obtain the Ephesoft Transact Installer.
- Download the Ephesoft Transact 2020.1 Install Wizard as instructed by Ephesoft. This is a zipped file with the following filename: WINDOWS_Ephesoft_Transact_2020.1_1316.zip
Note: The last four digits are an Ephesoft build number that is subject to change.
- Extract all contents of this .zip file to a temporary location. To extract the file, right-click the file, and from the pop-up menu, click Extract All.
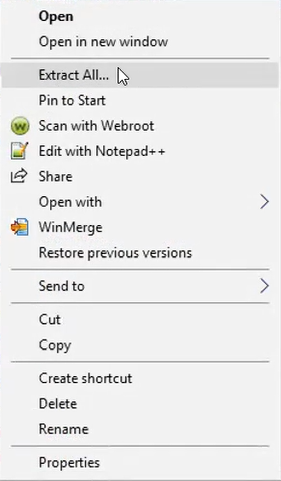
Figure 7. Click Extract All
Important: You must extract all elements of the installer package. The following figure illustrates the contents of the extracted installer package:
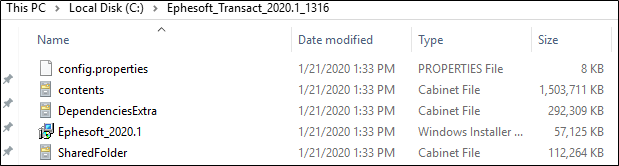
Figure 8. Installer Package Contents
Select Normal or Silent Installation
Ephesoft Transact can be installed normally—using the Install Wizard, or silently—using the config.properties file. Determine your installation method and follow the provided instructions.
Normal Installation
- Open the Windows Command Prompt as an Administrator. Navigate to the directory where you extracted the installer zip file, then execute the following command to install Ephesoft Transact 2020.1:
msiexec.exe /i Ephesoft_2020.1.msi
The following screen displays:
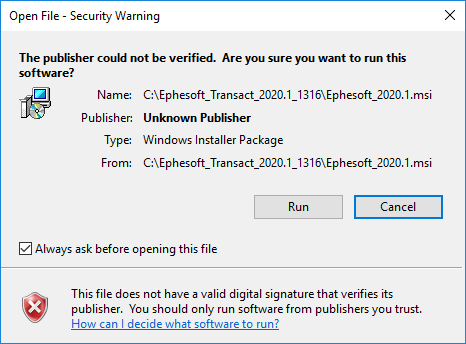
Figure 9. Open File – Security Warning
- Click Run to continue launching the Ephesoft Install Wizard. The Ephesoft Transact 2020.1 Setup screen displays.
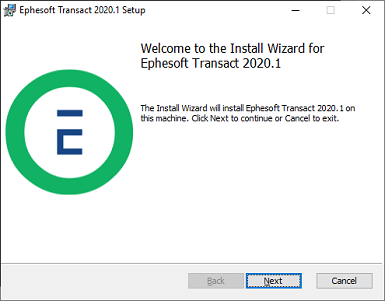
Figure 10. The Ephesoft Transact 2020.1 Setup Screen
- Click Next. The End-User License Agreement displays.
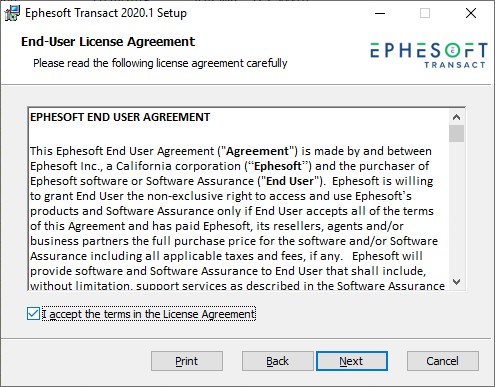
Figure 11. End-User License Agreement
- Read the end-user license agreement, select the check box to accept the terms, and click Next to continue. The Ephesoft Prerequisites Check displays.

Figure 12. Ephesoft Prerequisites Check
Note: The Install Wizard may take several minutes to perform these prerequisite checks. If a warning displays in the above screen, click Details for more information. Click Next when the prerequisites check is acceptable. Continue to .NET Framework 4.5.2 Installation.
.NET Framework 4.5.2 Installation
Ephesoft Transact performs a check to verify that the .NET Framework 4.5.2 is installed.
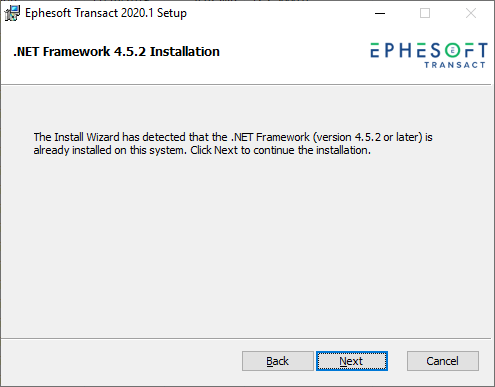
Figure 13. .NET Framework 4.5.2 Installation
Note: The following factors enable or disable the Next button:
-
- The Next button is enabled if the .NET Framework 4.5.2 is installed on the system.
- The Next button is disabled if the .NET Framework 4.5.2 is not installed on the system. A Download button will display. Follow these steps:
-
-
-
- Click Download and go to the appropriate link.
- Download and install the .NET 4.5.2 Framework.
-
-
-
- Once you have completed the installation of .NET 4.5.2 Framework, continue to step 9.
- Click Next. The Install Wizard performs a check of Microsoft® Visual C++ Redistributables.
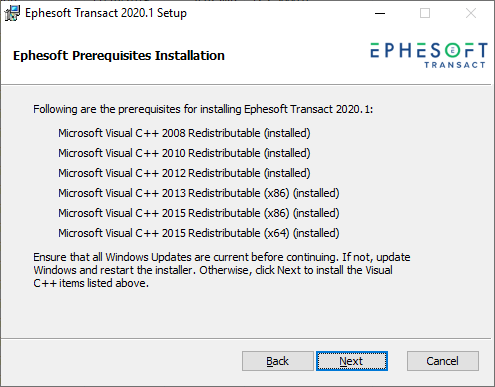
Figure 14. Ephesoft Prerequisites Installation
Important: If your system has newer versions of the Visual C++ redistributables, the Ephesoft Transact installer may fail. Perform the following steps:
-
-
- Uninstall the newer version of the library.
- Run the Ephesoft Transact installer.
- Install the newer version of the library.
-
Refer to the list of Visual C++ redistributables shown in Figure 14 for the required versions of these files.
Note: The Install Wizard may display the following message: “Transact prerequisites are being installed in the background.” Allow time for the background configuration processes to complete. Continue to Define Service Credentials.
Define Service Credentials
If you are running the Ephesoft Transact Server as a Windows service, the Install Wizard prompts you to choose which account to use. Choose the account that complies with your organization’s security policy.
- In most cases, users select Local System Account.
- To use another existing account, select This Account and enter the username and password for an account that has full access permissions to the network SharedFolders path.
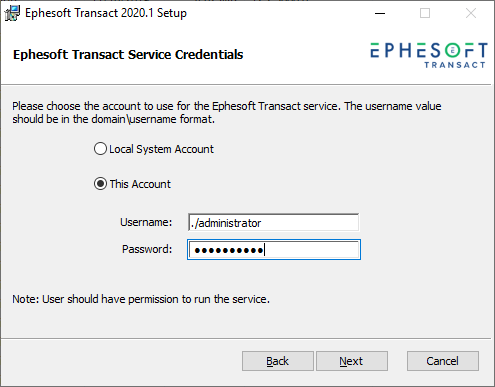
Figure 15. Service Credentials and Account Selection
Note: Use this option with a Windows service account that has access to the SharedFolders component, whether locally or remote. Ephesoft recommends configuring SharedFolders on a network location for future growth and scalability.
- Click Next. Continue to Select and Set Up the Database.
Select and Set Up the Database
The Configure Database screen displays. Perform the steps below to select and set up your database.
- Select the database you want to configure. Click Next.
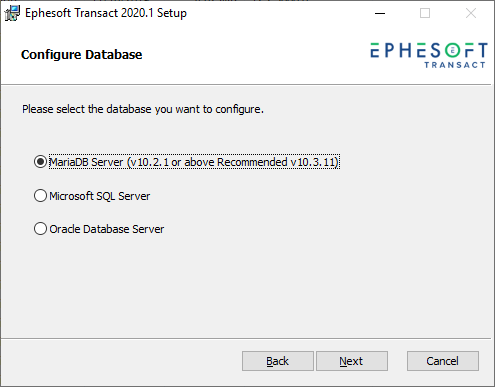
Figure 16. Configure Database Screen
- Follow the instructions for the selected database:
- MariaDB Server Configuration — the default selection in the Install Wizard
- Microsoft SQL Server Configuration
- Oracle Database Server Configuration
MariaDB Configuration
Note: The Install Wizard does not install MariaDB as a part of the installation process. You will need to configure the MariaDB database prior to running the Ephesoft Transact Install Wizard. The Install Wizard allows you to connect to an existing MariaDB server during installation of Ephesoft Transact.
For the latest information about MariaDB version support and MariaDB installation, refer to these documents:
- Install and Migrate MariaDB and MySQL for Windows
- 2020.1 Platform Configuration and Third-Party Integrations
Follow these steps when setting up an existing MariaDB database during the installation of Ephesoft Transact.
- Enter the MariaDB server configuration settings as prompted.
Note: The user credentials supplied on this page must have permission to create a database service account user, databases, and stored procedures.
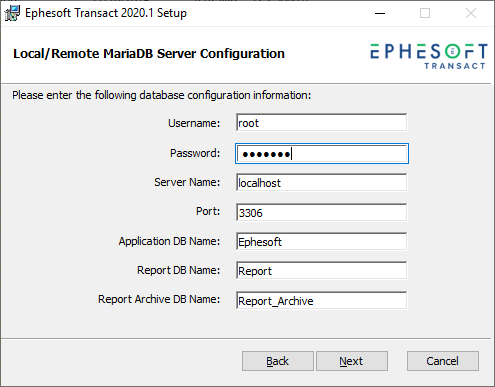
Figure 17. MariaDB Server Configuration
- Once you have provided configuration information for the MariaDB server, click Next to display the Database Login Configuration dialog.
Note: The Install Wizard performs a check of the database connectivity. An error message will display if the database is unreachable.
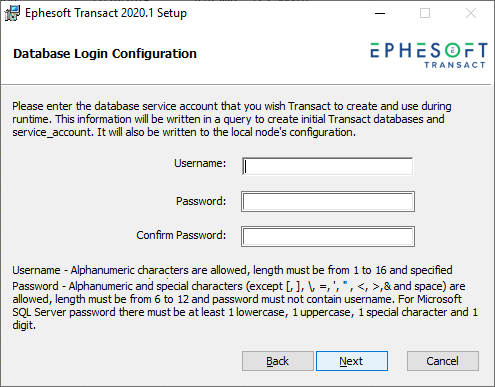
Figure 18. Database Login Configuration
- Specify login credentials that will be used as the service account to connect Ephesoft Transact and the databases at runtime.
- Click Next to complete this MariaDB database setup. MariaDB is now configured for your Ephesoft Transact installation.
- Continue to Configure OpenOffice to proceed with the Install Wizard.
Microsoft SQL Server Configuration
Before you configure Microsoft SQL Server, refer to Configuring Named Instance for Microsoft® SQL Server, and complete the steps. Then, follow these steps below to configure this database during the installation of Ephesoft Transact.
- Select Microsoft SQL Server on the Configure Database screen, as illustrated below.
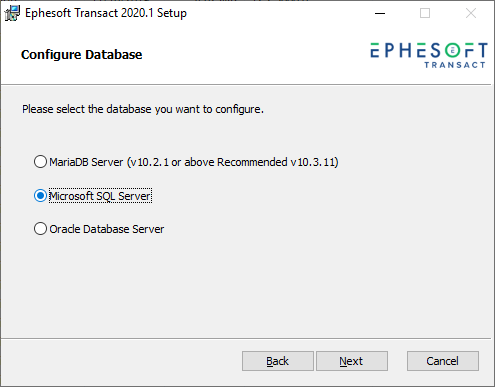
Figure 19. Configure Database Screen: Microsoft SQL Server Option
- The following step is optional. Review the following two options when selecting the installation type for Microsoft SQL server and choose only if applicable to your installation process.
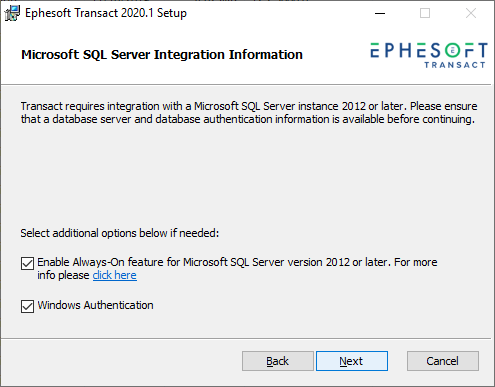
Figure 20. Selecting the Installation Type for Microsoft SQL Server Integration
The Install Wizard does not support the installation of a new instance of MS SQL Server. The only option is to configure an existing MS SQL instance, as illustrated in the following steps.
The following screen displays if you select both options:
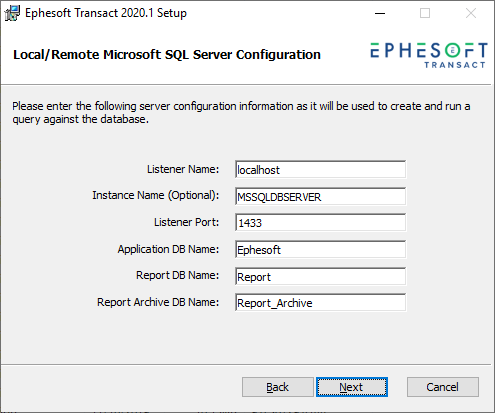
Figure 21. Local/Remote Microsoft SQL Server Configuration Screen
- Define the settings in the Local/Remote Microsoft SQL Server Configuration screen. In most cases, users proceed with the default settings.
- Click Next once these settings are defined. The OpenOffice Configuration screen displays.
- Continue to Configure OpenOffice to proceed with the Install Wizard.
Oracle Database Configuration
Follow these steps when setting up an Oracle database during the installation of Ephesoft Transact.
- Select Oracle Database Server in the Configure Database screen, as illustrated below:
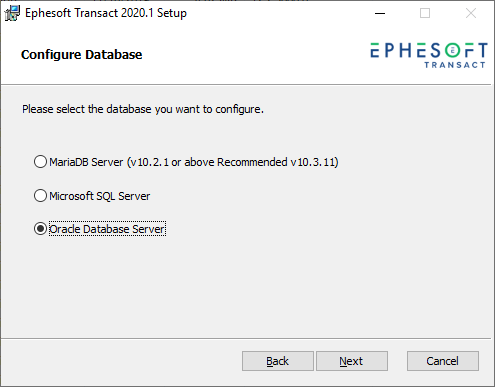
Figure 22. Select Oracle Database Server
- The Local/Remote Oracle Server Configuration Information screen displays with the option to create new schema or configure existing Oracle schema. With either of the following two options, a Security Identifier (SID) is required.
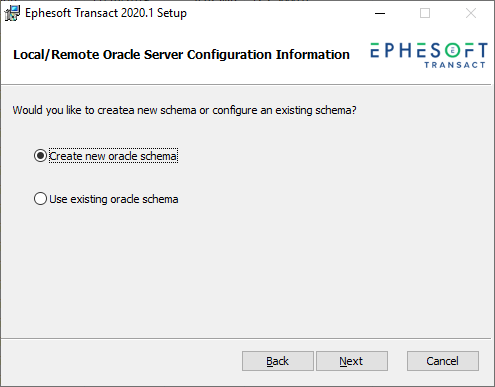
Figure 23. Oracle Schema Selection
-
- First Option: Select the first option to create a new Oracle schema. The following screen displays. Enter the appropriate information in the text fields and click Next.
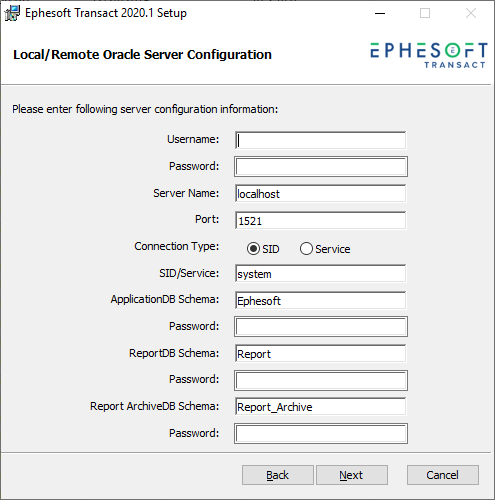
Figure 24. Local/Remote Oracle Server Configuration — Create New Oracle Schema
-
- Second Option: Select the second option to use existing Oracle schema. The following screen displays. Enter the appropriate information in the text fields for the Oracle database.
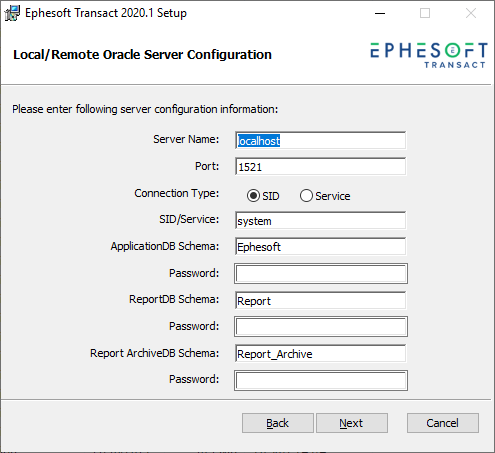
Figure 25. Local/Remote Oracle Server Configuration — Use Existing Oracle Schema
- Click Next. The Oracle database configuration for this installation of Ephesoft Transact is now complete.
- Continue to Configure OpenOffice to proceed with the Install Wizard.
Configure OpenOffice
After completing the database setup, the OpenOffice Configuration screen displays.
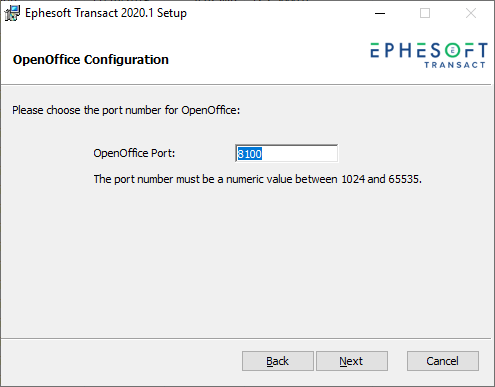
Figure 26. OpenOffice Configuration
- Use the default port number, unless your network specifically requires a different port. Click Next to proceed.
Configure Authentication Mode
The Authentication Mode dialog displays, as illustrated below:
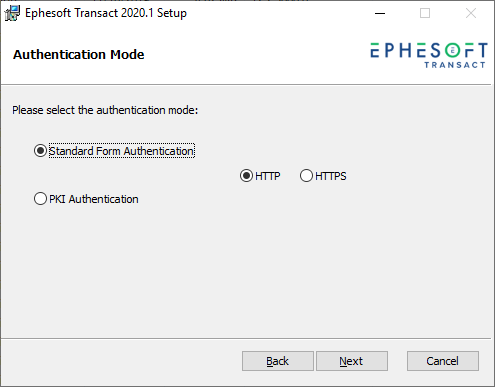
Figure 27. Select an Authentication Mode
- Select the appropriate Authentication Mode for this installation. If selecting Standard Form Authentication, choose HTTP or HTTPS.
- Follow these steps if using HTTP: Click Next. The User Connectivity Settings screen displays, with the option to choose one of the following connection types:
- LDAP
- Active Directory
- Tomcat
Proceed to Configure User Connectivity Settings for the next step in configuration.
- Follow these steps if using HTTPS: Click Next. The following screen displays, allowing you to choose either Standard Form Authentication or PKI Authentication.
Note: If you select PKI Authentication, an additional field displays that allows you to navigate to and select the PKI Property file. Complete this field.
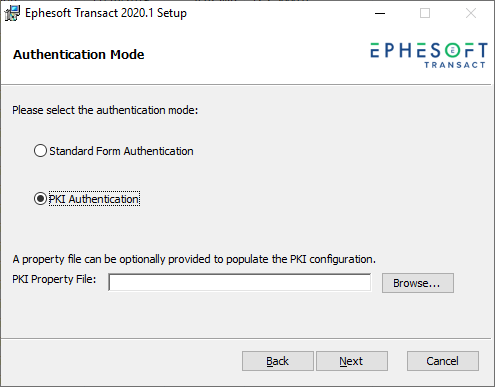
Figure 28. Authentication Mode
- Click Next to configure the Certificate Details for PKI.
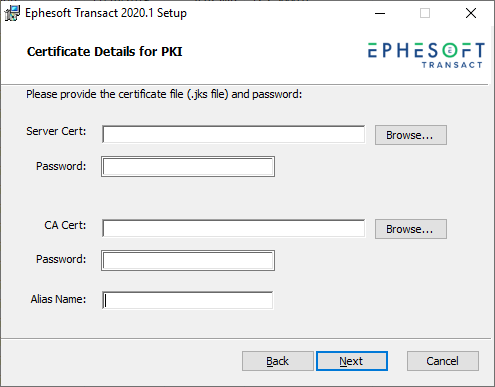
Figure 29. JKS Server Cert and CA Cert Details
- Both certificates are defined on the server for this installation.
- The Server Cert is a Java Keystore File (JKS) file for the server. Provide the JKS file and password for HTTPS configuration for the server certificate.
- The CA Cert is the certificate file for a client system. Provide the CA Cert, Password, and Alias Name for the client certificate.
- Click Next. The Realm Settings for PKI screen displays.
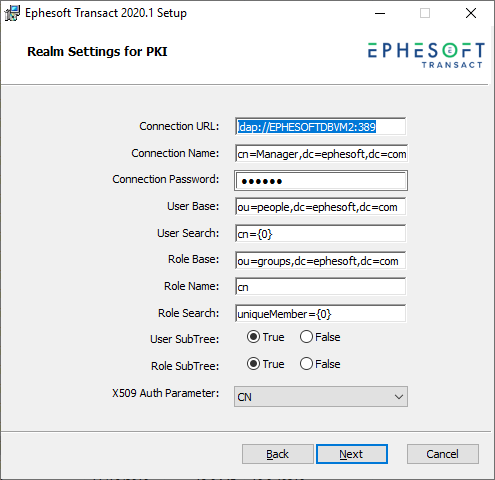
Figure 30. Realm Settings for PKI
- Enter the appropriate information in the text fields and click Next. The Connector Settings for PKI screen displays.
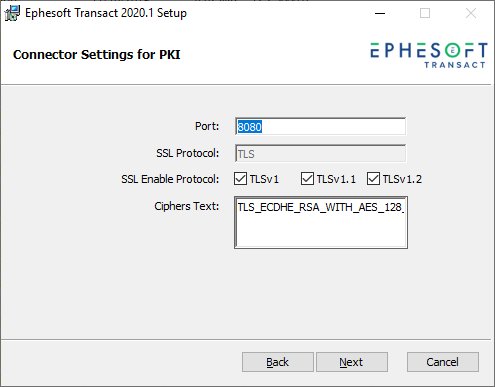
Figure 31. Connector Settings for PKI
- Enter the information in the text fields and define the corresponding settings.
- Click Next to complete this configuration for authentication. Proceed to Configure User Connectivity Settings.
Configure User Connectivity Settings
Once you have configured authentication mode and the related screens, the Install Wizard displays the User Connectivity Settings, as illustrated below:

Figure 32. User Connectivity Settings
When selecting Tomcat, click Next. The Ephesoft Registration Information screen displays.
Note: The default selection is Tomcat.
- Define the User Connectivity Settings as prompted for LDAP, Active Directory or Tomcat.
- LDAP — The following figure illustrates User Connectivity Setting for LDAP configuration. If this applies to the installation, enter the appropriate information in the text fields and click Next.
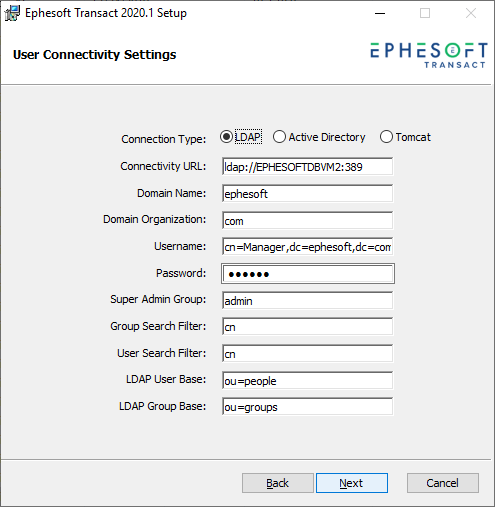
Figure 33. LDAP Configuration for User Connectivity Settings
- Active Directory — The following figure illustrates User Connectivity Settings for Active Directory configuration. If this applies to the installation, enter the appropriate information in the text fields and click Next.

Figure 34. Active Directory Configuration for User Connectivity Settings
- Tomcat — The following figure illustrates the first screen of User Connectivity Settings for Tomcat. If this applies to the installation, click Next.
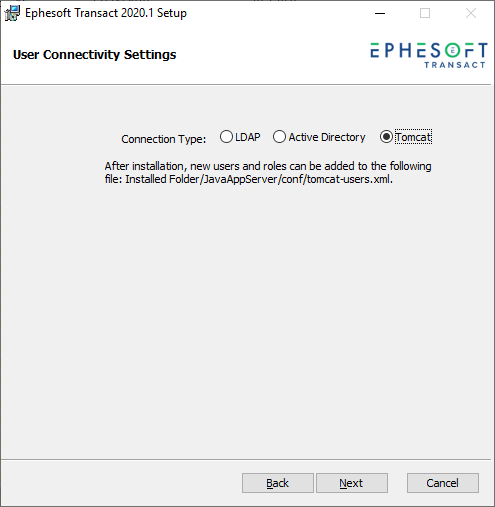
Figure 35. User Connectivity Settings for Tomcat
Enter Ephesoft Registration, SharedFolders, and Installation Information
Once you have completed the User Connectivity Settings, the Ephesoft Registration Information screen displays.
- Enter the appropriate information in the text fields and click Next.
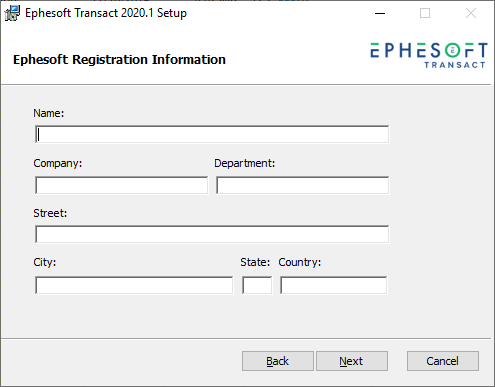
Figure 36. Ephesoft Registration Information Screen
The Shared Folder Configuration screen displays.
Important: With this screen, you define settings for the SharedFolders component, as described in the section titled Prerequisites. It is a requirement to use SharedFolders configured on a network location for multi-server installations.
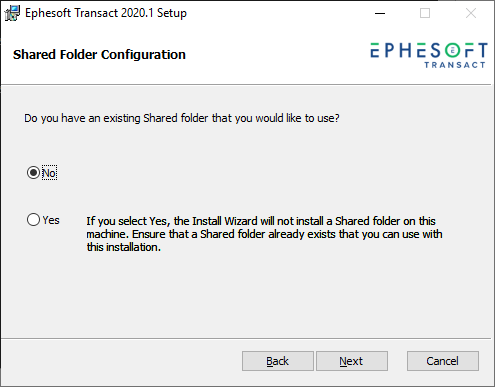
Figure 37. Shared Folder Configuration Screen
Important: All steps up to this point are done regardless of the server environment (single or multiple). The following steps vary depending on a single or multi-server installation. Carefully read the steps below before proceeding further.
- Select No if you are installing on a single-server environment, or if you are installing the first server in a multi-server environment.
- Select Yes if you are installing the second (third, fourth, etc.) server in a multi-server environment.
Note: For additional information on multi-server environments, refer to Multi-Server Installation.
- Click Next.
- The Installation Folder screen displays.
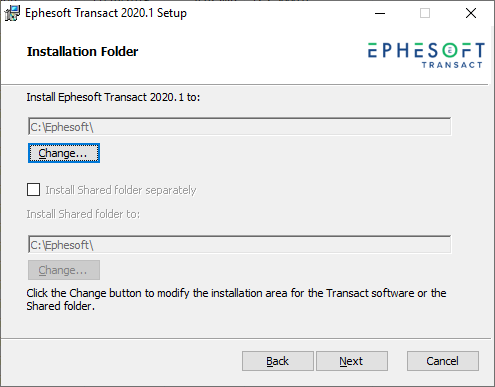
Figure 38. Installation Folder Setup Screen
- Select the checkbox labeled Install Shared folder separately and define the network location (if using SharedFolders on a network for this installation).
Important: When installing subsequent servers for multi-server deployments, the SharedFolders directory must be installed on a file share that will be accessible by all servers in the cluster. To do so, click Change to provide the network location of a previously installed shared folder.
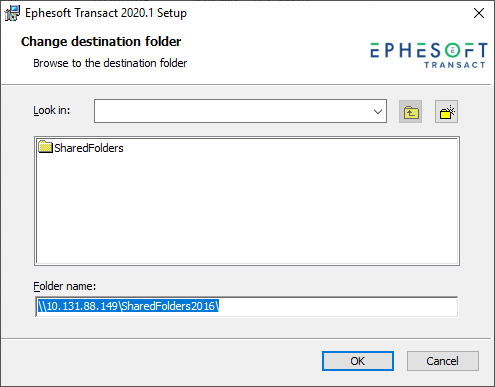
Figure 39. Change Destination Folder
- Click Next in the Installation Folder screen.
Run and Finish the Install Wizard
After you have chosen the folder location, the Ready to Install screen displays.
Note: If needed, click Back to adjust your configurations in previous screens.
- Click Install. The status bar displays.

Figure 40. Ready to Install Screen
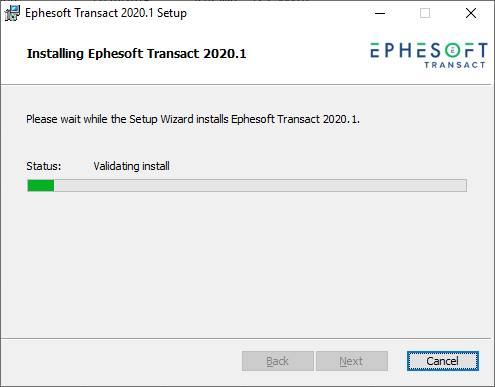
Figure 41. Status Bar of the Install Wizard Progress
Note: This may take some time.
Once the installation is completed, the Post-Installation Instructions screen displays.
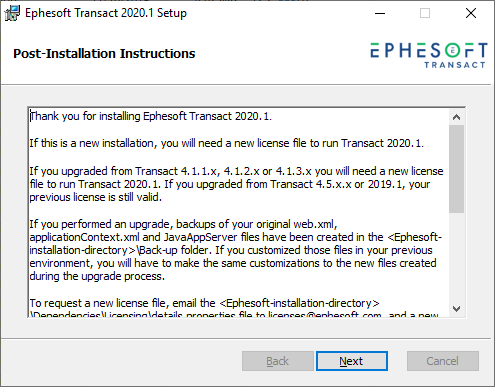
Figure 42. Post-Installation Instructions
- Read the post-installation instructions and perform the necessary tasks, then click Next. The following screen displays to confirm that the installation is complete.
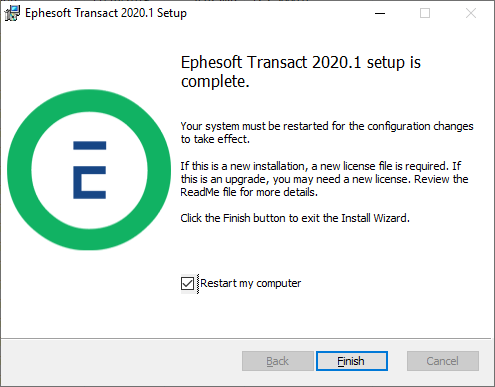
Figure 43. Ephesoft Transact 2020.1 Setup is Complete Screen
- Select Restart my computer.
Important: A restart is required for Ephesoft Transact to function properly.
- Click Finish.
- When the installation is complete, re-enable the User Access Control (UAC) on this server.
Important: This was a temporary setting required when running the Install Wizard in a previous task. This procedure reactivates the UAC after installation.
- From the Windows Start menu, select the User Access Control settings. The Windows Control Panel displays a link. Click this link to display the page.

Figure 44. Change User Account Control settings in Windows Control Panel
The User Account Control Settings screen displays.

Figure 45. User Account Control Settings
- Adjust this setting to the desired position for normal operations. Your setting may differ from the illustration shown above. The system prompts you to confirm this setting. Accept the changes.
This completes your installation. Continue to Service Pack Installation.
Silent Installation
Silent installation works by defining your installation configuration once in the config.properties file, which the installer reads to perform the installation. All configuration is completed prior to running the installation, and the installation program will not display any configuration options during the installation process.
Note: Silent installation requires the same amount of time and temporary disk space as a normal installation.
- Open the config.properties file, included in the zipped file.
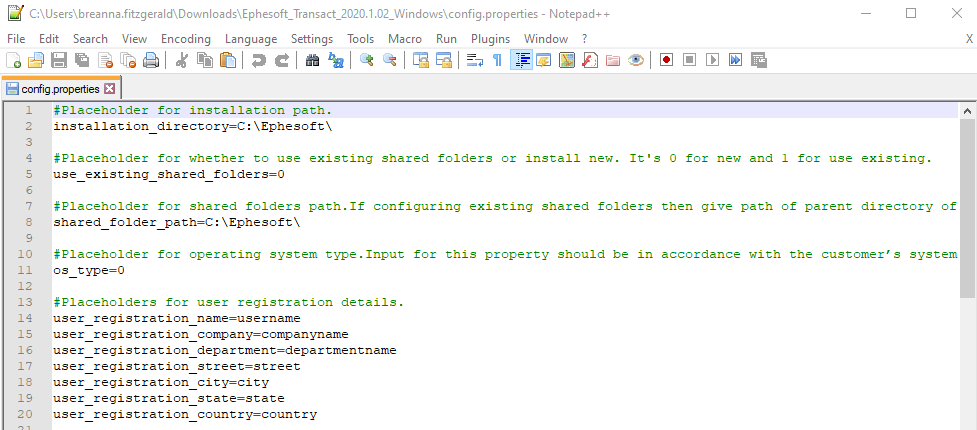
Figure 46. config.properties File
- Update the config.properties file based on your installation requirements. Comments in the property file will assist with configuration.
Note: Do not include semicolons (;) or special characters (\.[]{}()<>*+-=!?^$|) when editing the properties file.
- Run the command prompt as Administrator.
- Run the following command to initiate the Ephesoft installer:
msiexec /i “<directory path of msi>” /qb /norestart USERINPUTSPATH=<directory path of properties file>
For example,
msiexec /i “C:\Ephesoft_2020.1.msi” /qb /norestart USERINPUTSPATH=C:\config.properties
Note: A log file named installation will be created in the logs subdirectory. This is created within the directory where the properties file is placed. If an error occurs during installation, it will be logged in this file.
- Restart your computer. A restart is required for Ephesoft Transact to function properly.
- When the installation is complete, re-enable the User Access Control (UAC) on this server.
Important: This was a temporary setting required when running the Install Wizard in a previous task. This procedure reactivates the UAC after installation.
-
- From the Windows Start menu, select the User Access Control settings. The Windows Control Panel displays a link. Click this link to display the page.

Figure 47. Change User Account Control settings in Windows Control Panel
The User Account Control Settings screen displays.

Figure 48. User Account Control Settings
-
- Adjust this setting to the desired position for normal operations. Your setting may differ from the illustration shown above. The system prompts you to confirm this setting. Accept the changes.
This completes your installation. Continue to Service Pack Installation.
Service Pack Installation
Note: The following section is included as a reference, but you may skip this service pack in favor of the 2020.1.02 Feature Pack if preferred.
After the release of Ephesoft Transact 2020.1, issues were reported by customers that could affect numerous installations. In addition, there are some dependencies on Transact property file changes that are required to support the Cloud HyperExtender globally. Ephesoft has created a service pack to address these issues. This service pack must be installed immediately after completing the Install Wizard.
Perform the following steps to install the Ephesoft Transact Service Pack 2020.1.01:
Note: Steps listed as “CHE only” are mandatory for Cloud HyperExtender users.
- Stop the Ephesoft Transact service on all nodes.
- Download and extract the Windows_ServicePack_2020.1.01.zip folder to a temporary location.
- Open file explorer.
- Go to the [Ephesoft_Home]\Application\WEB-INF\lib\HOT-FIXES directory.
- If the gxt-core-0.0.15-SNAPSHOT.jar file already exists:
- Create a backup folder in the HOT-FIXES folder (step 4) named Backup_2020.1.01.
- Copy the existing .jar file to the Backup_2020.1.01 folder.
- Delete the old .jar file.
- If you did not already have the gxt-core-0.0.15-SNAPSHOT.jar file:
- Copy the new .jar file (included in the .zip file) from the temporary location to the HOT-FIXES folder (step 4).
Note: If you do not use the Cloud HyperExtender plugin, proceed to step 12.
CHE Only Steps
Note: Steps 7-11 are CHE only.
- Create a backup folder named CHE_Backup_2020.1.01 outside of the [Ephesoft_Home] directory.
- Navigate to the [Ephesoft_Home]\Application\WEB-INF\classes\META-INF\cloud-plugin\ directory and save a copy of the cloud-plugin.properties file to the new CHE_Backup_2020.1.01 folder.
- Open the cloud-plugin.properties file and replace the cloud.registration.url value with one of the following:
- For a US Transact instance, replace with “https://transact.us.ephesoftcloud.com/#/register?multiCountry=true“
- For a Frankfurt Transact instance, replace with “https://transact.de.ephesoftcloud.com/#/register?multiCountry=true“
- For a Singapore Transact instance, replace with “https://transact.sg.ephesoftcloud.com/#/register?multiCountry=true“
- Deploy the ephesoft-cloud-client application.
- Save a backup of the existing [Ephesoft_Home]\JavaAppServer\webapps\ephesoft-cloud-client directory to the CHE_Backup_2020.1.01 folder.
- Remove the existing [Ephesoft_Home]\JavaAppServer\webapps\ephesoft-cloud-client directory and its contents.
- Copy the new ephesoft-cloud-client folder from the temporary location (step 2) and save its contents to the [Ephesoft_Home]\JavaAppServer\webapps\ directory.
- Navigate to the [Ephesoft_Home]\JavaAppServer\webapps\ephesoft-cloud-client\WEB-INF\classes\ directory and open the application.properties file.
- In the application.properties file, search for the cloud.notification.transact-hybrid-url property. Replace the following variables with their respective values:
- @@HTTPORHTTPS@@ – Replace this variable with either “http” or “https” as per your server configuration.
- @@SERVER_ALIAS@@ – Replace this variable with your server hostname.
- @@PIV_OR_FORM_PORT@@ – Replace this variable with your web server port number (default is 8080).
- Deploy cloud-ui.
- Save a backup of the existing [Ephesoft_Home]\JavaAppServer\webapps\cloud-ui directory to the CHE_Backup_2020.1.01 folder.
- Remove the existing [Ephesoft_Home]\JavaAppServer\webapps\cloud-ui directory and its contents.
- Copy the new cloud-ui folder from the temporary location (step 2) to the [Ephesoft_Home]\JavaAppServer\webapps\ directory.
- Start the Ephesoft Transact server.
Note: These changes must be made on all servers (UI and Processing) in a cluster. Ephesoft recommends performing thorough testing of Ephesoft Transact after deploying the service pack.
You have successfully installed the 2020.1.01 Service Pack. If any issues occur, refer to Rollback Steps to revert the deployment. Otherwise, proceed to License and Launch Ephesoft Transact 2020.1.
Rollback Steps
If any issues occur with this service pack, follow the steps below to roll back this installation:
- Stop the Ephesoft Transact service on all nodes.
- Open file explorer.
- Go to the [Ephesoft_Home]\Application\WEB-INF\lib\HOT-FIXES directory.
- Delete the following file: gtx-core-0.0.15-SNAPSHOT.jar.
- Open the Backup_2020.1.01 folder located inside the HOT-FIXES folder.
- Copy the existing .jar file from the Backup_2020.1.01 folder to the HOT-FIXES folder.
- Delete the Backup_2020.1.01 folder.
Note: Steps 6-10 and 12 are CHE only.
- Restore the backup of the cloud-plugin.properties file from the CHE_Backup_2020.1.01 folder to its original location (step 8 above).
- Remove the existing [Ephesoft_Home]\JavaAppServer\webapps\ephesoft-cloud-client directory and its contents.
- Restore the backup of the ephesoft-cloud-client directory and its contents (step 10a above) inside [Ephesoft_Home]\JavaAppServer\webapps\.
- Remove the existing [Ephesoft_Home]\JavaAppServer\webapps\cloud-ui directory and its contents.
- Restore the backup of the cloud-ui-directory and its contents (step 11a above) inside [Ephesoft_Home]\JavaAppServer\webbapps\.
- Start the Ephesoft Transact server.
- If the Ephesoft Transact server starts successfully, delete the CHE_Backup_2020.1.01 folder.
You have successfully rolled back the 2020.1.01 Service Pack.
License and Launch Ephesoft Transact 2020.1
After starting the Ephesoft Transact service, you are ready to launch Ephesoft Transact. Follow the steps below:
Important: Ephesoft recommends restarting the service after your license is installed. For additional information about support for Microsoft SQL Server, refer to 2020.1 Platform Configuration and Third-Party Integrations.
- Follow the steps listed in Licensing Requirements.
- Open a web browser.
- Enter the following Ephesoft Transact URL: http://<server_name>:8080/dcma/home.html
Note: Allow time for the background configuration processes to complete. The initial startup may require several minutes.
- The Ephesoft Transact 2020.1 home page displays. Select Administrator or Operator to log in.
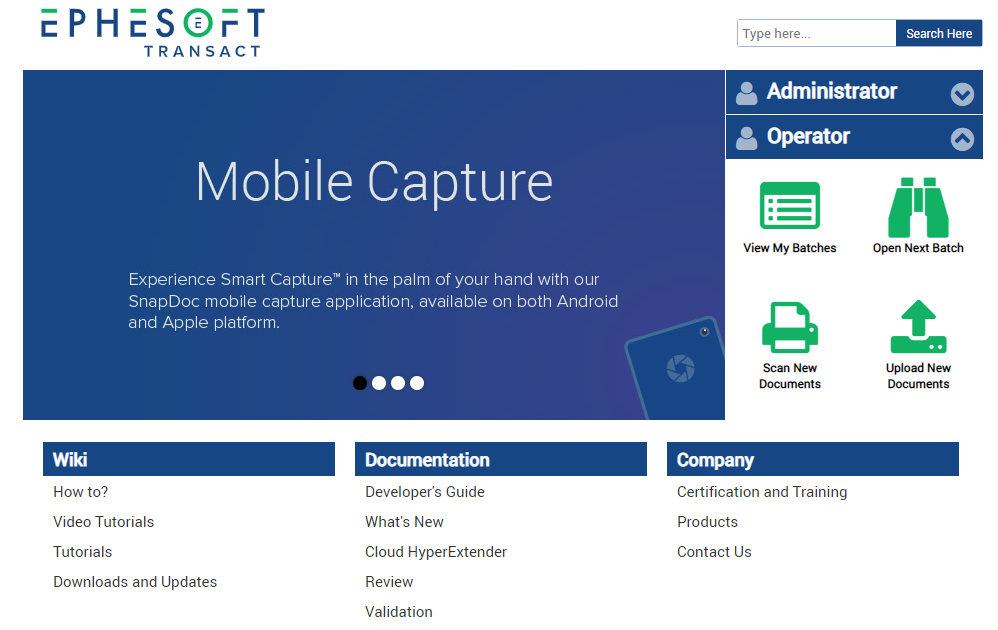
Figure 49. Ephesoft Transact Home Screen
- Enter the username and password.
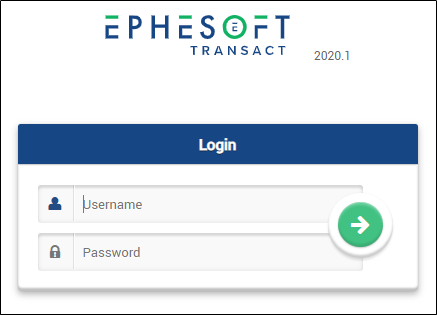
Figure 50. Login Screen
Important: The system may require additional time to complete the initial login.
Conclusion
This completes the installation process.