Introduction
This document provides information on important changes related to MariaDB and MySQL on Linux. The following changes affect Ephesoft Transact 2019.2 or above:
-
- The Ephesoft Transact installer no longer installs any database management systems (DBMS).
- Ephesoft Transact no longer supports MySQL databases.
Refer to Platform Configurations and Third-Party Integrations and reference your version of Ephesoft Transact to find more information on supported database versions.
Prerequisites
To perform the steps listed in this document, you will need super-user (root) permissions. If you are not a super-user, execute the following command to login as the root user:
sudo su root
Installing Ephesoft Transact
Follow these instructions if you are installing Ephesoft Transact 2019.2 or above for the first time.
Check for MariaDB
- Check your system for an existing instance of MariaDB before installing Ephesoft Transact, as some Linux operating systems include MariaDB.
-
- If you do not have an existing instance of MariaDB, proceed to Install MariaDB.
- If you have an existing instance of MariaDB that is supported for Ephesoft Transact 2019.2 or above, you can return to the Linux install guide for your version.
- If you have an existing instance of MariaDB that is not supported for Ephesoft Transact 2019.2 or above, you will need to uninstall your instance of MariaDB and install a supported version.
Important: This will remove all data from your database. It is recommended to take a backup of your database by running the following command:
mysqldump --all-databases --single-transaction --quick --lock-tables=false > full-backup.sql -uroot -p<password>
-
- Refer to your operating system below and run the listed command.
Ubuntu:
sudo apt-get remove MariaDB-server
CentOS or RHEL:
sudo yum remove MariaDB-server
-
- Proceed to Install MariaDB.
Upgrading Ephesoft Transact
Follow these instructions if you are upgrading to Ephesoft Transact 2019.2 or above. This section provides instructions on how to upgrade or migrate your database in the following cases:
-
- Existing MariaDB
- Existing MySQL
Existing MariaDB
If you have an existing instance of MariaDB, ensure that your instance of MariaDB is a supported version before upgrading Ephesoft Transact. Refer to Platform Configurations and Third-Party Integrations and reference your version of Ephesoft Transact for more information.
-
- If your instance of MariaDB is supported for upgrade to Ephesoft Transact 2019.2 or above, you can return to the Linux upgrade guide for your version.
- If your instance of MariaDB is not supported for upgrade to Ephesoft Transact 2019.2 or above, proceed to Upgrade MariaDB.
Existing MySQL
Follow these steps if you are currently using MySQL with Ephesoft Transact.
- Back up the ephesoft, report, and report_archive databases from the pre-existing MySQL database.
-
- Run the following command in the MariaDB installation bin folder, located in <Transact Installation Folder>/Dependencies/mariadb/bin/.
-
mysqldump -u<root username> -p<root user password> -h<server hostname> -P<database port number> <Database name> --single-transaction --routines --quick --lock-tables=false > <Folder location>.sql
Note: Text listed in angled brackets are placeholders. Replace the placeholders with the relevant information. For <Folder location> include the full folder path where the backup file will be created.
-
-
- Run the mysqldump command for the ephesoft, report, and report-archive databases. Below are sample commands for each:
-
mysqldump -uroot -p ephesoft –-single-transaction –-routines -–quick -–locktables=false > /opt/database_backup/ephesoft.sql
mysqldump -uroot -p report –-single-transaction --routines --quick –-lock-tables=false > /opt/database_backup/report.sql
mysqldump -uroot -p report --single-transaction --routines --quick-lock-tables=false > /opt/database_backup/report_archive.sql
- Stop and disable the service for the MySQL database to prevent it from running.
- Install a supported version of MariaDB. You can install MariaDB on the same server where Ephesoft Transact will be installed or choose a dedicated database server. Continue to Install MariaDB to proceed.
Install MariaDB
This section provides information on how to install MariaDB on different Linux distributions: Ubuntu, CentOS, and Red Hat Enterprise Linux (RHEL). Refer to Platform Configurations and Third-Party Integrations and reference your version of Ephesoft Transact to find more information on supported operating systems.
Follow the instructions for your specific Linux distribution, and proceed with the configuration.
RHEL or CentOS
- Run the following command to add a MariaDB yum repository to your server:
vi /etc/yum.repos.d/MariaDB.repo
- Enter the following text in the MariaDB.repo file:
Important: CentOS is not supported for Ephesoft Transact 2020.1 or above.
On RHEL 7
[MariaDB]
name = MariaDB
baseurl = http://yum.mariadb.org/10.3/rhel7-amd64
gpgkey=http://yum.mariadb.org/RPM-GPG-KEY-MariaDB
gpgcheck=1
On CentOS 7
[MariaDB]
name = MariaDB
baseurl = http://yum.mariadb.org/10.3/centos7-amd64
gpgkey=http://yum.mariadb.org/RPM-GPG-KEY-MariaDB
gpgcheck=1
- Run the following command to manually create the cache so that future yum queries will be quicker:
yum makecache fast

Figure 1: Make Cache Fast
- Once the MariaDB YUM repository has been added, you can install MariaDB with the following command:
yum install MariaDB-server MariaDB-client
- Run the following commands to start the MariaDB service and enable it to start automatically in the future:
systemctl start mariadb
systemctl enable mariadb

Figure 2: Start MariaDB Service
- Secure MariaDB by running the following command.
mysql_secure_installation

Figure 3: Secure Installation
This will prompt you to set the root password, disable remote root login, remove the test database and anonymous users, and reload privileges.
- Use the table below to respond to the prompts as they are displayed.
| Prompt | Description | Response |
| Set root password? [y/n] | Setting the root password ensures that nobody can log into the MariaDB root user without the proper authorization.
Important: This password will be used to configure your MariaDB connection when installing or upgrading Ephesoft Transact. |
y |
| Remove anonymous users? [y/n] | By default, a MariaDB installation has an anonymous user, allowing anyone to log into MariaDB without needing a user account created for them. This is intended only for testing, and to make the installation smoother.
You should remove them before moving into a production environment. |
y |
| Disallow root login remotely? [y/n] | Normally, root should only be allowed to connect from ‘localhost’. This ensures that someone cannot guess at the root password from the network. | y |
| Remove test database and access to it? [y/n] | By default, MariaDB comes with a database named ‘test’ that anyone can access. This is also intended only for testing, and should be removed before moving into a production environment. | y |
| Reload privilege tables now? [y/n] | Reloading the privilege tables will ensure that all changes made so far will take effect immediately. | y |
- Verify that a supported version of MariaDB was installed with one of the following:
- Run the following command:
mysql -v
This will return the server version as a response.

Figure 4: Verify Version
-
- Login to the MariaDB command shell by running following command and entering the root password:
mysql -u root -p
This will login as the root user and return the server version as a response.
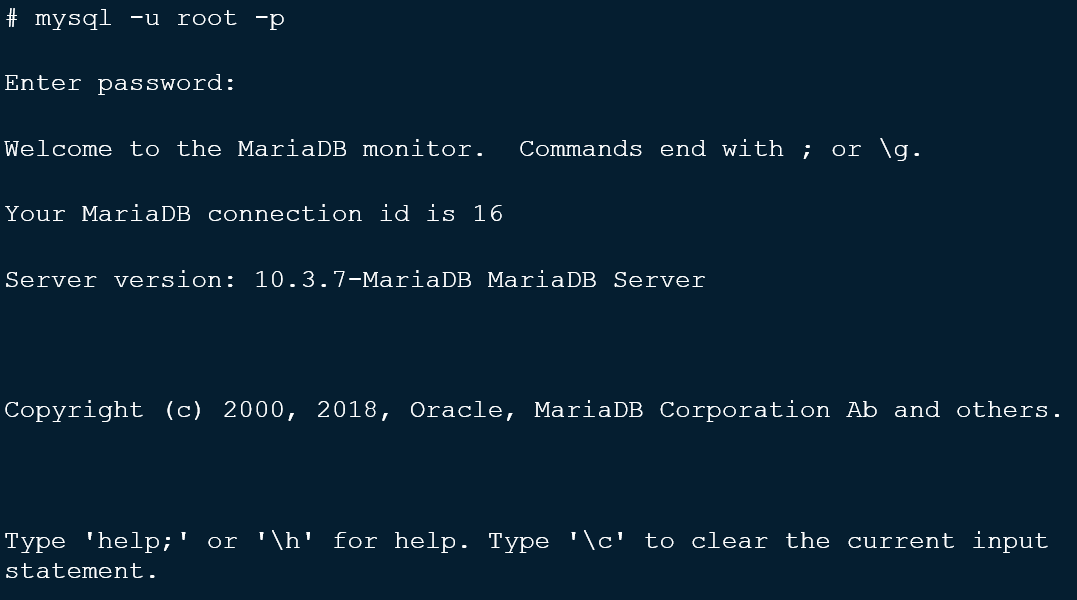
Figure 5: Root Login
- If you are performing a fresh installation of Ephesoft Transact, you have completed the MariaDB installation. Return to the install guide for your version. Otherwise, proceed to Create a New Database to migrate an existing MariaDB environment.
Ubuntu
Note: Ubuntu is not supported for Ephesoft Transact 2020.1 or above. You must have the software-properties-common library installed prior to installing MariaDB on Ubuntu. If the library is not installed, run the following command:
sudo apt-get install software-properties-common.
- Run the following command to install GNU Privacy Guard (GPG) to Ubuntu:
sudo apt install gnupg.
- Run the following command to add the MariaDB GPG key:
sudo apt-key adv --recv-keys --keyserver hkp://keyserver.ubuntu.com:800xF1656F24C74CD1D8
- Run the following command to add an APT repository to your server:
sudo add-apt-repository ‘deb [arch=amd64,arm64,i386,ppc64el] http://sfo1.mirrors.digitalocean.com/mariadb/repo/10.3/ubuntu/ xenial main’
- Run the following commands to install a supported version of MariaDB:
sudo apt-get update
sudo apt-get install mariadb-server mariadb-client
- When prompted, create a MariaDB root password. Keep the password in a safe location for future use.
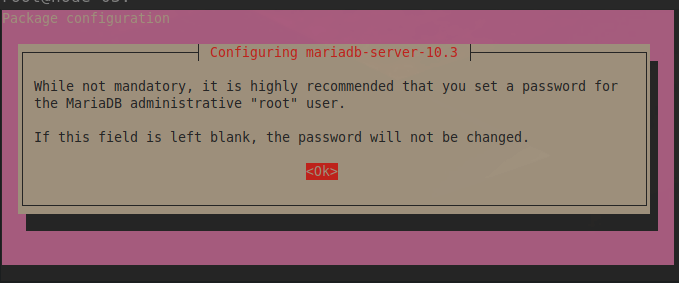
Figure 6: Create Password
- Re-enter the password and select <Ok> to confirm.
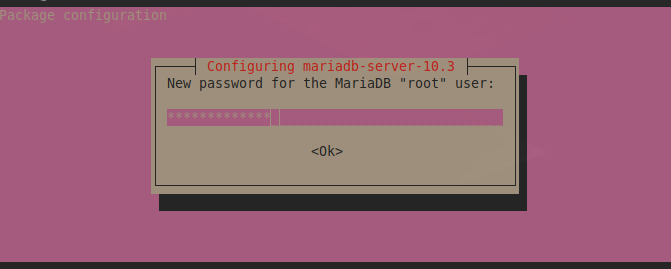
Figure 7: Confirm Password
- Verify that a supported version of MariaDB was installed with one of the following:
- Run the following command:
select version();
This will return the server version as a response.
-
- Login to the MariaDB command shell by running following command and entering the root password:
mysql -u root -p.
This will login as the root user and return the server version as a response.
- If you are performing a fresh installation of Ephesoft Transact, you have completed the MariaDB installation. Return to the install guide for your version. Otherwise, proceed to Create a New Database to migrate an existing MariaDB environment..
Create a New Database
Note: Follow the steps in this section if you are migrating an existing MariaDB or MySQL environment into your new MariaDB environment.
Once you have installed MariaDB, you will need to create the following three databases for Ephesoft Transact: ephesoft, report, and report_archive.
- Run the following commands on any MariaDB client tool, replacing the <username> with your username:
CREATE DATABASE IF NOT EXISTS ephesoft ;
CREATE DATABASE IF NOT EXISTS report ;
CREATE DATABASE IF NOT EXISTS report_archive ;
GRANT ALL PRIVILEGES ON ephesoft.* TO '<username>'@'%';
GRANT ALL PRIVILEGES ON report.* TO '<username>'@'%';
GRANT ALL PRIVILEGES ON report_archive.* TO '<username>'@'%';
GRANT ALL PRIVILEGES ON ephesoft.* TO '<username>'@'localhost';
GRANT ALL PRIVILEGES ON report.* TO '<username>'@'localhost';
GRANT ALL PRIVILEGES ON report_archive.* TO '<username>'@'localhost';
FLUSH PRIVILEGES;
Note: When the IF NOT EXISTS clause is used, MariaDB will return a warning instead of an error if the specified database already exists.
- Update the database details in all three resource tags in the <Ephesoft Installation Folder>\JavaAppServer\conf\server.xml file. Refer to the image below for an example:
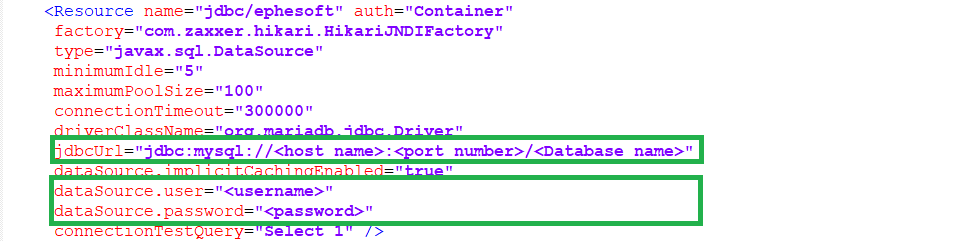
Figure 8: Update Resource Tags
- You have successfully installed MariaDB. Continue to Restore MySQL Backup if you previously performed a backup of your MySQL database. Otherwise, return to the Linux guide for your version of Ephesoft Transact to complete your installation or upgrade.
Restore MySQL Backup
Perform these steps if you are migrating your database from MySQL. This section outlines how to restore your ephesoft, report, and report_archive databases that you backed up in the section titled Pre-existing MySQL.
Important: Ensure that the original MySQL database is stopped and disabled, and the new MariaDB database is running.
- Use the following command to restore each database, replacing the placeholders in the angled brackets (< >) with the relevant details:
mysql -u<root username> -p<root user password> -P<database server port> <Database name> < <Folder location>\database_backup.sql
Below is a sample to restore each database:
mysql -uroot -ppassword -P3306 ephesoft < ephesoft.sql\database_backup.sql
mysql -uroot -ppassword -P3306 report < report.sql\database_backup.sql
mysql -uroot -ppassword -P3306 report_archive < report_archive.sql\database_backup.sql
- You have successfully restored the ephesoft, report, and report_archive databases in MariaDB. Return to the Linux guide for your version of Ephesoft Transact to complete your upgrade.
Upgrade MariaDB
This section provides instructions on how to upgrade your current MariaDB instance to a supported version. Refer to Platform Configurations and Third-Party Integrations and reference your version of Ephesoft Transact to find more information on supported database versions.
Note: Ephesoft Transact 2020.1 currently supports MariaDB 10.3.x (10.3.18 tested).
- Download a supported version of MariaDB from the MariaDB Foundation.
- Run the following commands to stop the ephesoft and mysql services:
service ephesoft stop
service mysql stop
- Rename the existing MariaDB folder:
mv /opt/mariadb /opt/mariadb-backup
- Move the .tar file to the /opt folder:
mv mariadb-xx.x.xx-linux-x86_64.tar.gz /opt/
Note: xx.x.xx has been added as a placeholder. Replace with your current version of MariaDB.
- Extract the .tar file:
tar -xvzf mariadb-xx.x.xx-linux-x86_64.tar.gz
Note: xx.x.xx has been added as a placeholder. Replace with your current version of MariaDB.
- Rename the mariadb-xx.x.xx-linux-x86_64 folder to mariadb:
mv mariadb-xx.x.xx-linux-86_64 mariadb
Note: xx.x.xx has been added as a placeholder. Replace with your current version of MariaDB
- Rename the my.cnf file to my.cnf.backup:
mv /etc/my.cnf /etc/my.cnf.backup
- Remove the mysql service:
rm -rf /etc/init.d/mysqld
- Open the mariadb folder:
cd /opt/mariadb
- Run the mysql_install_db script:
./scripts/mysql_install_db --basedir=/opt/mariadb --datadir=/opt/mariadb/data
- Restore the my.cnf file:
cp /opt/mariadb-backup/support-files/my.cnf /etc/
- Restore the service:
cp /opt/mariadb-backup/support-files/mysqld /etc/init.d/
- Remove the old links:
rm -rf /usr/bin/mysql
rm -rf /usr/bin/mysqldump
rm -rf /usr/bin/mysqladmin
- Create new links:
ln -s /opt/mariadb/bin/mysql /usr/bin/mysql
ln -s /opt/mariadb/bin/mysqldump /usr/bin/mysqldump
ln -s /opt/mariadb/bin/mysqladmin /usr/bin/mysqladmin
- Run the following command to add MariaDB to the list of services that will start after system reboot. This command differs based on your Linux distribution:
Ubuntu:
update-rc.d mysqld defaults
CentOS or RHEL:
chkconfig --add mysqld
- Restore the data backups:
mv /opt/mariadb/data /opt/mariadb/data-backup
cp -r /opt/mariadb-backup/data /opt/mariadb/
rm -rf /var/lock/subsys/mysql
- Allow permissions within the my.cnf file:
chmod -R 0777 /etc/my.cnf
- Open the my.cnf file and insert the following comments:
#innodb_large_prefix=on
#innodb_file_format=barracuda
#innodb_file_per_table=true
- Adjust the permissions within the my.cnf file:
chmod -R 0755 /etc/my.cnf
- Start the database service:
service mysqld start
- Run the upgrade:
./bin/mysql_upgrade -uroot –p<password>
The upgrade process is complete. Return to the Linux guide for your version of Ephesoft Transact to complete your installation or upgrade.
Conclusion
You have successfully configured MariaDB for Ephesoft Transact.