Introduction
Applies to: Transact version 2022.1.00 or newer. (Windows/Linux). Microsoft Azure Computer Vision support applies to Transact versions 2022.1.01 or newer.
This document describes how to install and configure the Cloud OCR (ADVANCED_HOCR) plugin in Ephesoft Transact.
With the Cloud OCR plugin, Transact will extract OCR content from document images to create HOCR files for use with downstream plugins. More specifically, this plugin enables Transact to connect to and use external OCR engines to extract the OCR content. These external OCR engines are Google Cloud Vision and Microsoft Azure Computer Vision,
With Google Cloud Vision, the Cloud OCR plugin can be configured as a cloud-based solution. With Azure Computer Vision, the Cloud OCR plugin can be configured for an on-premise or cloud-based solution.
Licensing
The Cloud OCR plugin is included with the standard Transact license. Additionally, to use this plugin you will need a service account with either Google for Google Cloud Vision or Microsoft for Azure Computer Vision. Google Cloud Vision and Microsoft Azure Computer Vision is a separate charge from Transact. Google Cloud Vision may be requested at no cost for Transact Cloud customers. See Prerequisites for more information.
Prerequisites
To configure and use the Cloud OCR plugin, the following must be in place:
- A licensed version of Ephesoft Transact 2022.1.00 or above. To use Azure Computer Vision, you must have a licensed version of Ephesoft Transact 2022.1.01 or above.
- Before installing or upgrading the Cloud OCR plugin, Transact must have been successfully installed and started.
- A MariaDB, MS SQL Server, or Oracle relational database management system (RDBMS) with administrative credentials having GRANTS to create a database and a user.
- Depending on whether you are using Google Cloud Vision or Azure Computer Vision, you need the following:
- A license from Google for Google Cloud Vision, or Microsoft for Azure Computer Vision.
- For Google Cloud Vision, a service endpoint and API key is required to configure the ADVANCED_HOCR plugin. To set up a Google Cloud Vision instance, see Quickstart: Setup the Vision API.
- For Azure Computer Vision, check with your Microsoft Cloud Solution Provider (CSP) or System Integrator (SI), to integrate Azure solutions with your environment.
- See Platform Configurations and Third-Party Integrations for supported operating systems and databases.
Functional Limitations
Functional limitations of the Cloud OCR plugin are listed below:
- For Transact 2022.1.00, Google Cloud Vision (GCV) is the only supported OCR engine. For Transact 2022.1.01, support was added for Azure Computer Vision.
- Per Google Cloud Vision, image files uploaded for processing have these limits:
- 20 MB per file
- 75M pixels (length x width) image size
For Azure, images must meet the requirements of Computer Vision 3.2:
- The file size of the image must be less than 50 MB (4 MB for free tier).
- The dimensions of the image must be greater than 50 x 50 pixels and less than 10,000 x 10,000 pixels.
Note: File uploads to Transact are not restricted according to the limitations of the OCR providers. These restrictions occur after pages are rasterized to PNG and submitted to the OCR provider for processing. If the rasterized image is greater than the limitations of the OCR provider, the OCR provider will fail to process the file.
- Handwritten dates may not extract well due to limitations of the OCR engine.
- The E13B font often used in checks may not extract well due to limitations of the OCR engine.
- Only the following web services are supported:
- uploadBatch
- advancedUploadBatch
- copyBatchClass
- exportBatchClass
- importBatchClass
- The following services and features are not supported:
- EText extraction
- Batch class encryption
- Vertical text extraction
- Autorotation and de-skewing
Note: Web services that directly communicate with the OCR process (OcrClassify, OcrClassifyExtract, v2/ocrClassifyExtract, and v2/ocrClassifyExtractBase64, etc.) cannot interact with a batch class that has been configured to use ADVANCED_HOCR. For additional information about Ephesoft Transact web services, refer to Web Services Explorer.
- Limitations of the underlying OCR engine can produce unexpected results:
- HOCR coordinate precision for words may be inaccurate.
- Certain input images can produce empty HOCR results.
For additional OCR limitations with Azure Computer Vision, see the Microsoft website.
Cloud OCR Components
The Cloud OCR plugin installer will install a plugin called the ADVANCED_HOCR plugin as well as a separate Cloud OCR Web App.
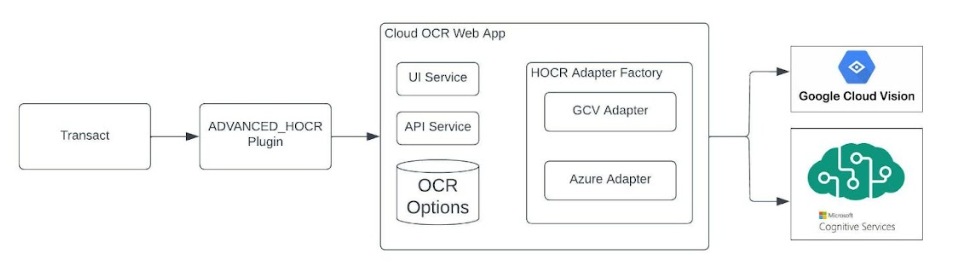
Figure 1. Cloud OCR Plugin Architecture within Transact
For an on-premise configuration with Azure Computer Vision, the Cloud OCR plugin has an Azure Cognitive Read adapter that creates the HOCR XML file used in downstream workflow processes.
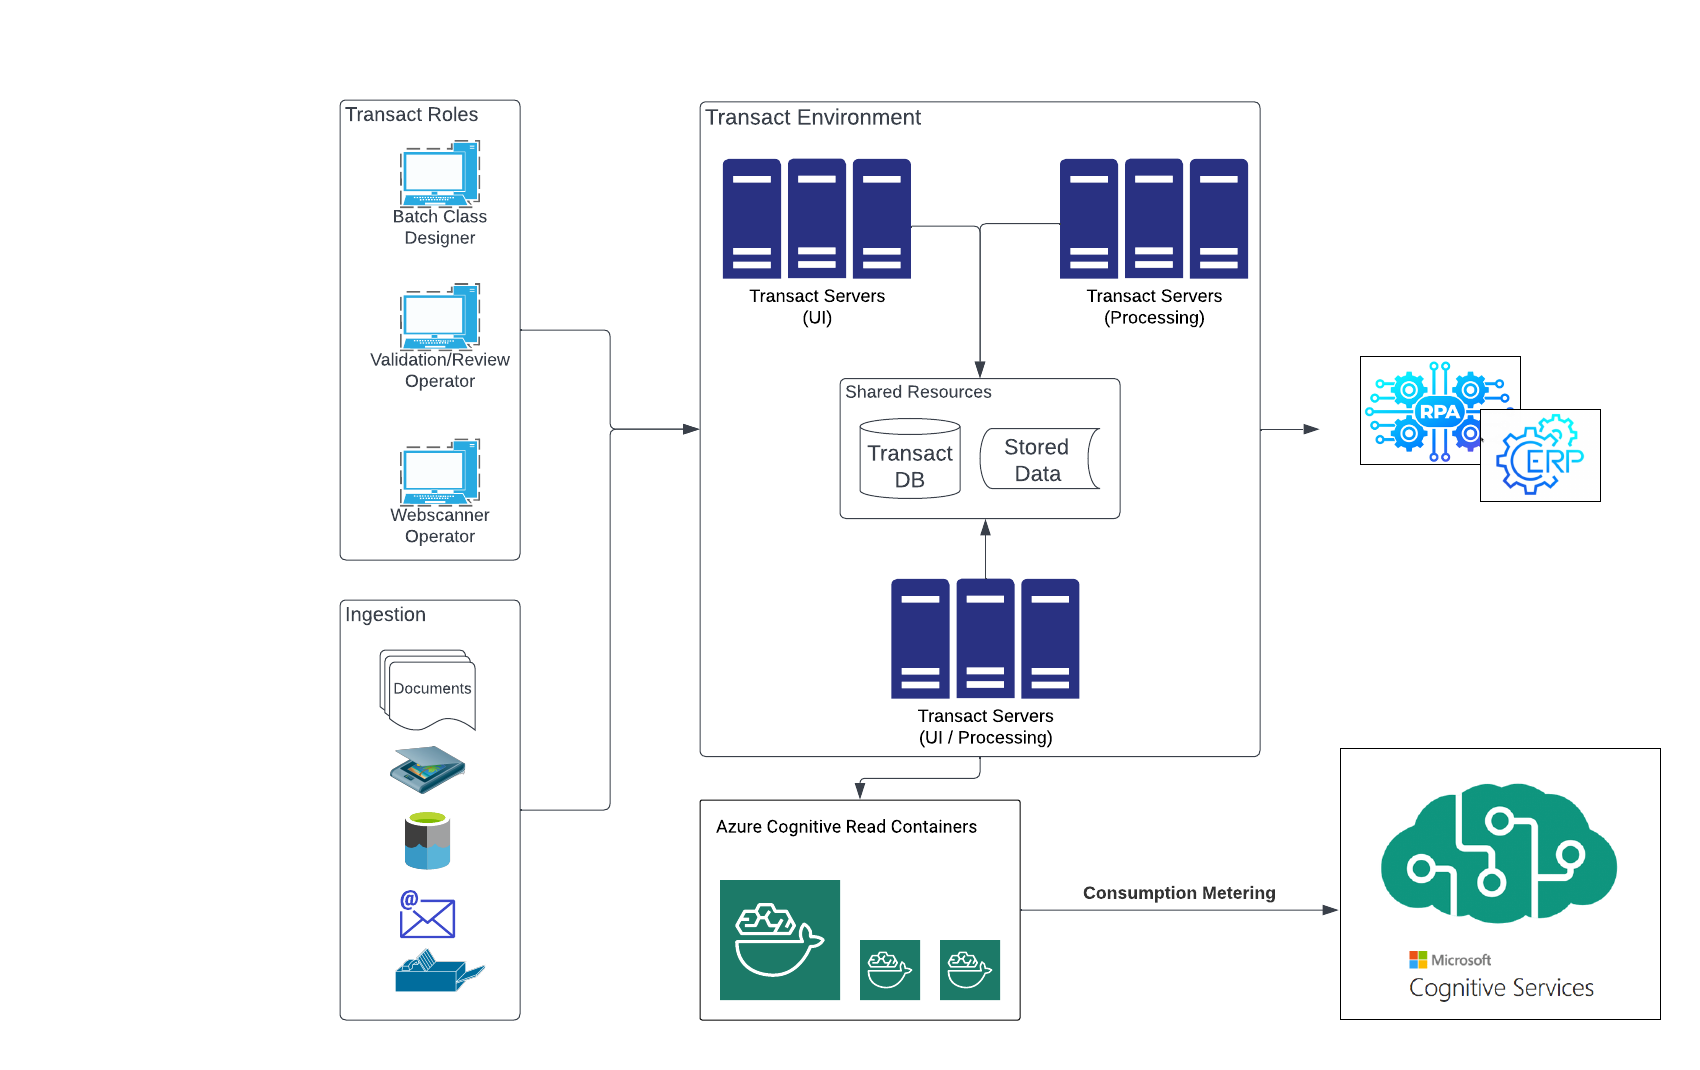
Figure 2. Transact Environment Architecture with On-Premise Azure Computer Vision
This plugin operates with an accompanying web app, so it operates differently from other Transact plugins. The differences are as follows:
- Since the installer package includes the ADVANCED_HOCR plugin, there is no need to import the plugin via the Transact UI.
- When the Transact service starts, it also starts the Cloud OCR Web App.
- The ADVANCED_HOCR plugin UI depends on two API services located at:
- /dcma/tcp-ocr-ui (default)
- /dcma/advancedHocr (default)
- The API requires a database to store plugin and web app configuration information. This can be the same database as Transact, or it can be a separate database.
- The plugin uses the PNG files generated by the CREATE_OCR_INPUT plugin. (Linux also requires the CREATE_DISPLAY_IMAGE plugin.)
Language Support
The Cloud OCR Plugin has options that provide language hinting for all Ephesoft-supported languages. The AUTO option will return all languages that the OCR service provider supports that may go beyond Ephesoft-certified languages. For more information on language support by these OCR service providers, see Google Cloud Vision or Azure Computer Vision.
Because Auto can hint towards all supported languages, you may want to select specific languages to improve recognition. You can select the language that hinting should favor when configuring the plugin.
Note: OCR accuracy depends on the quality of the supplied images.
Install the Cloud OCR Plugin and Web App
To install the Cloud OCR Plugin:
- Download the Cloud OCR plugin installer package (AdvancedHOCR_<release_number>.zip) from the Customer Support Portal.
- Follow the steps below according to your setup (Windows or Linux). See Installer Parameters when needed.
- For multi-node Transact environments, the Cloud OCR plugin installer must be run on each Transact node.
Windows Installation
- Download the Cloud OCR plugin installer package (AdvancedHOCR_<release_number>.zip) from the Customer Support Portal.
- Copy the zip file to a temporary folder on your Transact server and unzip it.
- Open the windows-args.txt file and modify the parameter values according to your environment (see Installer Parameters). (Sample)
- Stop the Transact server.
- Open a command prompt as an Administrator.
- Navigate to the directory where the installer is unzipped.
- In the command line, run install.cmd.
Note: Upon installation, the installer will update the workflow.deploy property in the dcma-workflows.properties file to true.
- Restart the Transact service.
- Proceed to Set Up the Cloud OCR Plugin.
Linux Installation
- Download the installer ZIP file from the Customer Support Portal.
- Copy the zip file to a temporary folder on your Transact server and unzip it.
- Open the linux-args.txt file and modify the parameter values according to your environment (see Installer Parameters).
- Stop the Transact server.
- Open a command prompt as an Administrator.
- Navigate to the directory where the installer is unzipped.
- In the command line, run bash install.sh.
Note: Upon installation, the installer will update the workflow.deploy property in the dcma-workflows.properties file to true.
- Restart the Transact service.
- Proceed to Set Up the Cloud OCR Plugin.
Installer Parameters
| Parameter Name | Description | Required |
ephesoftHome |
The home directory where Transact is installed. | Yes |
ahocrDatabaseHost |
The database host for the Cloud OCR plugin database. | Yes |
ahocrDatabasePort |
The database host’s port number for the Cloud OCR plugin database.
The default database values are:
|
Yes |
ahocrDatabaseName |
The database name of the Cloud OCR plugin database. This can be the same as Transact’s database. | Yes |
ahocrDatabaseType |
Database engine type for the Cloud OCR plugin database.
The options are:
Note: For MSSQL Server, only SQL Server authentication is supported. |
Yes |
ahocrDatabaseOracleSIDorServiceNameOption* |
API Database SID/Service Name Option (such as SID). For Oracle databases only.
The options are:
|
Yes (for Oracle) |
ahocrDatabaseOracleSIDorServiceNameValue* |
API Database SID/Service Name Value (such as ORCL and xe). For Oracle databases only. | Yes (for Oracle) |
ahocrDatabaseRootUsername |
Specify the database user credentials that will be used by the Cloud OCR installer. The user must have permission to create a database service account user, databases, and stored procedures. | Yes |
ahocrDatabaseRootPassword |
Password for ahocrDatabaseRootUsername. | Yes |
ahocrDatabaseRuntimeUsername |
The database user credentials that will be used as the service account to connect the Cloud OCR web app and the databases at runtime. | Yes |
ahocrDatabaseRuntimePassword |
Password for ahocrDatabaseRuntimePassword. Note: The dollar sign ($) character is not supported as a password character. | Yes |
pluginDatabaseHost |
The database host for the Transact database. | Yes |
pluginDatabasePort |
The database host’s port number for the Transact database. | Yes |
pluginDatabaseName |
The database name of the Transact database. This is required for installing the plugin values into the plugin* tables in Transact. | Yes |
pluginDatabaseType |
Database engine type for the Transact database.
The options are:
|
Yes |
pluginDatabaseOracleSIDorServiceNameOption* |
Transact Database SID/Service Name Option (such as SID). For Oracle databases only.
The options are:
|
Yes (for Oracle) |
pluginDatabaseOracleSIDorServiceNameValue* |
Transact Database SID/Service Name Value (such as ORCL and xe). For Oracle databases only. | Yes (for Oracle) |
pluginDatabaseRootUsername |
User with access to insert into the plugin* tables in the Transact database. | Yes |
pluginDatabaseRootPassword |
Password for pluginDatabaseRootUsername. | |
apiBaseUrlOverride |
Reserved for Ephesoft use only; do not change the value.
The default value is taken from the property batch.base_http_url from the dcma-batch.properties file. |
No |
installMode |
Reserved for Ephesoft use only; do not change the value. The default value is full. | No |
* For Transact version 2022.1.01 and newer.
Note on Oracle:
Oracle databases are supported when used with the Advanced HOCR plugin version 1.0.20 or later.
Set Up the Cloud OCR Plugin
This section provides information on how to configure the ADVANCED_HOCR plugin. This plugin only needs to be configured once per batch class.
Step 1: Add the ADVANCED_HOCR Plugin to the Workflow
- From the Batch Class Management screen, select your batch class and click Open.
- In the left menu, open Modules.
- On the Page Process and Folder Import plugin configuration screens, remove all the following plugins (if present):
- RECOSTAR_HOCR
- NUANCE_HOCR
- TESSERACT_HOCR
- In the Page Process module, do the following:
- Add the ADVANCED_HOCR plugin.
- Use the Up Arrow and Down Arrow buttons between the Associated Plugins and Deleted Plugins fields to move the ADVANCED_HOCR plugin below plugins that must be run first.
- On Windows, ADVANCED_HOCR must be moved below CREATE_OCR_INPUT.
- On Linux, ADVANCED_HOCR must be moved below CREATE_OCR_INPUT and CREATE_DISPLAY_IMAGE.
- Click Deploy.
Step 2: Enable the ADVANCED_HOCR Plugin
- Select Modules > Page Process > ADVANCED_HOCR. The Plugin Configuration screen appears.
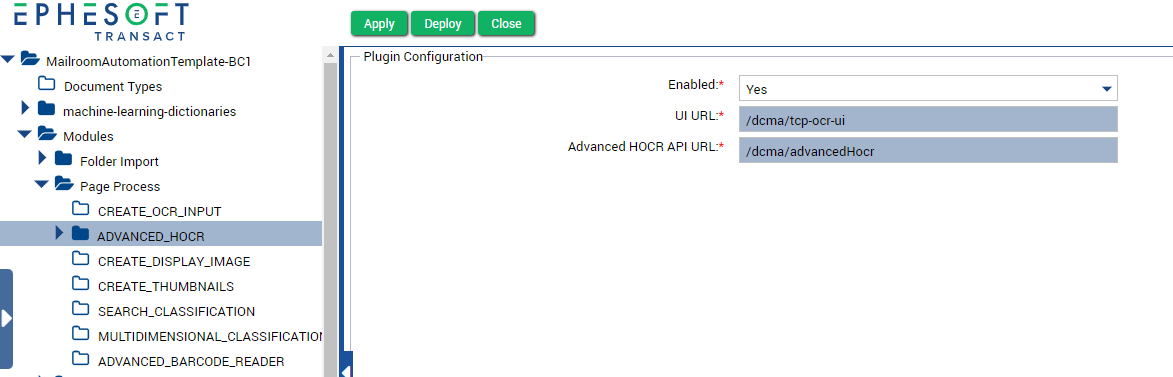
Figure 2. ADVANCED_HOCR Plugin Configuration Screen
- In the Enabled field, select Yes.
- The UI URL and Advanced HOCR API URL fields are read-only and display the values based on the installation.
Step 3: Configure the ADVANCED_HOCR Plugin
- Select Modules > Page Process > ADVANCED_HOCR > Configure. The Advanced HOCR Generation Engine screen appears.
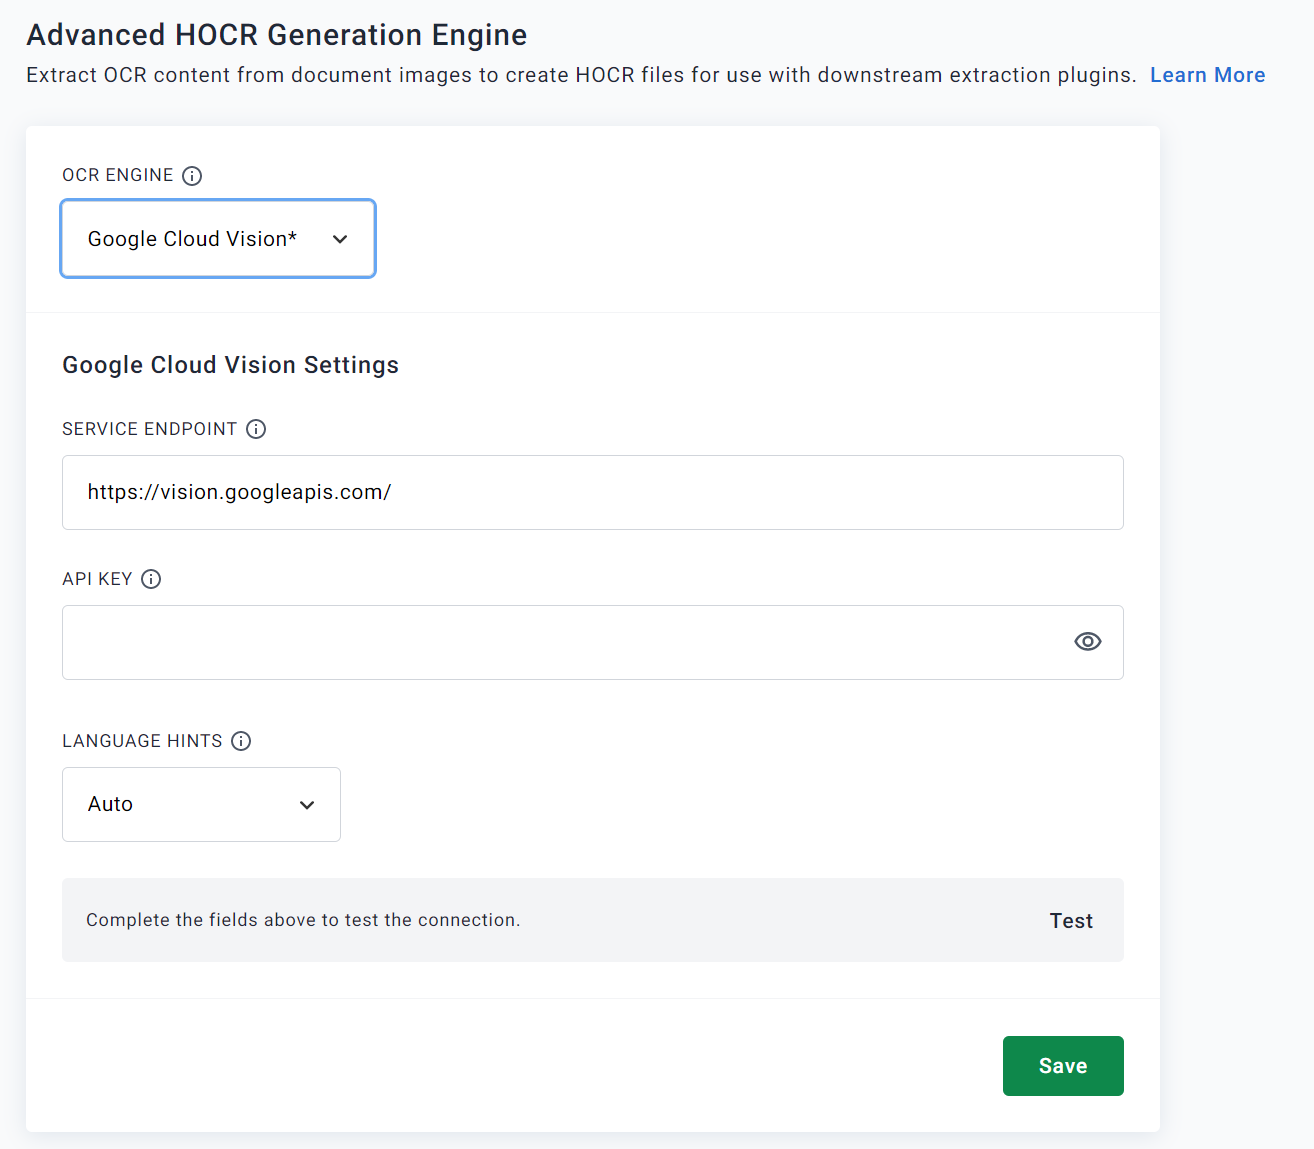
Figure 3. Advanced HOCR Generation Engine Screen for Google Cloud Vision

Figure 4. Advanced HOCR Generation Engine Screen for Azure Computer Vision
- Complete the fields as follows:
| Configurable Property | Options | Description |
| OCR ENGINE | Google Cloud Vision
Azure Computer Vision* |
Select the OCR provider you will use. |
| SERVICE ENDPOINT | N/A | Depending on your configuration, enter the following:
|
| API KEY | N/A | This field is required if you are using a cloud configuration of Azure Cloud Vision or Google Cloud Vision. The API Key enables Transact to connect to your licensed instance so it can send documents for OCR content extraction. Enter the API Key provided by the vendor. If you need to generate an API key, see the instructions provided by Google or Microsoft.
Leave this field blank for a Microsoft Azure Computer Vision on-premise configuration. Note: After you have entered an API Key and leave the Configure screen, you will not be able to see the API Key the next time you return to the Configure screen. |
| LANGUAGE HINTS |
|
Select Auto to auto-detect the languages in the documents. If you want to limit hints to specific languages, select them from the menu. See Language Support for more information. |
* Available in Transact version 2022.1.01 and newer.
- To verify the connection to the external OCR engine, click Test. See Troubleshooting if you are having problems with the connection.
- Click Save.
Your batch class is now ready to process documents using the Cloud OCR plugin.
Define Extraction Rules for Handwritten Content
The Cloud OCR plugin will generate whole-page HOCR content for cursive, handprint, and machine print automatically for any extraction methods to use. Because of this, select the standard machine print options when configuring extraction rules.
Process a Batch Instance with Cloud OCR Plugin
- From the Batch Class Management screen, click Upload Batch in the left fly-out menu. Alternatively, import your documents using a different method.
- Upload your documents.
- Select the batch class and click Start Batch.
Note: Batch classes configured to use the ADVANCED_HOCR plugin will follow the standard Transact workflow. To complete batch OCR processing, the plugin will automatically communicate with the selected external OCR engine, with no additional action required by the operator.
Import and Export a Batch Class
When importing or exporting a batch class between environments with the Cloud OCR plugin, the target system that will be importing the batch class requires the Cloud OCR plugin and the accompanying web app to be installed as a prerequisite.
Troubleshooting
The following table contains error messages that the administrator may receive if there is an issue with OCR operations.
Note on errors:
- Errors with Cloud OCR installation will appear in these folders:
- <Installer Execution Path>\logs\advanced-hocr-installer.log
- Errors with the Cloud OCR plugin will show up in the logs. The Cloud OCR plugin log files can be found at:
- Windows:
- <Ephesoft Installation Path>\JavaAppServer\webapps\dcma#advancedHocr\logs\advanced-hocr-api.log
- <Ephesoft Installation Path>\Application\dcma-all.log
- Linux:
- <Ephesoft Installation Path>/JavaAppServer/webapps/dcma#advancedHocr/logs/advanced-hocr-api.log
- <Ephesoft Installation Path>/Application/dcma-all.log
- Windows:
- Errors during batch processing will show up on the Batch Instance Management screen in the Batch Execution Details panel.
-
Workflow deploy may fail if the ADVANCED_HOCR plugin is not configured as a dependency for the plugins it is meant to replace (such as NUANCE_HOCR or RECOSTAR_HOCR). Add ADVANCED_HOCR as a dependency in Workflow Management.
Error Messages
| Error Message | Possible Root Cause | Resolution |
| 404 Error on ADVANCED_HOCR Plugin Configurations page | UI is not running at the expected location. | On the Advanced HOCR Generation Engine plugin page, confirm that the UI is running and accessible at the URL specified for “UI URL.” View Transact logs for any related Tomcat failures. |
| Test Connection Failure: 403 | Authorization token has expired. | The token expires after 30 minutes (regardless of session being active or inactive). Refresh the page to resolve. |
| Test Connection Failure: 400 API Key Invalid | The API Key is incorrect. | Verify the key is valid for the OCR provider. |
| Test Connection Failure: 500 Service Endpoint is missing or invalid | The Service Endpoint URL is incorrect. | Set the Service Endpoint URL to the default for the cloud OCR provider. Or, if you are using an on-premise solution, verify the URL is accessible external to Transact. |
| Save Failed: 403 | Authorization token has expired. | The token expires after 30 minutes (regardless of the session being active or inactive). Refresh the page to resolve. |
| Save Failed: 500 | An internal API server error occurred.
Or The API failed to process the file submitted. |
Inspect the rasterized files created during Folder Import to ensure each page is within the OCR provider’s input limitations. If not, you may need to adjust the Folder Import settings. |
| Save/Test Failed: 0 | API was unreachable.
Or Plugin setting for API URL is incorrectly configured. |
|
| 400 BAD_REQUEST Status code 429 | Requests to the Read Operation under Computer Vision API (v3.2) exceeded the rate limit of your current ComputerVision S1 pricing tier. | Contact Microsoft about increasing your transactions per second limit. |
| Status code 400: The input image is too large. | When using Azure Computer Vision, images exceeded the API file size limitation. | Adjust image conversion settings for CREATE_OCR_INPUT to reduce the image file size. |
API URL (2022.1.00 only)
If you’ve made changes to the port or DNS name for Transact, or you’ve exported the batch class from a different environment (i.e. dev, QA, prod), update the API URL for the API endpoint after the Cloud OCR plugin installer has run.
The API URL can be modified in the plugin_config_sample_value table in the Transact database. Once the batch class is configured with the Advanced_HOCR plugin, the API URL can be modified in the batch_class_plugin_config table for the configured batch class. Note: You do not need to restart Transact after editing the file.
API Key
The web app database stores the API Key as an encrypted value. The encryption key is hard-coded into the API.
Release Notes
| Release Versions | Release Date | Notes |
| 1.0.31 | 9/12/2023 | Compatibility release for 2023.1.00. |
| 1.0.26 | 11/29/2022 | Microsoft Computer Vision, Oracle and cluster support added. Some bug fixes. Certified with Transact 2022.1.01. |
| 1.0.3 | 5/3/2022 | Certified with Transact 2022.1.00. |