Introduction
This document describes how to upgrade Ephesoft Transact 2020.1 in the following environments:
-
- Environments — single or multi-server
- Operating system — Red Hat Enterprise Linux (RHEL) 7.5 or 7.6
Note: Ephesoft Transact 2020.1 is only supported for these Linux distributions. Do not run the sudo yum update command, as this updates RHEL to an unsupported version. Refer to How to Update to a Previous Version of RHEL for more information.
-
- Installation types — normal or silent
Upgrade Overview
The process of upgrading to Ephesoft Transact 2020.1 follows this general sequence of tasks.
| Installation Task | General Scope of Activity |
| Prerequisites | Prepare to upgrade by gathering the required resources and verifying that the environment and databases are supported. |
| Prepare the Server for Upgrade | Perform these steps to prepare the server for the upgrade installer. |
| Download and Run the Ephesoft Transact Installer
|
Run the Ephesoft Transact installer in the command line interface.
For silent upgrade, provide the required configurations in the config.properties file. |
| Select Normal or Silent Upgrade | Determine if you are performing a normal or silent upgrade and follow the steps for your selected option. |
| Service Pack Installation | This service pack must be installed immediately after completing the upgrade process. |
| License and Launch Ephesoft Transact 2020.1 | Perform these steps to complete the upgrade for Ephesoft Transact 2020.1. |
Prerequisites
Perform these steps for a successful software upgrade and startup:
- Determine if you need to perform a single-server or multi-server upgrade.
Important: Steps unique to a multi-server environment upgrade are identified where applicable.
- Verify that the existing installation of Ephesoft Transact is supported for direct upgrade to Ephesoft Transact 2020.1
-
- If the system is currently running Ephesoft Transact version 4.5.0.0 or above, your system is supported for a direct upgrade to Ephesoft Transact 2020.1.
- If the system is currently running a release prior to Ephesoft Transact 4.5.0.0, you will need to upgrade to version 4.5.0.0 before upgrading to Ephesoft Transact 2020.1.
Important: If you are required to perform an intermediate upgrade, then you must launch the Ephesoft Transact 4.5.0.0 service before upgrading to version 2020.1 or the upgrade process will fail.
-
- If you are required to perform an intermediate upgrade, you will need a new license for Ephesoft Transact 4.5.0.0
- Verify that your database version is supported. Refer to Platform Configuration and Third-Party Integrations for additional information.
Important: If you are upgrading to Ephesoft Transact 2020.1 with an existing version of MariaDB or MySQL database engine, refer to Install and Migrate to MariaDB for Linux before proceeding any further with the upgrade.
- Verify that internet connectivity is available for this upgrade.
nm-online
Note: The installation will be interrupted if an internet connection is unavailable, as some software requires updates or installation from the operating system’s repository.
- Verify that you have super-user (root) permissions. If you are not a super-user, execute the following command to gain super-user permissions.
sudo su root
Important: The installation script must be run with super-user permissions, or an error will occur, and the script will exit.
- Verify that SharedFolders is accessible on the server undergoing upgrade.
User Instructions
Prepare the Server for Upgrade
Perform these steps to prepare the server for an upgrade to Ephesoft Transact 2020.1:
- Complete all in-flight batches. All batch instances must be in the Finished state for the upgrade to be successful.
- Perform a complete backup of the following:
-
- Ephesoft, Report, and Report_Archive databases
- Batch classes
- Ephesoft SharedFolders directory
- Run all reports and ensure they are complete and in sync.
- If the Apache Tomcat memory settings were changed from default, take note your current configuration to restore after upgrading. Refer to Configuring Tomcat Memory Settings for additional information.
- Verify registry information with the following command:
/etc/.java/.systemPrefs/com/Ephesoft/license/core/annotation
- Ensure the following paths and settings are properly configured:
-
- Check that the path for sharedFolderDir matches the SharedFolders path currently being used by Ephesoft Transact.
- Check the registry settings to ensure that the DB Names and IP Address in Apache Tomcat’s server.xml and registry database entries match. If there are any changes in the database information you will need to edit the appropriate settings in the server.xml and registry database to reflect those changes.
- Edit the SelectedDb entry in the registry to reflect the correct database type.
- Edit the number in the Value data field in the registry settings to match the database.
- Select 1 for MariaDB Server(MySQL compatible).
- Select 2 for Oracle Database Server.
Important: If the upgrade to Ephesoft Transact 2020.1 requires a database migration or database version upgrade, these changes must be made prior to starting the upgrade process. Refer to Platform Configurations and Third-Party Integrations for supported versions and Install and Migrate to MariaDB for additional instructions.
Note: Ephesoft recommends testing any software upgrade with an existing application before moving the upgrade into production if the software being upgraded is integrated with any other applications, systems, or workflows.
- Stop Ephesoft Transact running as a service using the command service ephesoft stop.
![]()
Figure 1. Stop Ephesoft Transact Service
- Ensure that the target installation drive has enough space for the installation files. You may require up to 8GB of space.
Download and Run the Ephesoft Transact Installer
Perform these steps to upgrade to Ephesoft Transact 2020.1:
- Refer to the Downloads page for information on how to obtain the Ephesoft Transact Installer.
- After saving the .zip file to your Linux machine, verify the MD5 Sum on the file against the MD5 Sum listed in the Partner Portal.
md5sum ./LINUX_Ephesoft_Transact_2020.1_1316.zip
![]()
Figure 2. Verify MD5 Sum Against Partner Portal
- Unzip the Ephesoft Transact installer by navigating to the folder containing the ZIP file and execute the unzip LINUX_Ephesoft_Transact_2020.1_1316.zip command.
Important: The last four digits of the ZIP file name are an Ephesoft build number that is subject to change.

Figure 3. Execute the unzip command
-
- If unzip is not installed, use the following command:
sudo yum install unzip
- Run the following command to make the files executable:
chmod 777 install install-helper uninstall
This is illustrated in Figure 4, below.
![]()
Figure 4. Execute the cmod 777 Command
- Run the following command to start the installation process:
./install
![]()
Figure 5. Execute the ./install Command
Important: If the Ephesoft Transact installer stops fails during any step of the upgrade process, contact Ephesoft Support and provide the following files and details:
-
- Your distribution and version of Linux.
- var/log/install-ephesoft.log
- /etc/Ephesoft/Ephesoft.conf
- Only the root user has access to this folder. If the file does not exist, send only the first file.
- You will be prompted to decide if you want to install Ephesoft Transact as a silent installer (figure 5).
- If you are performing a normal upgrade, select n and proceed to Normal Upgrade.
- If you are performing a silent upgrade, select y and proceed to Silent Upgrade.
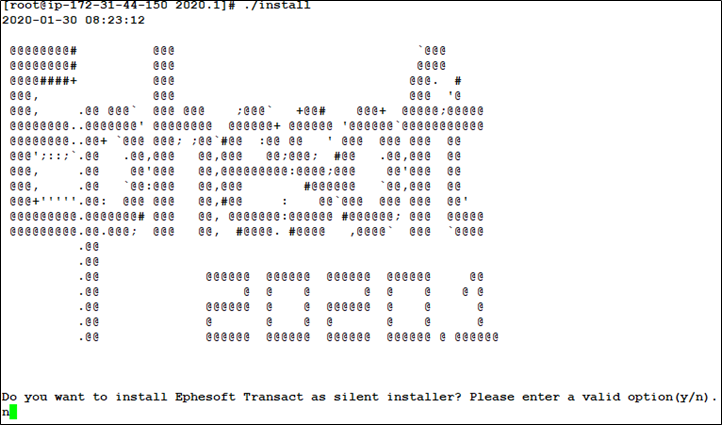
Figure 6. Silent or Normal Installation
Normal Upgrade
- The following screen will display while the installer checks the internet connection. Press y to confirm that you want to upgrade to Ephesoft Transact 2020.1.

Figure 7. Upgrade to Ephesoft Transact 2020.1
- You will be prompted to forcefully stop the Ephesoft Transact service if it is running. Press y to stop the Ephesoft Transact service on all nodes. The upgrade process cannot proceed if the Ephesoft Transact server is running.
Important: The following steps vary depending on a single or multi-server installation. Carefully read the steps below before proceeding further.
- The following screen displays:

Figure 8. Database Patch
-
- For single-server upgrade, press y to run the database patch. The database patch is mandatory for a single-server upgrade, or if you are upgrading the first server in a multi-server installation.
- For a multi-server upgrade, the database patch is only required for the first server in the node. Press n for subsequent server upgrades.
Important: If you run the database patch on a second or subsequent server in a multi-server upgrade, you may corrupt the existing database.
- If Tesseract (an OCR engine) was not installed with the previous installation, the following screen will display:
- Select n to decline installing Tesseract. Tesseract is optional, and not required for Ephesoft Transact to function properly.

Figure 9. Install Tesseract
-
- Select y to install Tesseract.
- The installer will begin upgrading sources. This may take some time.
- The installer will prompt for registration information. This information is used to assist in the generation of your license for Ephesoft Transact. Provide the registration details.
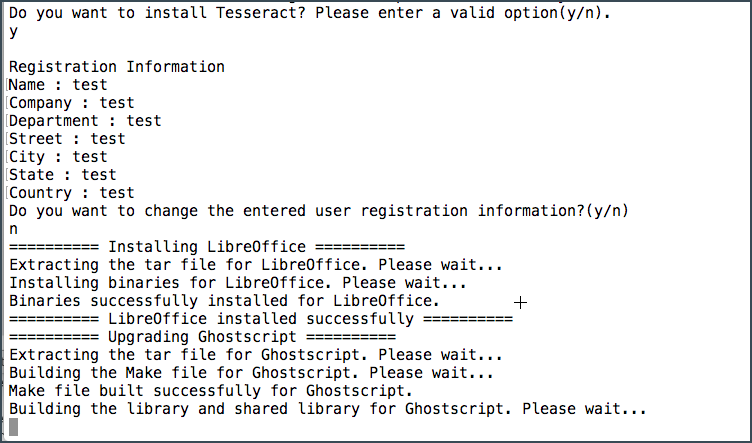
Figure 10. Registration Information
Note: The following screen will display after the installer saves critical configurations, license files, and folders in the back-up directory for future reference. The only exception is the log4j.xml file, which needs to be updated manually.
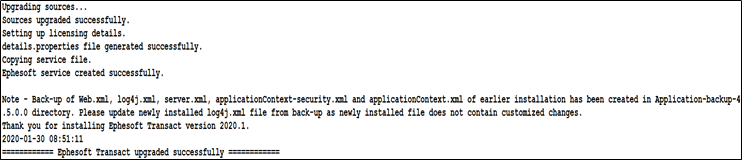
Figure 11. Ephesoft Transact Upgrade Complete
- Update the log4j.xml file. The old log4j.xml can be found at /opt/Ephesoft/Application-backup-<previous-version>/log4j.xml.
- Copy the old log4j.xml and replace the new log4j.xml with the old one at /opt/Ephesoft/Application/log4j.xml.
- The upgrade is complete. Proceed to Install the Ephesoft Transact License.
Silent Upgrade
- Open the config.properties file located in the Response-Files folder. To do so, open a text editor and run one of the following commands:
-
- vi config.properties
- vim config.properties
- nano config.properties
![]()
Figure 12. vi config.properties Command
Note: You can also use WinSCP to connect to your Linux server and open the file in any UI text editor application.
- Edit the values for the parameters in config.properties to reflect the required configuration for the upgrade. If using vi editor, run the i command to enter insert mode and edit the content. See the table on configurable properties below for explanations of important parameters.
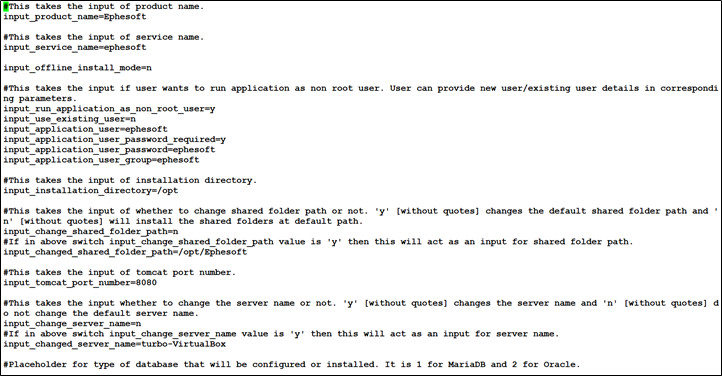
Figure 13. Edit config.properties File
Important: The upgrade may fail if any of the following settings in config.properties file are incorrect.
| Configurable Property | Description |
| input_database_patch_enable | Select one of the following options depending on your server environment:
For single-server upgrade, press y to run the database patch. The database patch is mandatory for a single-server upgrade, or if you are upgrading the first server in a multi-server installation. For a multi-server upgrade, the database patch is only required for the first server in the node. Press n for subsequent server upgrades. |
| input_upgrade_application | Select y to upgrade Ephesoft Transact from an older version. |
- Save the updated config.properties file to the same name in the Response-Files folder. If using vi editor, press the ESC key to exit insert mode and use the :wq command to save and close the file.
- Navigate to the folder with the unzipped Ephesoft Transact installer and start the silent installation process by running the ./install -silentinstall -product command.

Figure 14. Start the Silent Installation
- The installer will pick up all the required details from the config.properties files.
Note: When upgrading to the latest version of Ephesoft Transact, critical configurations, license files, and the Certs, lib, and META-INF folders are saved in the back-up directory for future reference.
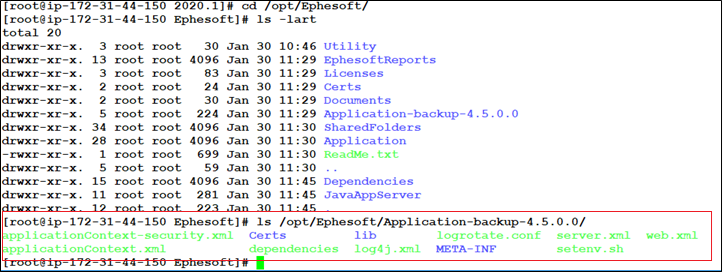
Figure 15. Back-up Directory
- All configurations files are automatically transferred to the newly upgraded application. The only exception is the log4j.xml file, which needs to be updated manually.
-
- The old log4j.xml can be found at /opt/Ephesoft/Application-backup-<previous-version>/log4j.xml.
- Copy the old log4j.xml and replace with the new log4j.xml at /opt/Ephesoft/Application/log4j.xml.
- The silent upgrade is complete. Proceed to Service Pack Installation.
Service Pack Installation
Note: The following section is included as a reference, but you may skip this service pack in favor of the 2020.1.02 Feature Pack if preferred.
After the release of Ephesoft Transact 2020.1, issues were reported by customers that could affect numerous installations. In addition, there are some dependencies on Ephesoft Transact property file changes required to support the Cloud HyperExtender globally. Ephesoft has created a service pack to address these issues. This service pack must be installed immediately after completing the install process.
Perform the following steps to install the 2020.1.01 service pack for Ephesoft Transact.
Note: Steps listed as “CHE only” are mandatory for Cloud HyperExtender users.
- Stop the Ephesoft Transact service on all nodes.
- Download and extract the Linux_ServicePack_2020.1.01.zip folder to a temporary location.
- Open shell with the root user.
- Go to the [Ephesoft_Home]/Application/WEB-INF/lib/HOT-FIXES directory.
- If the gxt-core-0.0.15-SNAPSHOT.jar file already exists:
- Create a backup folder in the HOT-FIXES folder (step 4) named Backup_2020.1.01.
- Copy the existing .jar file to the Backup_2020.1.01 folder.
- Delete the old .jar file.
- If you did not already have the gxt-core-0.0.15-SNAPSHOT.jar file:
- Copy the new .jar file (included in the .zip file) from the temporary location to the HOT-FIXES folder (step 4).
Note: If you do not use the Cloud HyperExtender plugin, proceed to step 12.
CHE Only Steps
Note: Steps 7-11 are CHE only.
- Create a backup folder named CHE_Backup_2020.1.01 outside of the [Ephesoft_Home] directory.
- Navigate to the [Ephesoft_Home]/Application/WEB-INF/classes/META-INF/cloud-plugin/ directory and save a copy of the cloud-plugin.properties file to the new CHE_Backup_2020.1.01 folder.
- Open the cloud-plugin.properties file and replace the cloud.registration.url value with one of the following:
- For a US Transact instance, replace with “https://transact.us.ephesoftcloud.com/#/register?multiCountry=true“
- For a Frankfurt Transact instance, replace with “https://transact.de.ephesoftcloud.com/#/register?multiCountry=true“
- For a Singapore Transact instance, replace with “https://transact.sg.ephesoftcloud.com/#/register?multiCountry=true“
- Deploy the ephesoft-cloud-client application.
-
- Save a backup of the existing [Ephesoft_Home]/JavaAppServer/webapps/ephesoft-cloud-client directory to the 1.01 folder.
- Remove the existing [Ephesoft_Home]/JavaAppServer/webapps/ephesoft-cloud-client directory and its contents.
- Copy the new ephesoft-cloud-client folder from the temporary location (step 2) and save its contents to the [Ephesoft_Home]/JavaAppServer/webapps/ directory.
- Execute the following command to change ownership of the folder to the user “ephesoft”:
chown -R ephesoft ephesoft-cloud-client
-
- Navigate to the [Ephesoft_Home]/JavaAppServer/webapps/ephesoft-cloud-client/WEB-INF/classes/ directory and open the application.properties file.
- In the application.properties file, search for the cloud.notification.transact-hybrid-url property. Replace the following variables with their respective values:
- @@HTTPORHTTPS@@ – Replace this variable with either “http” or “https” as per your server configuration.
- @@SERVER_ALIAS@@ – Replace this variable with your server hostname.
- @@TOMCATPORTNUMBER@@ – Replace this variable with your web server port number (default is 8080).
11. Deploy cloud-ui.
-
- Save a backup of the existing [Ephesoft_Home]/JavaAppServer/webapps/cloud-ui directory to the CHE_Backup_2020.1.01 folder.
- Remove the existing [Ephesoft_Home]/JavaAppServer/webapps/cloud-ui directory and its contents.
- Copy the new cloud-ui folder from the temporary location (step 2) to the [Ephesoft_Home]/JavaAppServer/webapps/ directory.
- Execute the following command to change ownership of the folder to the user “ephesoft”:
chown -R ephesoft cloud-ui
- Start the Ephesoft Transact server.
Note: These changes must be made on all servers (UI and Processing) in a cluster. Ephesoft recommends performing thorough testing of Ephesoft Transact after deploying the service pack.
You have successfully installed the 2020.1.01 Service Pack. If any issues occur, refer to Rollback Steps to revert the deployment. Otherwise, proceed to License and Launch Ephesoft Transact 2020.1 to complete the installation process.
Rollback Steps
If any issues occur with this service pack, follow the steps below to roll back this installation:
- Stop the Ephesoft Transact service on all nodes.
- Open shell with the root user.
- Go to the [Ephesoft_Home]/Application/WEB-INF/lib/HOT-FIXES directory.
- Delete the following file: gtx-core-0.0.15-SNAPSHOT.jar.
- Open the Backup_2020.1.01 folder located inside the HOT-FIXES folder.
- Copy the existing .jar file from the Backup_2020.1.01 folder to the HOT-FIXES folder.
- Delete the Backup_2020.1.01 folder.
Note: Steps 6-10 and 12 are CHE only.
- Restore the backup of the cloud-plugin.properties file from the CHE_Backup_2020.1.01 folder to its original location (step 8 above).
- Remove the existing [Ephesoft_Home]/JavaAppServer/webapps/ephesoft-cloud-client directory and its contents.
- Restore the backup of the ephesoft-cloud-client directory and its contents (step 10a above) inside [Ephesoft_Home]/JavaAppServer/webapps/.
- Remove the existing [Ephesoft_Home]/JavaAppServer/webapps/cloud-ui directory and its contents.
- Restore the backup of the cloud-ui-directory and its contents (step 11a above) inside [Ephesoft_Home]/JavaAppServer/webbapps/.
- Start the Ephesoft Transact server.
- If the Ephesoft Transact server starts successfully, delete the CHE_Backup_2020.1.01 folder.
You have successfully rolled back the 2020.1.01 Service Pack.
License and Launch Ephesoft Transact 2020.1
To complete the upgrade, refer to Licensing Requirements.
Important: Ephesoft recommends restarting the service after your license registry is updated.
a. Compare the post-upgrade properties files against the pre-upgrade properties files. You must match the configuration settings of the post-upgrade property files to the pre-upgrade property files.
Note: The upgrade installer creates a backup folder to store the pre-upgrade configuration settings and components.
-
- Use the diff command to compare and merge the pre-upgrade configurations into the post-upgrade configurations. Original configuration files are backed up on the same server. Navigate to the folder where Ephesoft Transact was installed and find the backup folder of your previously installed version of Ephesoft Transact to get access to your prior configurations, files, and settings. Properties, file settings, or components that are unique to each deployment can include the following:
- Computer names
- Database paths
- HTTPS (as applicable)
- ImageMagick (as applicable)
- JavaAppServer
- Keystore location
- Registry
- Single Sign-On (SSO)
- User connectivity for Microsoft Active Directory, Apache Tomcat, or LDAP
Refer to Folders where Customer-specific Data is Stored for additional information.
b. If you are required to perform an intermediate upgrade to 4.5.0.0, your previously installed license will not work on 4.5.0.0. You will need a new license for Ephesoft Transact 4.5.0.0 in order to successfully launch Ephesoft Transact.
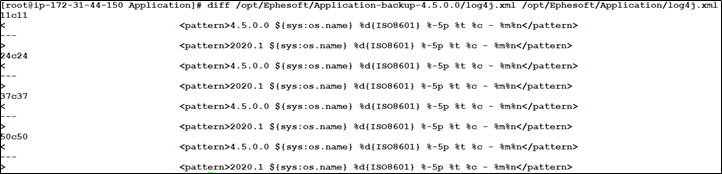
Figure 16. diff Command to Compare Configurations
- Start the Ephesoft Transact service by running the following command:
service ephesoft start
You can track the service start-up process by opening the catalina.out file in the /opt/Ephesoft/JavaAppServer/logs/ folder and running the following command:
tail -f catalina.out
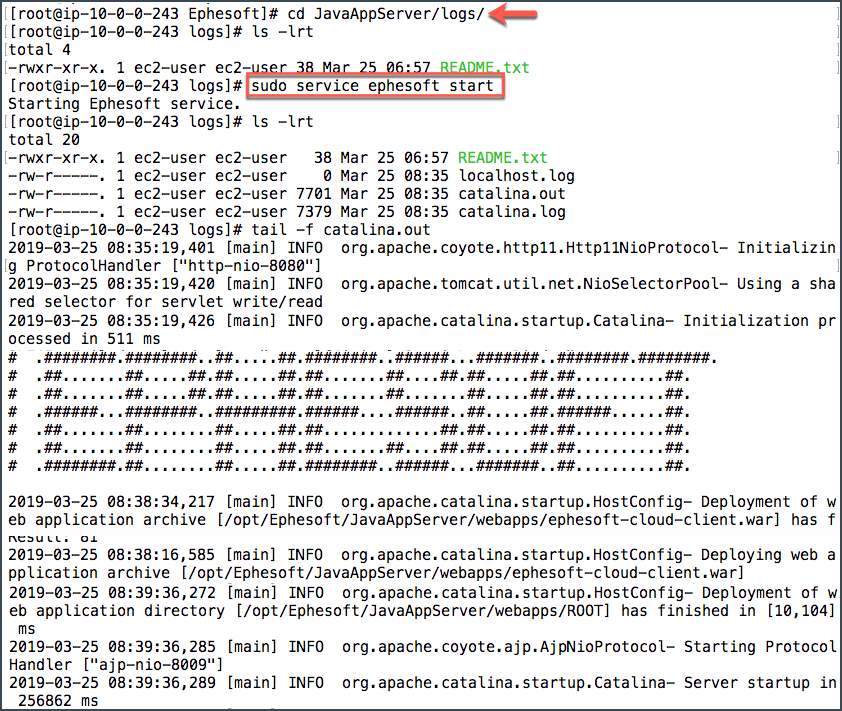
Figure 17. Start Ephesoft Transact
- Open a web browser and enter the following Ephesoft Transact URL: http://<servername>:<portnumber>/dcma/home.html. The default port number is 8080. Allow time for the background configuration processes to complete. The initial startup may require several minutes.
Important: If you receive an error or connection warning, you will need to open the firewall ports to connect to Ephesoft Transact.
- The Ephesoft Transact 2020.1 home page displays. Select Administrator or Operator to log in.
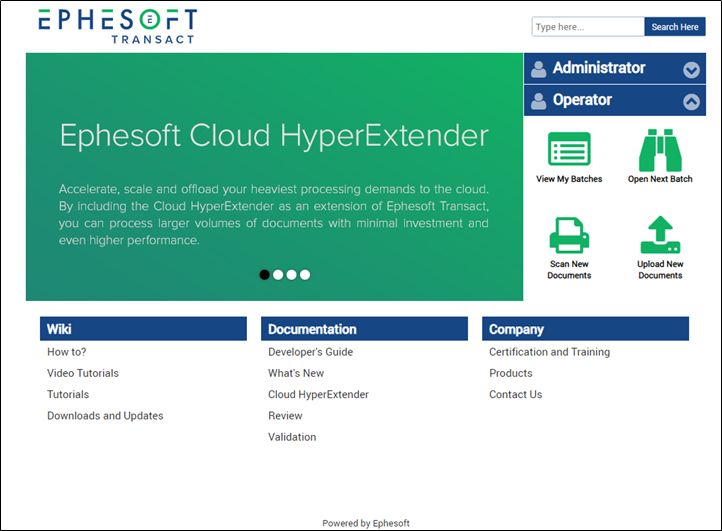
Figure 18. Ephesoft Transact Home Screen
- Enter the username and password. The default username is ephesoft, and the default password is demo.
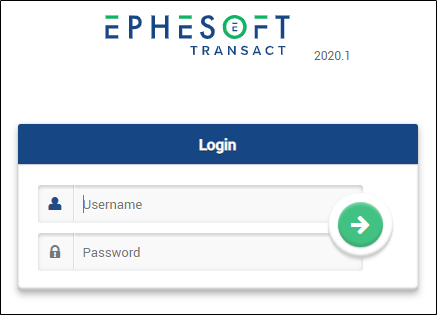
Figure 19. Login Screen
Note: The system may require additional time to complete the initial login.
Conclusion
This completes the upgrade process.