Applies to: All versions of Ephesoft Transact
Overview
The licensing model for Ephesoft Transact is based on either a core or consumption-based sales model. Additional Transact features can be purchased as add-ons to a core-based license, or are available for consumption-based licenses depending on the bundle you have purchased.
The following table provides additional details on add-ons and their availability for each license type.
| Feature | Core Sales Model | Consumption Sales Model | ||
| Standard | Professional | Enterprise | ||
| Advanced Reporting |
$ |
✔ |
✔ |
✔ |
| Cloud HyperExtender Plugin |
✔* |
✔* |
✔ |
✔ |
| Web Services APIs |
$ |
✔ |
✔ |
|
| ID Extraction Plugin |
$ |
$ |
$ |
$ |
* 1,000 images free when you self-register
$ Premium add-on
Note: If you purchase the Professional or Enterprise bundle, please self-register for Cloud HyperExtender and submit a license request to expand the 1,000 images to the amount that was purchased.
To obtain additional licenses for these features, log in to the Customer Support Portal and go to Licenses.
Licensing Prerequisites
The following list outlines prerequisites required to obtain an Ephesoft Transact license:
- An installed instance of Ephesoft Transact version 4.5.0.0 or above — if you have not yet completed this step, refer to Install and Upgrade for your version of Ephesoft Transact.
- An Ephesoft Transact license server — the number of cores in the Transact environment will be used to configure the license. Refer to How to Set Up an Ephesoft License Server for more information.
- For multi-server environments, a server failover mechanism is required. For more information about configuration, refer to the License Server Failover Mechanism guide.
Obtaining an Ephesoft Transact License
To obtain a license for your version of Ephesoft Transact whether it’s a core or consumption-based license, you will need to determine your server core count. Reference the Appendix in this document for instructions to access this information.
Retrieving the details.properties File
To complete your license request, you will need to submit your details.properties file to Ephesoft Support from the Customer Support Portal. To prepare the details.properties file, follow the below steps:
- Retrieve a copy of the details.properties file from the Ephesoft Transact installation folder. Based on your operating system, this folder is found in the following path:
- Windows: navigate to {Installation Folder}\Dependencies\licensing
- Linux: navigate to /opt/Ephesoft/Dependencies/licensing
- Ensure each MAC address for your system is included in the file. The MAC address for your properties file should resemble the format illustrated on the right side of the following figure:

Figure 1: MAC address format
Note: If the Device Address is missing or incorrect, it must be manually populated. Refer to the Appendix for instructions on locating the MAC address for your system.
- Navigate to the Customer Support Portal and login. In the Licenses request form, complete the required fields and upload the details.properties file to submit a license request.
This concludes the steps necessary to obtain your Ephesoft Transact license file. Once you have received your license file, refer to the below installation guide specific to your operating system.
Installing the Ephesoft Transact License on Windows
Perform the following steps to install the license file for either a new installation or an upgraded version of Ephesoft Transact.
- If the Windows system has ever had a prior installation of Ephesoft Transact, open the Windows Registry and delete the following key:
HKEY_LOCAL_MACHINE\SOFTWARE\JavaSoft\Prefs\com\ephesoft
Note: Verify that all users are set to have full control over the Registry key path HKEY_LOCAL_MACHINE\SOFTWARE\JavaSoft\Prefs\com\.
- Copy the new ephesoft.lic file to the \Ephesoft\Dependencies\license-util folder.
- If a previous license file exists, you must delete the original license file, then rename the new license file to the original filename — ephesoft.lic.
- Open the Windows command prompt as an Administrator and navigate to the \Ephesoft\Dependencies\license-util folder.
- From this folder in the command prompt, type install-license.bat and then press Enter. Ephesoft recommends running install-license.bat twice to ensure the license applies correctly.
- Refresh and ensure the following registry path exists:
HKEY_LOCAL_MACHINE\SOFTWARE\JavaSoft\Prefs\com\ephesoft\
If you observe issues with Ephesoft Transact after completing the above steps, please refer to the following articles on common issues that may occur during license installation.
If these articles do not resolve your issue, please contact Ephesoft Support at tickets@ephesoft.com and include your log files. For information about how to obtain log files, refer to How to Collect the Ephesoft Application Logs.
To access your license information once installed, reference the Appendix in this document.
This concludes the steps required to license Ephesoft Transact on Windows. Refer to Getting Started with Transact to launch Ephesoft Transact.
Installing the Ephesoft Transact License on Linux
Perform the following steps to install the license file for either a new installation or an upgraded version of Ephesoft Transact.
Note: These steps must be performed from a Linux root user account.
- The Ephesoft licensing team will send you a file named ephesoft.lic. Place this file in the /opt/Ephesoft/Dependencies/license-util/ephesoft-license-installer folder.
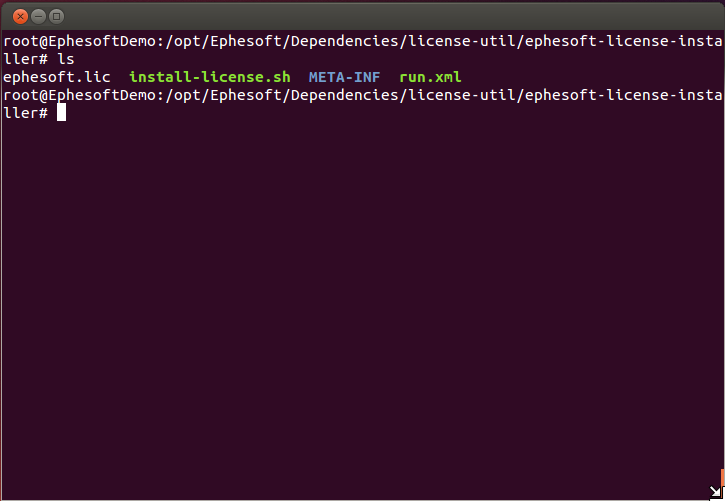
Figure 2: Folder /opt/Ephesoft/Dependencies/license-util/ephesoft-license-installer
- Run the following command in the folder mentioned above:
./install-license.sh
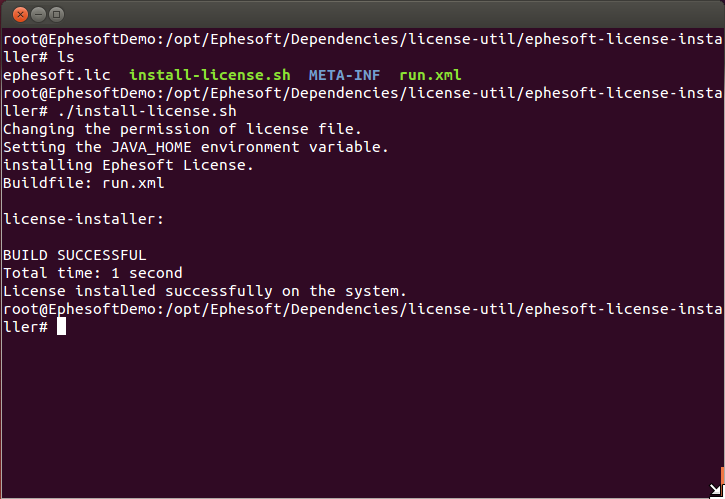
Figure 3: Running the ./install-license.sh command
- Run the
./install-license.shcommand a second time to ensure the license was installed correctly.
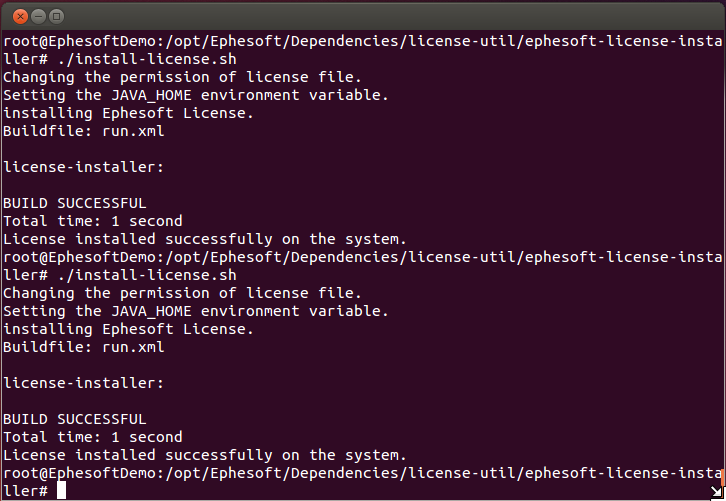
Figure 4: Running the ./install-license.sh command a second time
To access your license information once installed, reference the Appendix in this document.
This concludes the steps required to license Ephesoft Transact on Linux. Refer to Getting Started with Transact to launch Ephesoft Transact.
Appendix
Verifying Server Core Count
To determine the number of server cores that will require licensing, identify your operating system and follow the steps below:
Windows: Logical Processors (Cores)
- Right-click in the Windows Task Bar or Start menu.
- Click Task Manager > More Details.
- Click Performance > CPU. The quantity of logical processors is provided on this screen, as shown in the screenshot below.
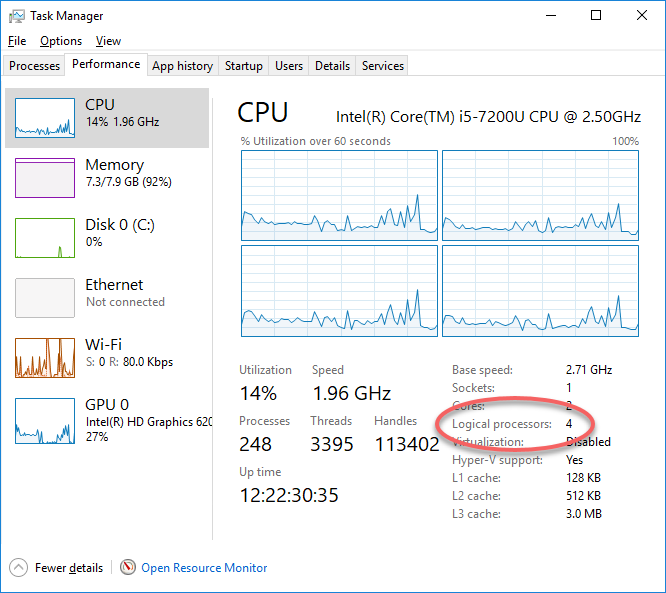
Figure 5: Viewing Logical Processors in Task Manager
Linux: Cores per Socket
There are two methods to obtain the number of cores in your Linux server:
- Option 1: Enter
lscpuat the command prompt of the Linux terminal.
The system returns the following information. The Core(s) per socket value indicates the number of cores in this deployment.
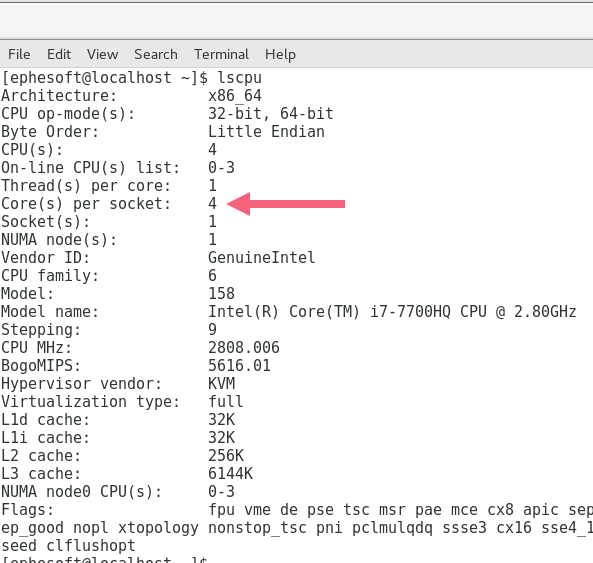
Figure 6: Viewing Core(s) in Linux
- Option 2: Enter
nprocin the terminal. This command returns the number of cores as an output.
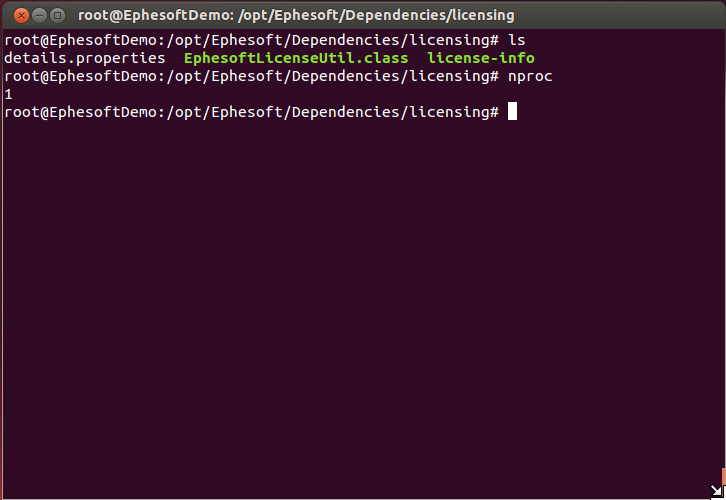
Figure 7: Viewing Core(s) in Linux with the nproc command
Obtaining MAC Address
When retrieving the details.properties file, the MAC address(s) should resemble the format illustrated on the right side of the following figure:

Figure 1: MAC address format
If the Device Address is missing or appears incorrect, the file must be manually populated. To obtain the MAC address(es) for your system, follow the below instructions:
- Windows — Open a command prompt from the system, then run the
ipconfig /allcommand. - Linux — As the root user:
- Type
ifconfig -a. - From the displayed information, find
eth0— this is the default first Ethernet adapter. - Locate the number next to
HWaddr. This is the MAC address. - Paste the MAC address(es) into the details.properties file.
- Save the changes in the properties file.
- Type
Viewing License Details in Ephesoft Transact
For both informational and troubleshooting purposes, perform the following steps to access the License Details screen in Ephesoft Transact.
Note: The following example uses an Ephesoft Transact 2019.2 release version with a 4.5.0.0 license file installed. Your version may appear differently, depending on your version of Transact.
- Log in to Ephesoft Transact with Super Administrator privileges. Expand the navigation pane on the left and click System Configuration.
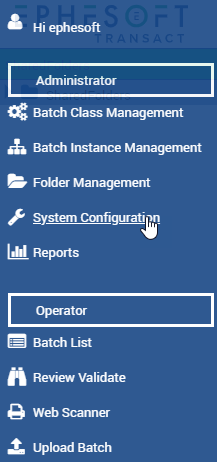
Figure 8: Selecting System Configuration
- Click License Details to view the contents and settings of the current license.
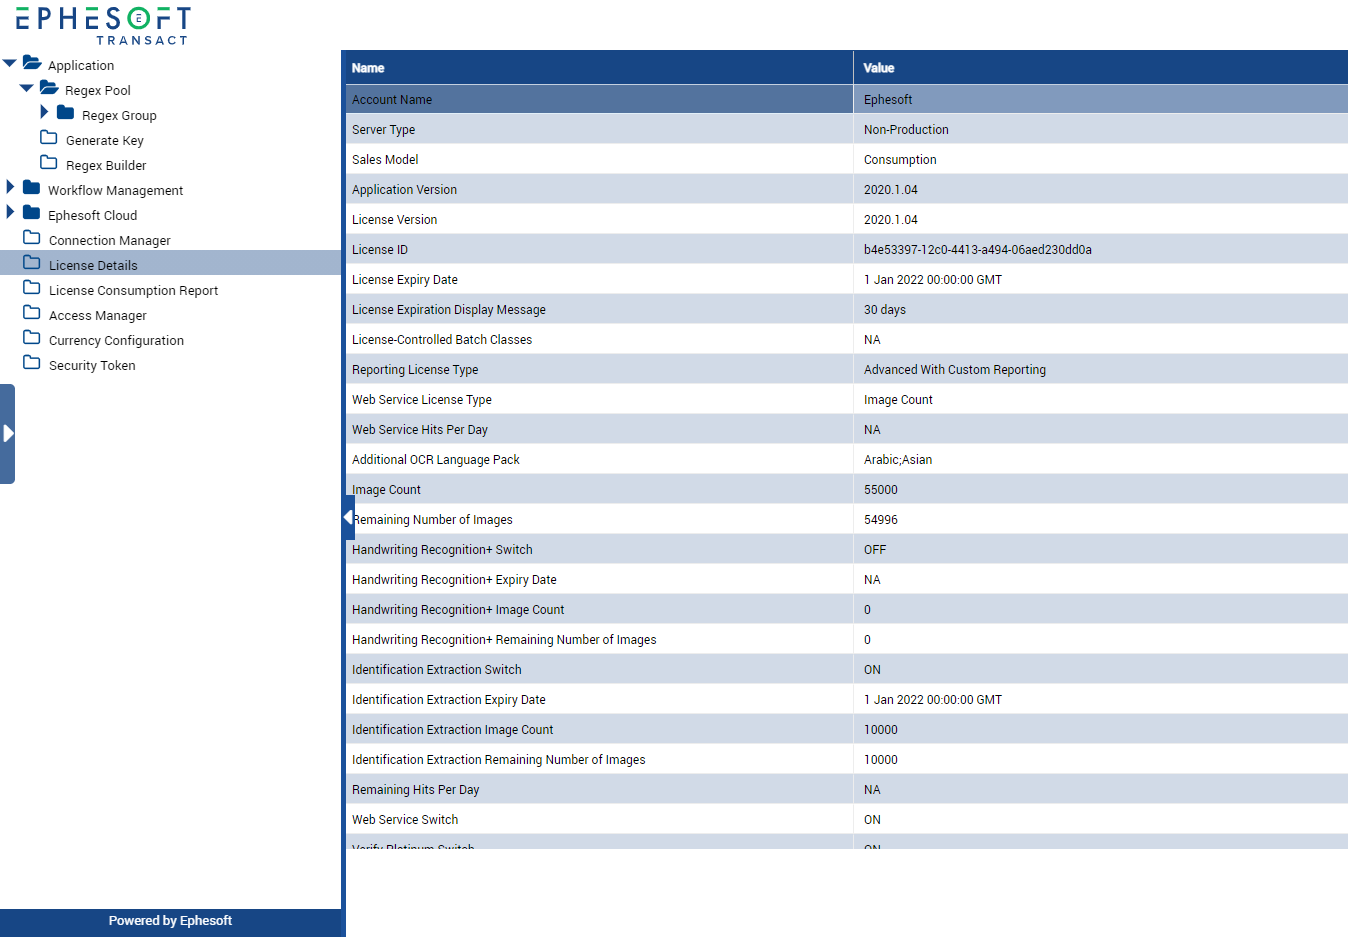
Figure 9: Viewing License Details
The following table describes how each of the licensing items is used within the product:
| Field or Switch | Description |
| Account Name | The name of the company on the license. |
| Server Type | Production or nonproduction. |
| Sales Model | Core or consumption-based license. For consumption-based licenses refer to the License Consumption Report for more information. |
| Application Version | Displays the Transact version that is installed on the environment. This field might contain a software version that is more recent than the original software version when the license was purchased. |
| License Version | Displays the version of the license generator schema. License version schemas are compatible with multiple versions of Transact, and may not exactly match your version of Transact. |
| License ID | The unique identifier assigned to each Transact license. |
| License Expiry Date | Displays the date on which this Ephesoft Transact license expires. |
| License Expiration Display Message | Displays the number of days before license expiration. This is when the system will begin to prompt users about upcoming license expiration. |
| Reporting License Type | Identifies the type of reporting functions that are supported in this license. The three options for this field are as follows:
|
| Web Service License Type | Identifies the use of Web Services by (1) Image Count or (2) service hits per day. |
| Web Service Hits Per Day | If the above field is set to “Web Service hits per day”, the number of daily Transact Web Service requests displays here. |
| Additional OCR Language Pack | Lists the language packs that are supported by OCR engines in this installation. |
| Image Count | Displays the image count for this license, which may be one of the following:
|
| Overage Image Count | The number of images that a user can process after they’ve exceeded the image count specified in their contract. |
| Remaining Number of Images | Specifies the remaining number of images that can be processed before Transact stops if the license is image count based. |
| Handwriting Recognition+ Switch | Currently not in use. |
| Handwriting Recognition+ Expiry Date | Currently not in use. |
| Handwriting Recognition+ Image Count | Currently not in use. |
| Handwriting Recognition+ Remaining Number of Images | Currently not in use. |
| Identification Extraction Switch | Indicates the status of the Identification Extraction plugin as either ON or OFF. |
| Identification Extraction Expiry Date | Displays the date when this Identification Extraction license expires. |
| Identification Extraction Image Count | Displays the image count for the Identification Extraction license, which may be one of the following:
|
| Identification Extraction Remaining Number of Images | Specifies the remaining number of images that can be processed with the Identification Extraction plugin if the license is image count-based. |
| Remaining Hits Per Day | Specifies the number of remaining Web Service hits allowed in the day if the license is Web Service by hits per day. |
| Web Service Switch | Indicates whether web service API calls are enabled for service.
|
| Verify Platinum Switch | Indicates whether this installation includes multi-server connectivity (YES) or single-server deployment (NO). |
| High Performance Switch | Any installation of 8 cores or more allows this switch to be enabled (ON).
Enabling high performance allocates half of the available cores for OCR functions:
|
| MAC Address | Lists the MAC address(es) associated with this installation. If there are multiple cores, each MAC address is separated by the pipe ( | ) symbol. |
| Number of Cores | Cites the number of cores for this licensed installation. |
| Operating System | Identifies the operating system for this installation and license. |