Introduction
This document describes how to install Ephesoft Transact 2020.1 in the following environments:
- Environment types — single or multi-server
- Operating System — Red Hat Enterprise Linux (RHEL) 7.5 or 7.6
Note: Ephesoft Transact 2020.1 is only supported for these Linux distributions. Do not run the sudo yum update command, as this updates RHEL to an unsupported version. Refer to How to Update to a Previous Version of RHEL for more information.
- Installation types — normal or silent
Installation Overview
The process of installing Ephesoft Transact 2020.1 follows this general sequence of tasks.
| Installation Task | General Scope of Activity |
| Prerequisites | Prepare for installation by gathering installation resources and verifying that the environment is supported. |
| Download and Run the Ephesoft Transact Installer | Run the Ephesoft Transact installer in the command line interface. |
| Select Normal or Silent Install | Determine if you are performing a normal or silent installation and follow the steps for your selected option. |
| Service Pack Installation | This service pack must be installed immediately after completing the install process. |
| License and Launch Ephesoft Transact 2020.1 | Perform these steps to complete the install for Ephesoft Transact 2020.1. |
Prerequisites
Perform these steps to prepare for successful software installation and startup:
- Determine if you need to perform a single-server or multi-server installation.
Important: Installation steps unique to a multi-server installation are identified where applicable.
- Verify that your database version is supported. Refer to Platform Configuration and Third-Party Integrations for additional information.
- The following database information is required when you run the installer:
- Username and password
- Database connection parameters
Important: The Ephesoft Transact 2020.1 installer does not install any database management systems (DBMS). You will need to externally or locally install and configure any relevant DBMS prior to installing Ephesoft Transact 2020.1. If you’re installing Ephesoft Transact for the first time using MariaDB, reference Install and Migrate to MariaDB for Linux for additional information.
- Verify that internet connectivity is available for this installation.
nm-online
Note: The installation will be interrupted if an internet connection is unavailable, as some software requires updates or installation from the operating system’s repository.
- If you are installing Ephesoft Transact with Microsoft Active Directory (MSAD), MSAD must already be installed and configured prior to installing Ephesoft Transact.
- Verify that you have super-user (root) permissions. If you are not a super-user, execute the following command to gain super-user permissions.
sudo su root
Important: The installation script must be run with super-user permissions, or an error will occur, and the script will exit.
- Refer to How to Manually Install Microsoft’s TrueType Core Fonts and complete the steps for your Linux distribution.
Important: Ephesoft Transact requires Microsoft’s TrueType Core (msttcore) fonts to be installed when converting PDF to TIFF files. The msttcore fonts must be installed on the same processing server(s) as Ephesoft Transact.
User Instructions
Download and Run the Ephesoft Transact Installer
Perform these steps to run the Ephesoft Transact 2020.1 installer.
- Refer to the Downloads page for information on how to obtain the Ephesoft Transact Installer.
- Unzip the Ephesoft Transact installer by navigating to the folder containing the .zip file and execute the following command:
unzip LINUX_Ephesoft_Transact_2020.1_1316.zip
Important: The last four digits of the ZIP file name are an Ephesoft build number that is subject to change.
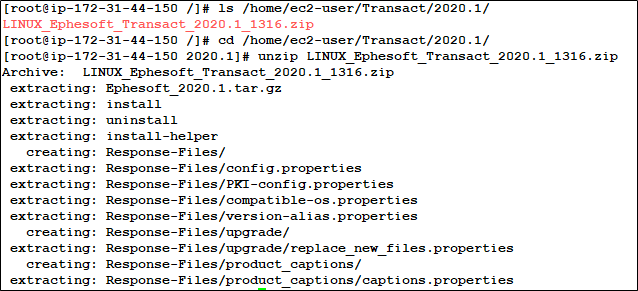
Figure 1. Execute the unzip command
-
- If unzip is not installed, use the following command:
sudo yum install unzip
- Run the following command to make the files executable:
chmod 777 install install-helper uninstall.
This is illustrated in Figure 2, below.
![]()
Figure 2. Execute the cmod 777 Command
- Run the following command to start the installation process:
./install
![]()
Figure 3. Execute the ./install Command
Important: If the Ephesoft Transact installer stops or fails during any step of the upgrade process, contact Ephesoft Support and provide the following files and details:
-
- Your distribution and version of Linux.
- var/log/install-ephesoft.log
- /etc/Ephesoft/Ephesoft.conf
- Only the root user has access to this folder. If the file does not exist, send only the first file.
- You will be prompted to decide if you want to install Ephesoft Transact as a silent installer (figure 5).
-
- If you are performing a normal install, select n and proceed to Normal Install.
- If you are performing a silent install, select y and proceed to Silent Install.
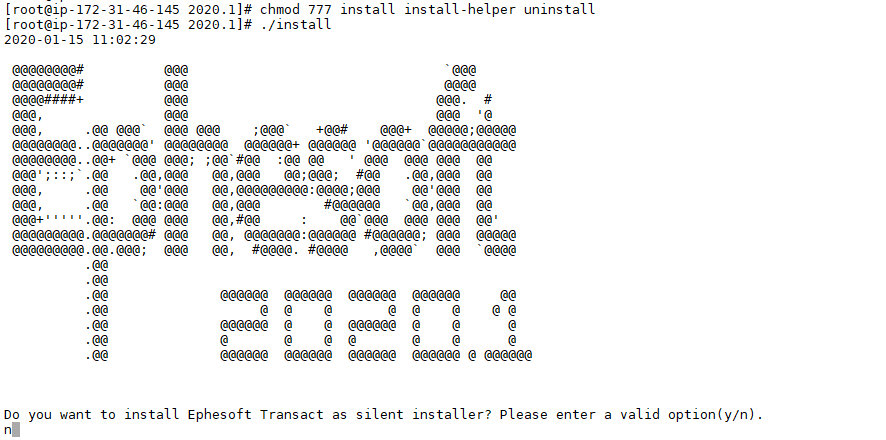
Figure 4. Execute the ./install command
Normal Install
- The installer will check the internet connection.
- After the installer runs a check on the Linux operating system, you will be prompted to change the detected operating system. In most cases, users select the operating system detected by the installer. Select n to keep the detected operating system.

Figure 5. Installer Detects Operating System
- While you must be the root user to install Ephesoft Transact, you do not have to be the root user to run the application. You will be prompted to decide whether to run Ephesoft Transact as either root or non-root user with one of the following:
- “Do you want to run Ephesoft Application as a non-root user?”
- “Ephesoft Application will run as root. Do you want to change it?”
- “Ephesoft Application will run as <current user>. Do you want to change it?”
- Select n for any option to proceed as a root user.
- Select y to change the user and provide the required information, as prompted by the installer.
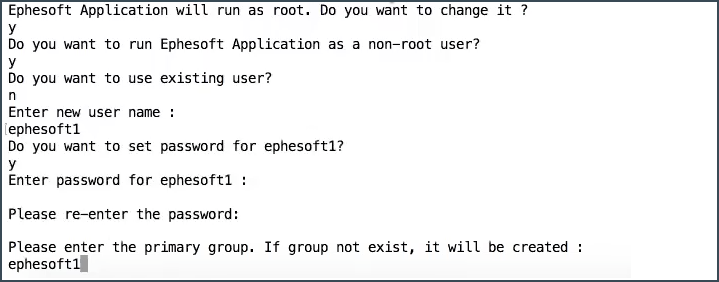
Figure 6. Change to non-root user
The following list further describes the configurable properties:
-
- New username: username for a new user to run the application
- Password: valid password for a new user to run the application
- Primary group: primary user group for a new user, which will give them required permissions (read, write, and execute). If the group doesn’t exist, it will be created with the provided name.
- Input the path for the target installation directory. The default option is /opt. Ephesoft recommends keeping the default directory, but you can change the directory by editing the text line if needed.

Figure 7. Installation path
- Press the Enter key to confirm the listed path. The installer will extract the Ephesoft tar file and copy the Ephesoft folder to the installation directory. This may take some time.
Important: Never install Ephesoft Transact in the /home directory for a user, or in the /root, /bin, /etc, /sbin, /usr, or /boot directories.
Create SharedFolders
- You will be prompted to determine whether you want to use an existing SharedFolders. If you are installing on a single-server environment, or if you are installing the first server in a multi-server environment, you will need to install SharedFolders for Ephesoft Transact to function properly.
Important: For Ephesoft Transact to function properly, SharedFolders must be accessible on the local server. If you are installing the SharedFolders directory on a remote server (network path)/NAS/SAN, advise your system administrator to mount the share locally to your server and use the path they provide during the installation.
-
- Press n if you are installing on a single-server environment, or if you are installing the first server in a multi-server environment.

Figure 8. Install SharedFolders
-
- Press y if you are installing the second or subsequent server in multi-server environment.
- You will be prompted to specify where to install SharedFolders. The recommended option is the default /opt/Ephesoft.
- Select n to keep the default /opt/Ephesoft option.
- Select y to designate a different folder and provide the chosen location. For single server installation, enter a local server directory path. For a multi-server installation, enter the path of a shared location.

Figure 9. Change SharedFolders Path
- Press the Enter key to confirm the chosen folder.
- Confirm the server name that will be saved in the Properties files. The default server name is the OS hostname, which is automatically identified by the installer.
Note: If you want to confirm your hostname, run the following command:
hostname
This will display the current hostname of your Linux system.
a. Select y to change the default server name.
Important: If you change the server name it must be to a fully qualified domain name (FQDN) that your Ephesoft Transact users will have access to. This allows browsers to resolve images correctly. For example, if your Linux hostname is server01 but you want users to access Ephesoft Transact via http://transact.ephesoft.com, change the server name to transact.ephesoft.com.
b. Select n to keep the default server name.
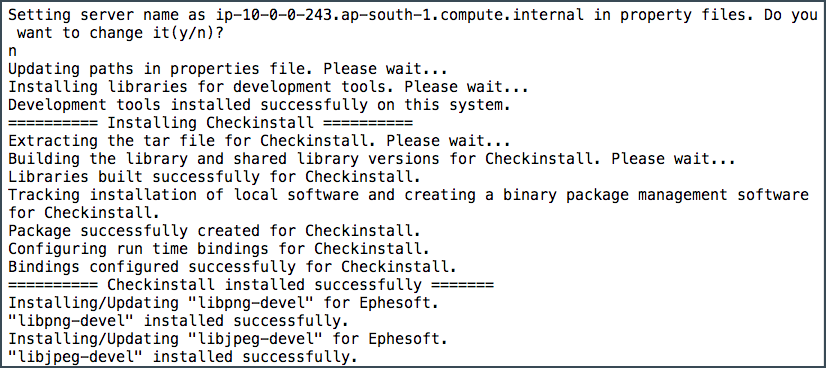
Figure 10. Default Hostname Selected
Select and Set Up the Database
You will be prompted to select the database type you want to use. This section will explain the available options for MariaDB and Oracle.
The following screen displays:

Figure 11. Select Database Type
MariaDB Configuration
Note: The installer does not install MariaDB as part of the installation process. You will need to configure the database for MariaDB prior to running the Ephesoft Transact installer. The installer allows you to connect to an existing MariaDB server during the installation of Ephesoft Transact. For the latest information about MariaDB version support and MariaDB installation, refer to these documents:
Follow these steps when setting up an existing MariaDB database during the installation of Ephesoft Transact.
- Select MariaDB by typing 1 and pressing the Enter key.
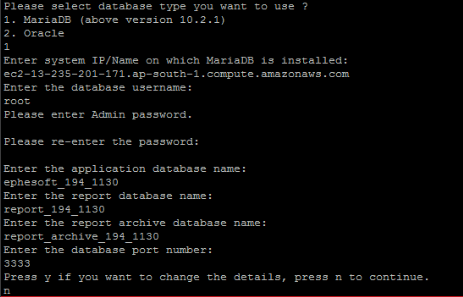
Figure 12. Provide MariaDB Details
- Provide the required details, as explained in the table below.
| Maria DB property | Description |
| system IP | The hostname/IP address on which MariaDB is installed. |
| database username | Enter root.
This is the username for the administrator of the three Ephesoft databases (ephesoft, report, and report_archive). |
| Admin password | This is the password you created when installing MariaDB. This password will be used to log in as a database administrator. |
| application database name | Default database name is ephesoft. This name can be changed as needed.
Important: Do not include special characters besides underscore “_”. |
| report database name | Default report database name is report. This name can be changed as needed. |
| report archive database name | Default report archive database name is report_archive. This name can be changed as needed. |
| database port number | Default port number is 3306. This is the port that will be used to access the database. |
Note: In the table above, the configurable properties are listed exactly how they display on the screen.
- Press y to change any details. Otherwise, press n to continue.

Figure 13. Change Details or Continue
- You have successfully configured MariaDB. Proceed to Run or Decline the Database Patch.
Oracle Database Configuration
- Select Oracle by typing 2 and pressing the Enter key.
- Press y to create a new database schema. You will be prompted to configure several properties for the database. See the table below for details on configurable properties.
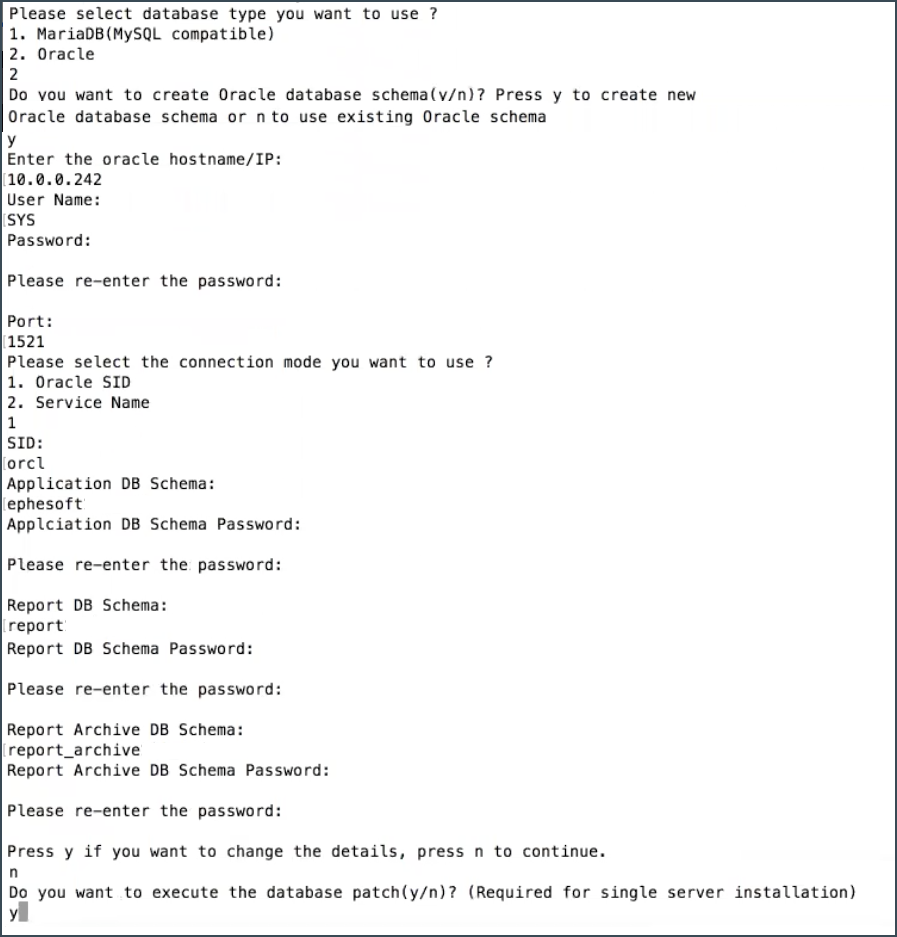
Figure 14. Select Oracle DB
-
- Press n to use an existing database. Provide the required details, as explained in the table below.
| Oracle schema property | Description |
| oracle hostname/IP | Host name/IP for accessing the Oracle database. |
| User Name | Username for the user of the Oracle database. |
| Password | Password that will be used to access the Oracle database. |
| Port | Port that will be used to access the Oracle database. |
| connection mode | Oracle SID: Oracle system identification used to uniquely identify the database on a system.
Service Name: TNS alias used to remotely connect to the database. |
| Application DB Schema | Default application schema is ephesoft. This name can be changed as needed.
Important: Do not include special characters besides underscore “_”. |
| Application DB Schema Password | Password that will be used to access the Application database |
| Report DB Schema | Default report schema is report. This name can be changed as needed. |
| Report DB Schema Password | Password that will be used to access the Report database |
| Report Archive DB Schema | Default report archive schema is report_archive. This name can be changed as needed. |
| Report Archive DB Schema Password | Password that will be used to access the Report Archive database. |
Note: In the table above, the configurable properties are listed exactly how they display on the screen.
- Press y to change any details. Otherwise, press n to continue.

Figure 15. Finalizing Oracle DB Details
- You have successfully configured the Oracle Database. Proceed to Run or Decline the Database Patch.
Run or Decline the Database Patch
Important: The following steps vary depending on a single or multi-server installation. Carefully read the steps below before proceeding further.
- For single-server installation, press y to run the database patch. The database patch is mandatory for a single-server installation, or if you are installing the first server in a multi-server installation.
- For a multi-server installation, the database patch is only required for the first server in the installation. Press n for subsequent server installations.
Important: If you run the database patch on a second or subsequent server in a multi-server installation, you may corrupt the existing database.

Figure 16. Database Patch Execution
Configure Authentication Mode
The following text displays:

Figure 17. Authentication Configuration
- Press 1 for Standard Form Authentication. This is the default option.
- Press 2 for PKI Authentication, and follow the steps listed in Configure PKI Authentication on Linux.
The following text displays:

Figure 18. Application Protocol Options
- Press 1 for HTTP
- Press 2 for HTTPS, and follow the steps listed in Form Authentication with HTTPS on Linux.
The following text displays:

Figure 19. Apache Tomcat Server Port Number
- The default port number will display (8080 for HTTP).
- You will be prompted to change any details. Press y if any changes are needed. Otherwise, press n to continue.
Note: If you press y, you will need to re-input the information in Configure Authentication Mode.
Configure User Connectivity Settings
The following text displays:
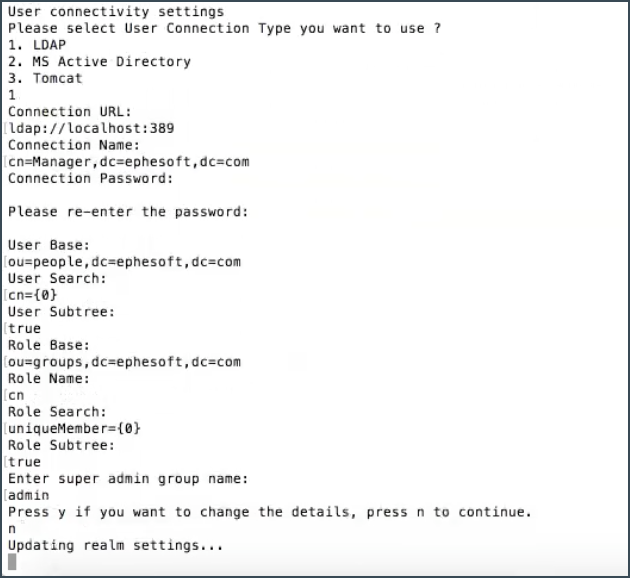
Figure 20. User Connectivity Settings
The available user connection types are as follows:
- LDAP (included with the Ephesoft Transact installer)
- Microsoft Active Directory (MSAD)
- Apache Tomcat (included with the Ephesoft Transact installer)
Note: Apache Tomcat is the simplest user connection type to set up, as is does not require any configuration. However, any changes to users (each time the user file is changed) will require a restart of Ephesoft Transact.
LDAP
- Select LDAP by typing 1 and pressing the Enter key.
- Provide the required details, as described in the table below.
| LDAP property | Description |
| Connection URL | A valid URL to connect to an LDAP server. The connection URL should be in the following format:
ldap://<server_address>:<port_number>. |
| Connection Name | A valid username to connect and access the LDAP server. This is the username of the user responsible for interacting with the server. |
| Connection Password | The password for the user responsible for interacting with the server. |
| User Base | The relative path where all users’ information will be located. This attribute defines where to look for a user. |
| User Search | Search string for searching users. |
| User Subtree | This attribute defines the search scope.
|
| Role Base | The relative path where all roles information will be located. This attribute defines where to look for a role corresponding to a user. |
| Role Name | The role name defines which attribute is used for a role. |
| Role Search | Search string for searching roles. |
| Role Subtree | This attribute defines the search scope.
|
| super admin group name | The group name for users with super admin privileges, such as access to the entire functionality of Ephesoft Transact. The super admin users can assign the user roles from the Access Manager screen in Ephesoft Transact (Home > System Configuration > Access Manager). |
Note: In the table above, the configurable properties are listed exactly how they display on the screen.
- Press y if you need to change any details. Otherwise, press n to continue.
- Proceed to Install Applications.
Microsoft Active Directory (MSAD)
- Select MSAD by typing 2 and pressing the Enter key.
- Provide the required details, as described in the table below.
| MSAD property | Description |
| Connection URL | A valid URL to connect to an Active Directory server. The connection URL should be in the following format:
ldap://<server_address>:<port_number>. |
| Connection Name | A valid username to connect and access the Active Directory server. This is the username of the user responsible for interacting with the server. |
| Connection Password | The password for the user responsible for interacting with the server. |
| User Base | The relative path where all users’ information will be located. This attribute defines where to look for a user. |
| User Search | Search string for searching users. |
| User Subtree | This attribute defines the search scope.
|
| Role Base | The relative path where all roles information will be located. This attribute defines where to look for a role corresponding to a user. |
| Role Name | The role name defines which attribute is used for a role. |
| Role Search | Search string for searching roles. |
| Role Subtree | This attribute defines the search scope.
|
| MS AD Group Search Filter | This attribute helps to filter search results and can have the following operators:
Example: ((!cn=a*))(|cn=Ephesoft*)(&(cn=b*))) This parameter is optional and can be left empty. |
| super admin group name | The group name for users with super admin privileges, such as access to the entire functionality of Ephesoft Transact. The super admin users can assign the user roles from the Access Manager screen in Ephesoft Transact (Home > System Configuration > Access Manager). |
Note: In the table above, the configurable properties are listed exactly how they display on the screen.
- Press y if you need to change any details. Otherwise, press n to continue.
- Proceed to Install Applications.
Apache Tomcat
- Select Tomcat by typing 3 and pressing the Enter key.
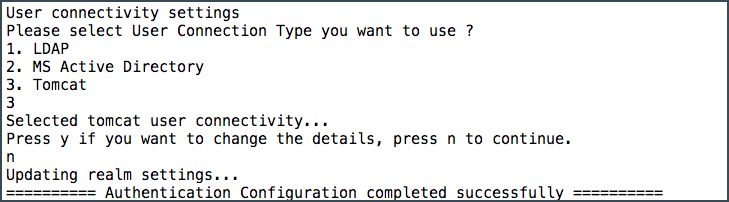
Figure 21. Select Tomcat
- Press y if you need to change any details. Otherwise, press n to continue.
- Proceed to Install Applications.
Install Applications
- You will be prompted to install Tesseract (an OCR engine).
Note: Tesseract is optional and not recommended but has the option to support more languages. The recommended OCR engine is Nuance, which will be installed automatically in step 3 below.
-
- Press n to decline installing Tesseract.
- Press y to install Tesseract.

Figure 22. Installing Tesseract
- The installer will prompt for registration information, which will assist with generating your license for Ephesoft Transact. Provide the registration details.
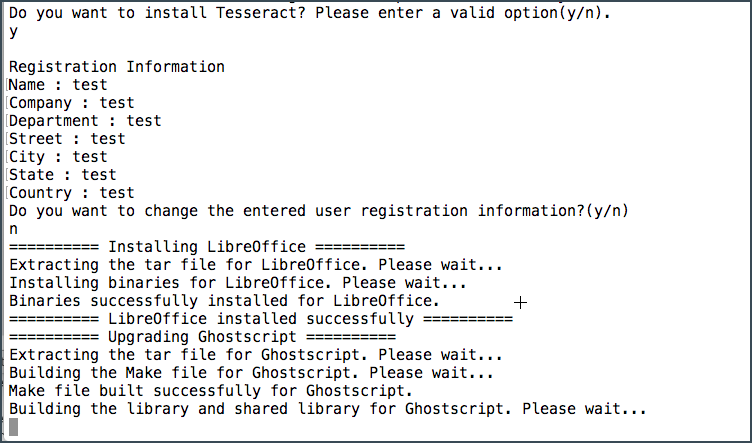
Figure 23. Registration Information
-
- Press y to make any changes. Otherwise, press n to continue.
The following screen will display:

Figure 24. Installing and Updating Applications
- The installer will continue to automatically install and upgrade other applications used by Ephesoft Transact such as LibreOffice, ImageMagick, Nuance, and Poco.
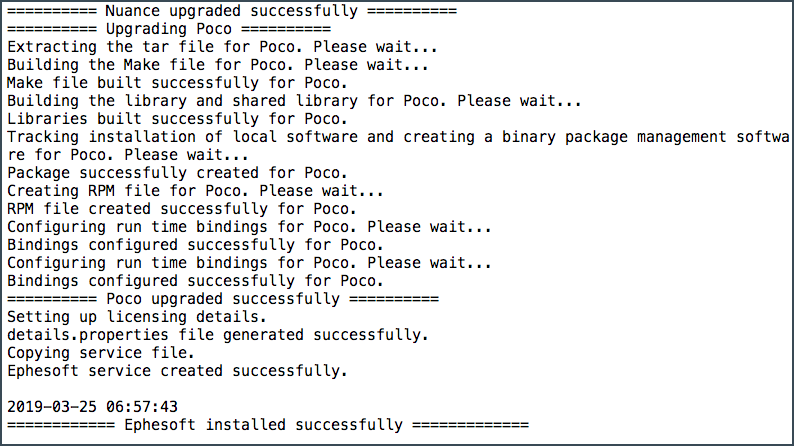
Figure 25. Installing and Updating Applications (cont.)
Important: This step may take some time depending on your server configuration. If the installation process is interrupted at any point due to internet connectivity issues, you can restart the installation process by running the ./install command again. To check the installation logs and see the installation status, you can use the following command:
tail -f /var/log/install-ephesoft.log
- This completes the normal installation. Continue to License and Launch Ephesoft Transact.
Silent Install
- Open the config.properties file located in the Response-Files folder.
![]()
Figure 26. vi config.properties Command
- Edit the values for the parameters in config.properties to reflect the required configuration for the install. See the table on configurable properties below for explanations of important parameters.
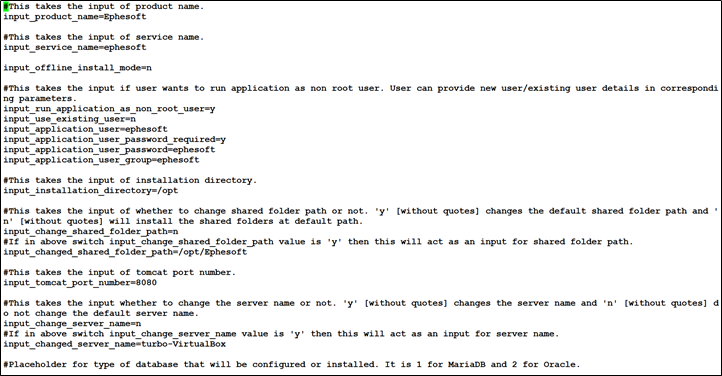
Figure 27. Edit config.properties File
Important: The upgrade may fail if any of the following settings in config.properties file are incorrect.
| Configurable Property | Description |
| input_database_patch_enable | Select one of the following options depending on your server environment:
|
| input_upgrade_application | Select y to upgrade Ephesoft Transact from an older version. |
- Save the updated config.properties file to the same name in the Response-Files folder.
- Navigate to the folder with the unzipped Ephesoft Transact installer and start the silent installation process by running the following command:
./install -silentinstall -product

Figure 28. Start the Silent Installation
- The installer will pick up all the required details from the config.properties files.
- The silent install is complete. Proceed to Service Pack Installation.
Service Pack Installation
Note: The following section is included as a reference, but you may skip this service pack in favor of the 2020.1.02 Feature Pack if preferred.
After the release of Ephesoft Transact 2020.1, issues were reported by customers that could affect numerous installations. In addition, there are some dependencies on Ephesoft Transact property file changes required to support the Cloud HyperExtender globally. Ephesoft has created a service pack to address these issues. This service pack must be installed immediately after completing the install process.
Perform the following steps to install the 2020.1.01 service pack for Ephesoft Transact.
Note: Steps listed as “CHE only” are mandatory for Cloud HyperExtender users.
- Stop the Ephesoft Transact service on all nodes.
- Download and extract the Linux_ServicePack_2020.1.01.zip folder to a temporary location.
- Open shell with the root user.
- Go to the [Ephesoft_Home]/Application/WEB-INF/lib/HOT-FIXES directory.
- If the gxt-core-0.0.15-SNAPSHOT.jar file already exists:
- Create a backup folder in the HOT-FIXES folder (step 4) named Backup_2020.1.01.
- Copy the existing .jar file to the Backup_2020.1.01 folder.
- Delete the old .jar file.
- If you did not already have the gxt-core-0.0.15-SNAPSHOT.jar file:
- Copy the new .jar file (included in the .zip file) from the temporary location to the HOT-FIXES folder (step 4).
Note: If you do not use the Cloud HyperExtender plugin, proceed to step 12.
CHE Only Steps
Note: Steps 7-11 are CHE only.
- Create a backup folder named CHE_Backup_2020.1.01 outside of the [Ephesoft_Home] directory.
- Navigate to the [Ephesoft_Home]/Application/WEB-INF/classes/META-INF/cloud-plugin/ directory and save a copy of the cloud-plugin.properties file to the new CHE_Backup_2020.1.01 folder.
- Open the cloud-plugin.properties file and replace the cloud.registration.url value with one of the following:
- For a US Transact instance, replace with “https://transact.us.ephesoftcloud.com/#/register?multiCountry=true“
- For a Frankfurt Transact instance, replace with “https://transact.de.ephesoftcloud.com/#/register?multiCountry=true“
- For a Singapore Transact instance, replace with “https://transact.sg.ephesoftcloud.com/#/register?multiCountry=true“
- Deploy the ephesoft-cloud-client application.
- Save a backup of the existing [Ephesoft_Home]/JavaAppServer/webapps/ephesoft-cloud-client directory to the 1.01 folder.
- Remove the existing [Ephesoft_Home]/JavaAppServer/webapps/ephesoft-cloud-client directory and its contents.
- Copy the new ephesoft-cloud-client folder from the temporary location (step 2) and save its contents to the [Ephesoft_Home]/JavaAppServer/webapps/ directory.
- Execute the following command to change ownership of the folder to the user “ephesoft”:
chown -R ephesoft ephesoft-cloud-client
-
- Execute the following command to change the group of the new files to the “ephesoft” group:
chgrp -R ephesoft ephesoft-cloud-client
-
- Navigate to the [Ephesoft_Home]/JavaAppServer/webapps/ephesoft-cloud-client/WEB-INF/classes/ directory and open the application.properties file.
- In the application.properties file, search for the cloud.notification.transact-hybrid-url property. Replace the following variables with their respective values:
- @@HTTPORHTTPS@@ – Replace this variable with either “http” or “https” as per your server configuration.
- @@SERVER_ALIAS@@ – Replace this variable with your server hostname.
- @@TOMCATPORTNUMBER@@ – Replace this variable with your web server port number (default is 8080).
11. Deploy cloud-ui.
-
- Save a backup of the existing [Ephesoft_Home]/JavaAppServer/webapps/cloud-ui directory to the CHE_Backup_2020.1.01 folder.
- Remove the existing [Ephesoft_Home]/JavaAppServer/webapps/cloud-ui directory and its contents.
- Copy the new cloud-ui folder from the temporary location (step 2) to the [Ephesoft_Home]/JavaAppServer/webapps/ directory.
- Execute the following command to change ownership of the folder to the user “ephesoft”:
chown -R ephesoft cloud-ui
-
- Execute the following command to change the group of the new files to the “ephesoft” group:
chgrp -R ephesoft cloud-ui
- Start the Ephesoft Transact server.
Note: These changes must be made on all servers (UI and Processing) in a cluster. Ephesoft recommends performing thorough testing of Ephesoft Transact after deploying the service pack.
You have successfully installed the 2020.1.01 Service Pack. If any issues occur, refer to Rollback Steps to revert the deployment. Otherwise, proceed to License and Launch Ephesoft Transact 2020.1 to complete the installation process.
Rollback Steps
If any issues occur with this service pack, follow the steps below to roll back this installation:
- Stop the Ephesoft Transact service on all nodes.
- Open shell with the root user.
- Go to the [Ephesoft_Home]/Application/WEB-INF/lib/HOT-FIXES directory.
- Delete the following file: gtx-core-0.0.15-SNAPSHOT.jar.
- Open the Backup_2020.1.01 folder located inside the HOT-FIXES folder.
- Copy the existing .jar file from the Backup_2020.1.01 folder to the HOT-FIXES folder.
- Delete the Backup_2020.1.01 folder.
Note: Steps 6-10 and 12 are CHE only.
- Restore the backup of the cloud-plugin.properties file from the CHE_Backup_2020.1.01 folder to its original location (step 8 above).
- Remove the existing [Ephesoft_Home]/JavaAppServer/webapps/ephesoft-cloud-client directory and its contents.
- Restore the backup of the ephesoft-cloud-client directory and its contents (step 10a above) inside [Ephesoft_Home]/JavaAppServer/webapps/.
- Remove the existing [Ephesoft_Home]/JavaAppServer/webapps/cloud-ui directory and its contents.
- Restore the backup of the cloud-ui-directory and its contents (step 11a above) inside [Ephesoft_Home]/JavaAppServer/webbapps/.
- Start the Ephesoft Transact server.
- If the Ephesoft Transact server starts successfully, delete the CHE_Backup_2020.1.01 folder.
You have successfully rolled back the 2020.1.01 Service Pack.
License and Launch Ephesoft Transact 2020.1
After installing the Ephesoft Transact service, you are ready to license and launch Ephesoft Transact. Follow the steps below:
Important: Ephesoft recommends starting the service after your license is installed. To complete the installation, refer to Licensing Requirements.
- Start the Ephesoft Transact service by running the following command:
service ephesoft start
You can track the service start-up process by opening the catalina.out file in the /opt/Ephesoft/JavaAppServer/logs/ folder and running the following command:
tail -f catalina.out
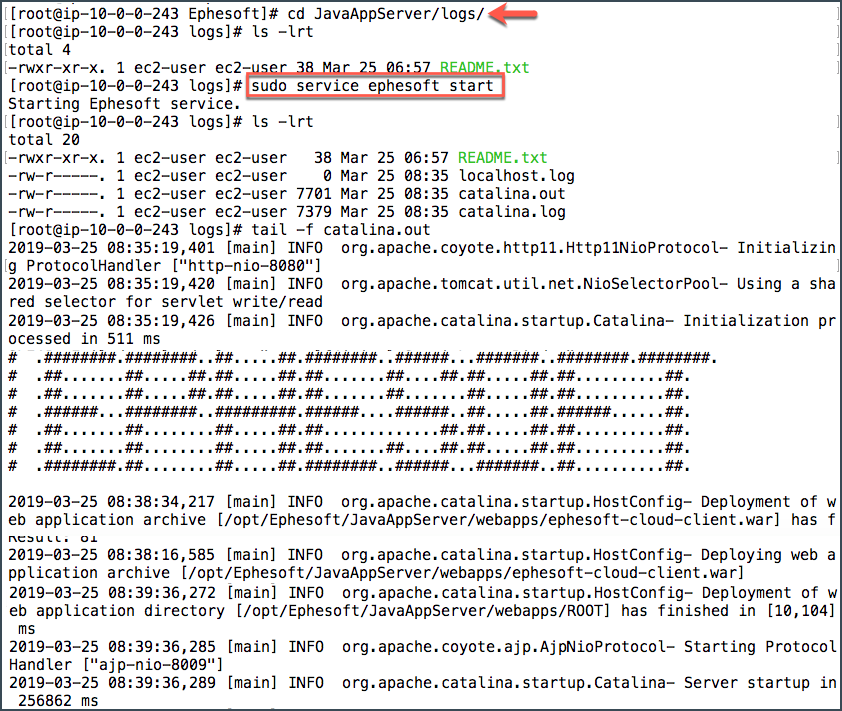
Figure 29. Launch Ephesoft Transact
- Open a web browser and enter the following Ephesoft Transact URL: http://<servername>:<portnumber>/dcma/home.html. The default port number is 8080. Allow time for the background configuration process to complete. The initial startup may require several minutes.
Important: If you receive an error or connection warning, you will need to open the firewall ports to connect to Ephesoft Transact.
- The Ephesoft Transact 2020.1 home page displays. Select Administrator or Operator to log in.

Figure 30. Ephesoft Transact Home Screen
- Enter the username and password. The default username is ephesoft, and the default password is demo.
Figure 31. Login Screen
Important: The system may require additional time to complete the initial login.
Conclusion
This completes the installation process.