Introduction
This quick reference guide provides a brief overview of Ephesoft Transact features and terminology, user roles, and main operating interfaces.
Ephesoft Transact captures document data using context-driven productivity and open source technologies, and can operate both on-premises and in the cloud. Ephesoft Transact processes incoming documents and extracts data in the following workflow:
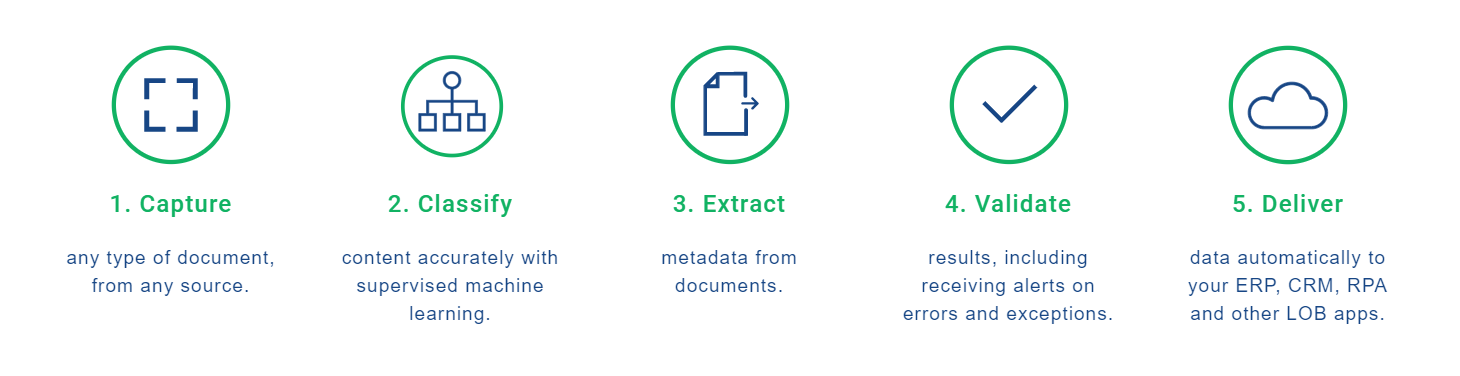
Figure 1. Ephesoft Transact Workflow
For a list of workflow terms and definitions, refer to the Glossary of Terms and Definitions.
Getting Started
Ephesoft Transact Home Page
Upon navigating to the Ephesoft Transact host URL, the home page displays:
![]()
Figure 2. Home Page
The home page includes resources and navigation menus to access Ephesoft Transact as an administrator or operator. Additional resources are listed at the bottom section of the home page.
![]()
Figure 3. Additional Resources
User Roles and Login Screens
The following table outlines the three supported user types and their responsibilities.
| User Role | Responsibilities |
| Super administrator | Manages initial deployment, cloud configuration, security configuration, and tasks associated with back-end operations and setup. |
| Administrator | Performs ongoing administrative functions with batch class management and batch instance management. |
| Operator | Uploads batches for processing, reviews document type classification results in the Review interface, and reviews data extraction results in the Validation interface. |
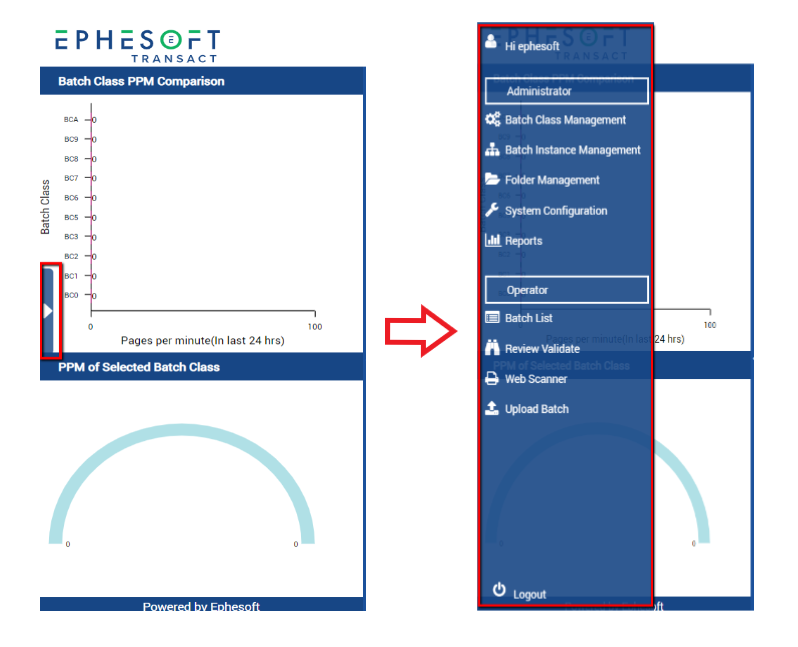
- On the right side of the home screen, select an operation icon under either the Administrator or Operator menu to prompt the login page. The icon selected will determine the page that displays after login.

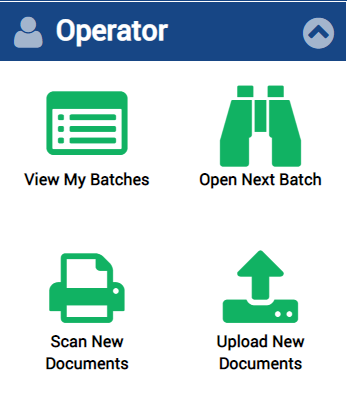
Figure 4. User Icons at Login
- Enter your login credentials.
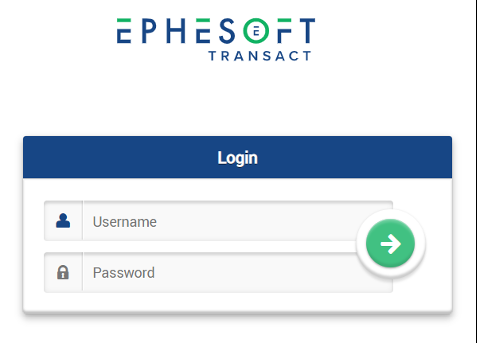
Figure 5. Login Screen
- Your selected page displays upon login. As an example, the Administrator > Batch Class Management screen is shown below.
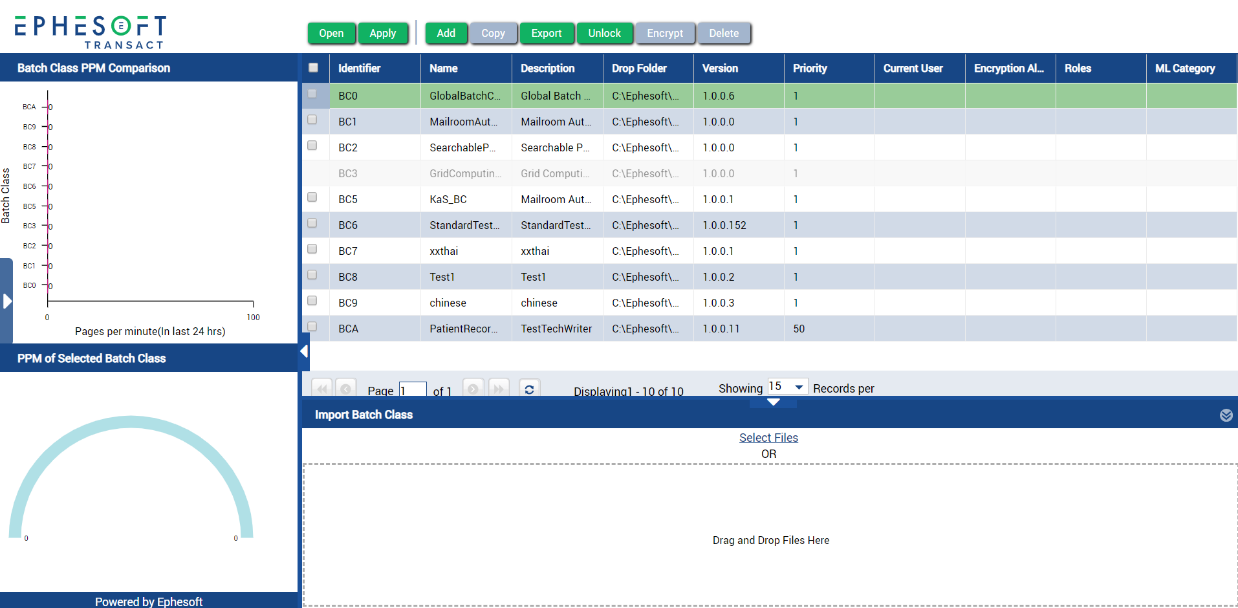
Figure 6. Batch Class Management Screen
- To navigate to other screens, hover over the left-hand tab to display the navigation menu.
Administrator Functions
Administrators are responsible for creating, configuring and maintaining batch classes, and managing batch instance processing.
The Administrator navigation menu options are displayed below.
Note: Access to System Configuration is restricted to Ephesoft Transact users with super administrator permissions.
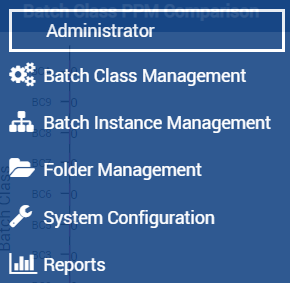
Figure 8. Administrator Menu
The following table provides a brief overview of each administrator interface and its functions.
| Feature | Overview |
| Batch Class Management | Primary configuration area where workflows, classification rules, and extraction rules are configured and managed. |
| Batch Instance Management | Dashboard that displays all batches that are being processed, as well as a real-time status per batch in the overall workflow. Administrators can also view which batches are currently locked for use by other users. |
| Folder Management | Web browser access to specific areas of the Ephesoft Transact server, to allow uploads and downloads of files without logging onto the server. Stores document images that were used as part of training the system. |
| System Configuration (Super Administrator only) | Administrators can use the System Configuration interface to manage user security, database connections, licensing, security tokens and keys, and the regular expression pool. |
| Reports | Reporting dashboard that provides access to standard and advanced reports. |
Batch Class Management
The Batch Class Management screen displays all existing batch classes and enables administrators to add, remove, and configure batch classes. The configuration options include creating document types, index fields, and extraction rules.
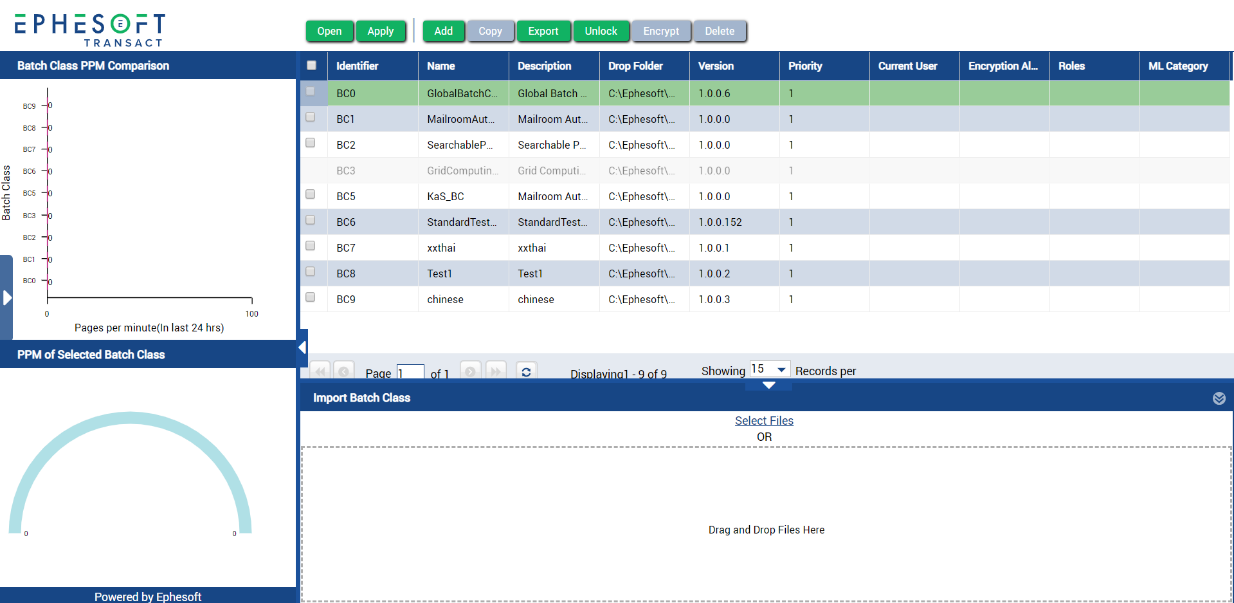
Figure 9. Batch Class Management Screen
Batch Class Configuration
Batch classes provide the global settings and configurations from which all additional operations in the Ephesoft Transact workflow are derived.
To access Batch Class Configuration, navigate to the Batch Class Management screen.
- Click Add to create a new batch class and view the configuration screen.
- To view and edit any existing batch class configurations, double-click the batch class name or select the check box for the batch class and click Open.
The following screen illustrates the general layout of the Batch Class Configuration screen:
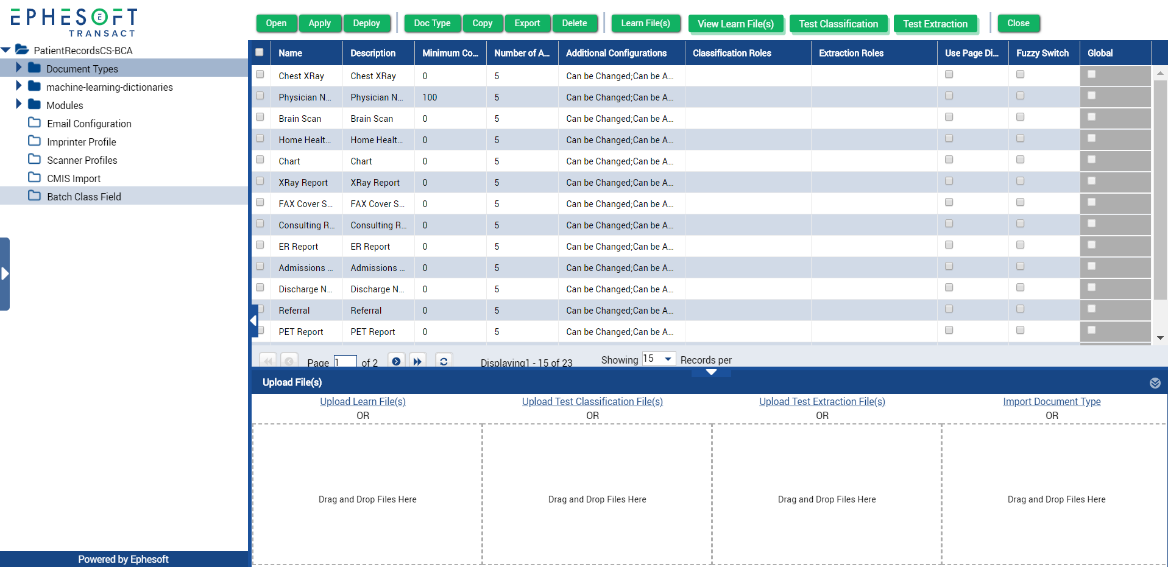
Figure 10. Batch Class Configuration Screen
For more details on batch class configuration options, reference the Glossary of Terms and Definitions.
Document Types
The Document Types screen displays all document types that have been created within a selected batch class.
To access Document Types from a batch class, locate the batch class name in the left navigation tree and expand the Document Types node.

Figure 11. Sample Document Types Folder
The following screen will display:

Figure 12. Sample List of Document Types
Within the Document Types node, the following configuration options are available:
| Document Type Setting | Definition |
|---|---|
| Index Fields | Individual pieces of metadata that will be extracted from documents of a specific document type. |
| Tables | Allows the user to define extraction rules for various types of tables that can be found inside each document type. |
| Function Key Mapping | Allows the user to configure a custom script to be used when a function key is pressed. |
| DB Export Configuration | Allows the user to map document type index fields to columns in a database table. During export, Ephesoft Transact will insert the index field metadata into the database table.
Note: This functionality only supports index field extraction, and not Ephesoft Transact table extraction. |
| Fixed Form Extraction | When a document type requires fixed-form extraction such as handprint, check boxes, or signature detection, this setting maps the external fixed-form project to the individual pages of that document type. |
| Fuzzy DB Extraction Configuration | Ephesoft Transact supports two different fuzzy database lookup options, each described below. |
| Document Fuzzy | Document Fuzzy allows the user to use either all document OCR content, or individual extracted values to perform a lookup to an external database. The data returned can be assigned to specific index fields. |
| Field Fuzzy | Field Fuzzy allows the user to extract index fields from a document, then use those values for a database lookup, and return the values into the same (or other) index fields. |
| REST API Lookup | Allows the user to look up external data using index field data extracted from a document. Index field data is passed to the external API, and pieces of data returned from the API can be mapped to other index fields. |
Modules and Plugins
Modules represent specific stages of the batch class workflow. To access the modules used in any batch class, open a batch class and expand the Modules node.
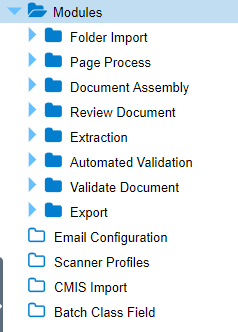
Figure 13. Modules in a Workflow
Within each module are a set of plugins. Plugins can be added, arranged and edited within a module to configure a workflow that will satisfy a customer’s requirements. From the expanded Modules node, select any specific module folder to view the plugins used in that module.
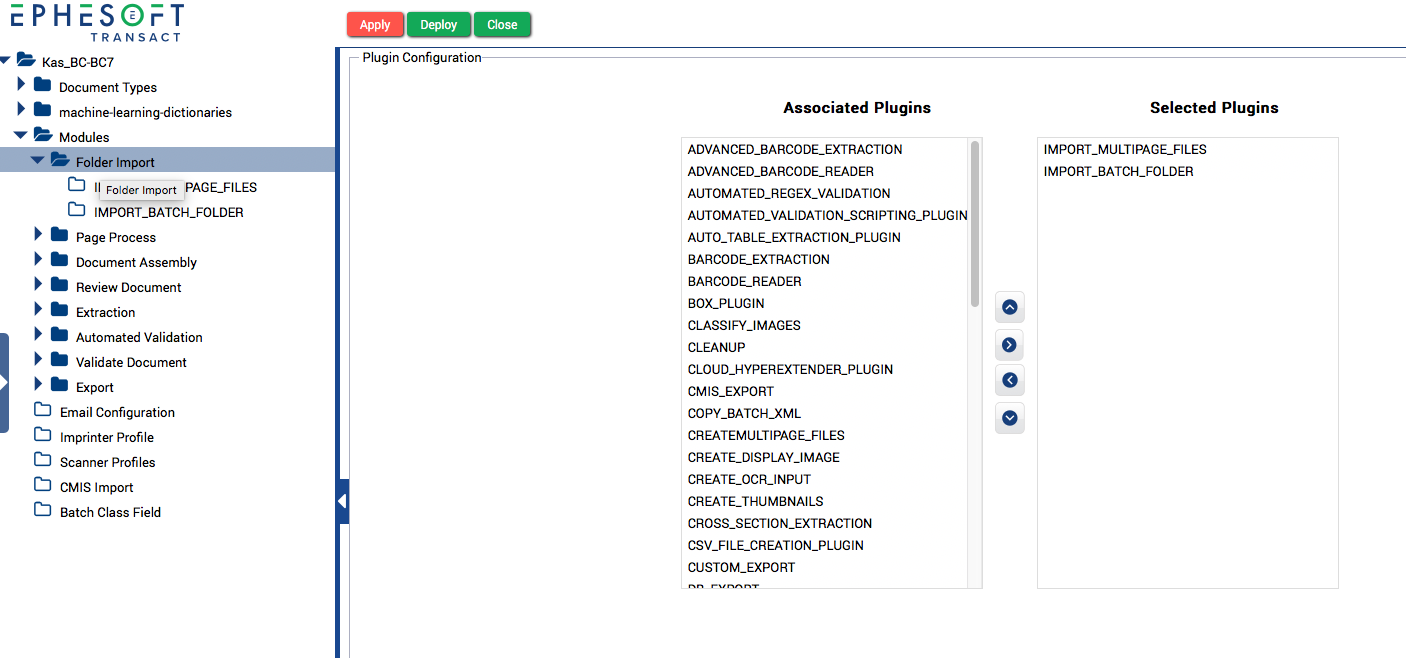
Figure 14. Folder Import: Available and Selected Plugins
Within a module, selecting a specific plugin will direct users to its configuration settings.
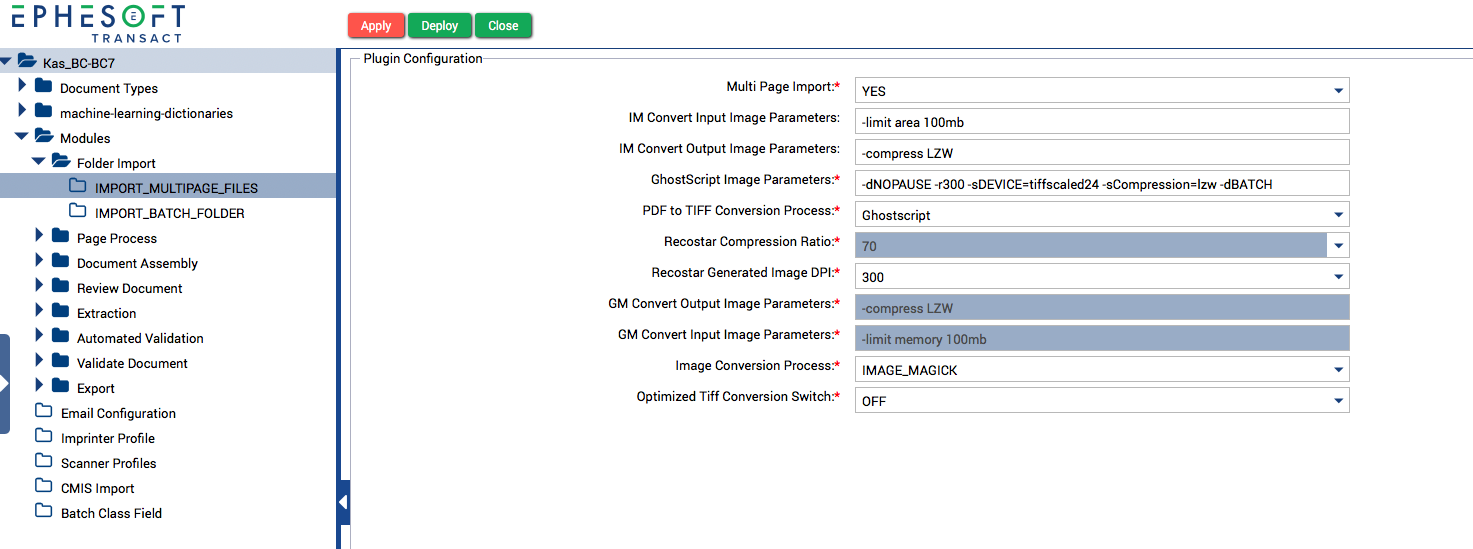
Figure 15. Sample Plugin Configuration
For details on module configuration options, reference the Glossary of Terms and Definitions.
Email Configuration
The Email Configuration screen enables administrators to configure document ingestion from an email account.
The Email Import plugin is responsible for importing documents from an email account. Administrators can specify the types of documents to be ingested, including determining if the body of the email should be ingested.
Scanner Profiles
The Scanner Profiles section allows administrators to add and configure multiple scanner profiles to support different scanning needs. These profiles are used by the Ephesoft Transact Web Scanner, a client application that integrates Ephesoft Transact directly with local scanners.
CMIS Import
The CMIS Import feature downloads files from a CMIS-compliant repository (such as Alfresco, Nuxeo, or Documentum) and processes them as batches. Once processed, the completed documents and index field metadata can be exported using any of Ephesoft Transact’s supported export mechanisms.
Batch Class Field
This feature allows administrators to add fields at the batch class level. If a custom field exists, it will prompt the operator to complete field details during the initial steps of batch processing. Fields can be used to include various types of information not found on all documents, such as customer business process information or commonly audited details.
Batch Instance Management
A batch instance contains all files and pages that are to be processed in a particular work session (a “job” or “instance”). Whenever documents are ingested on the server, a new batch instance is created.
The Batch Instance Management section allows administrators to configure, add, or remove batch instances. Tasks for batch instance management include the following:
- View and prioritize all existing batch instances.
- Select any batch instance to display batch execution details and current status in the workflow.
- Open, restart, unlock, or delete batch instances.
- Troubleshoot batch instances.
- View batch instance performance metrics.
For more details on batch class configuration options, reference the Glossary of Terms and Definitions.
View Batch Instance Status and Details
On the left side of the Batch Instance Management screen, a pie chart displays the number of batch instances per processing status type.
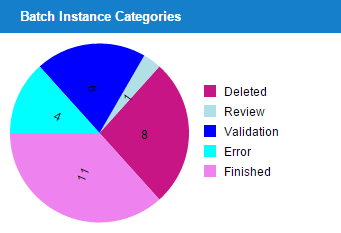
Figure 16. Sample Pie Chart of Batch Instance Categories
The stacked chart located below the pie chart shows the number of batch instances backlogged in either Review or Validation status, organized by the following 4 time periods:
- 0-1 hour
- 1-4 hours
- 4 hours – 1 day
- 1 day+
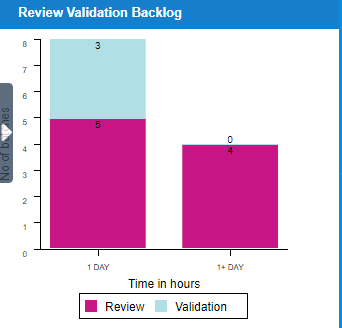
Figure 17. Sample Bar Chart of Review-Validation Backlog
This feature allows an administrator to check batch instance status. When a batch instance is selected from the grid, the details of the batch instance are displayed in the bottom panel.
To view configuration details for a particular batch class, such as name, processing priority, or current processing status, navigate to the Batch Execution Details screen located at the bottom of the Batch Instance Management page. If the selected batch class is running, the colored bars represent the stage progression and real-time status of the batch instance within the overall workflow.
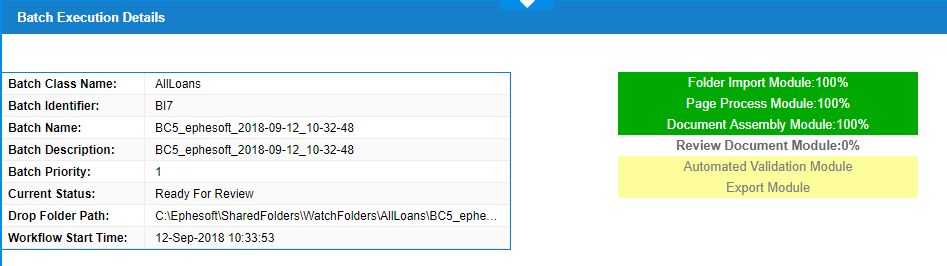
Figure 18. Sample Batch Execution Details
Adding, Sorting, and Filtering Batch Instance Columns
For enhanced visibility, sorting and filtering is available in the Batch Instance screen inside the Batch Instance Grid.
To add additional columns to the grid, select the drop-down icon (▼) on any existing column, navigate to Columns, and select the desired column types.
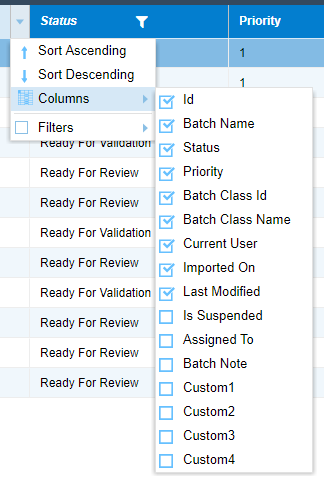
Figure 19. Custom Columns in Batch Instance Management
Set Batch Instance Priority
Batch instance priority defines the order in which batches are executed. The priority of the batch instance is a numerical value from 1 to 100, with 1 as the highest priority and 100 as lowest. When multiple batches are running simultaneously, they will be executed in order of highest to lowest priority.
Set Batch Instance Auto-Refresh
Administrators and operators can modify the auto-refresh interval in the Batch Instance Management and Batch List screens. To modify the auto-refresh interval, navigate to the Refresh Interval drop-down menu at the bottom of the screen and select the preferred option.

Figure 20. Refresh Interval Drop-down Menu
Troubleshooting Batch Instances
The Troubleshooting Batch Instance window is found in the bottom right section of the Batch Instance Management screen and provides the option to download multiple types of logs, batch instance files, and batch class files.
If hidden, click the arrow (◄) to view and expand.
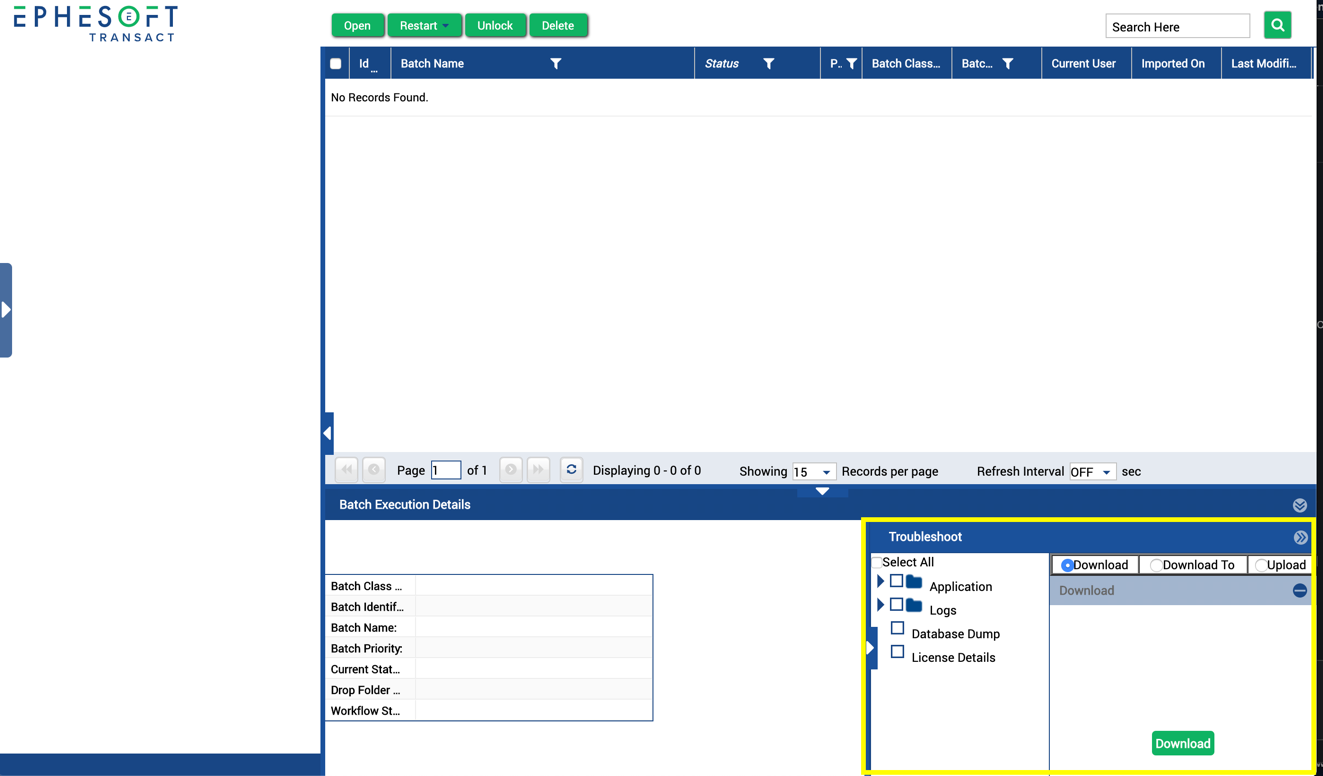
Figure 21. Troubleshoot Window
Folder Management
The Folder Management screen provides a browser-based folder navigation tool for administrators to browse, view, and modify files, folders, and batch class configurations. This feature is useful when users don’t have direct access to the Ephesoft Transact server at the operating system level.
Super administrators have further functionality to view batch XML files for each batch instance, as well as the final output PDF or TIFF files generated by the Ephesoft Transact workflow.
The following image illustrates a sample Folder Management screen and its components.
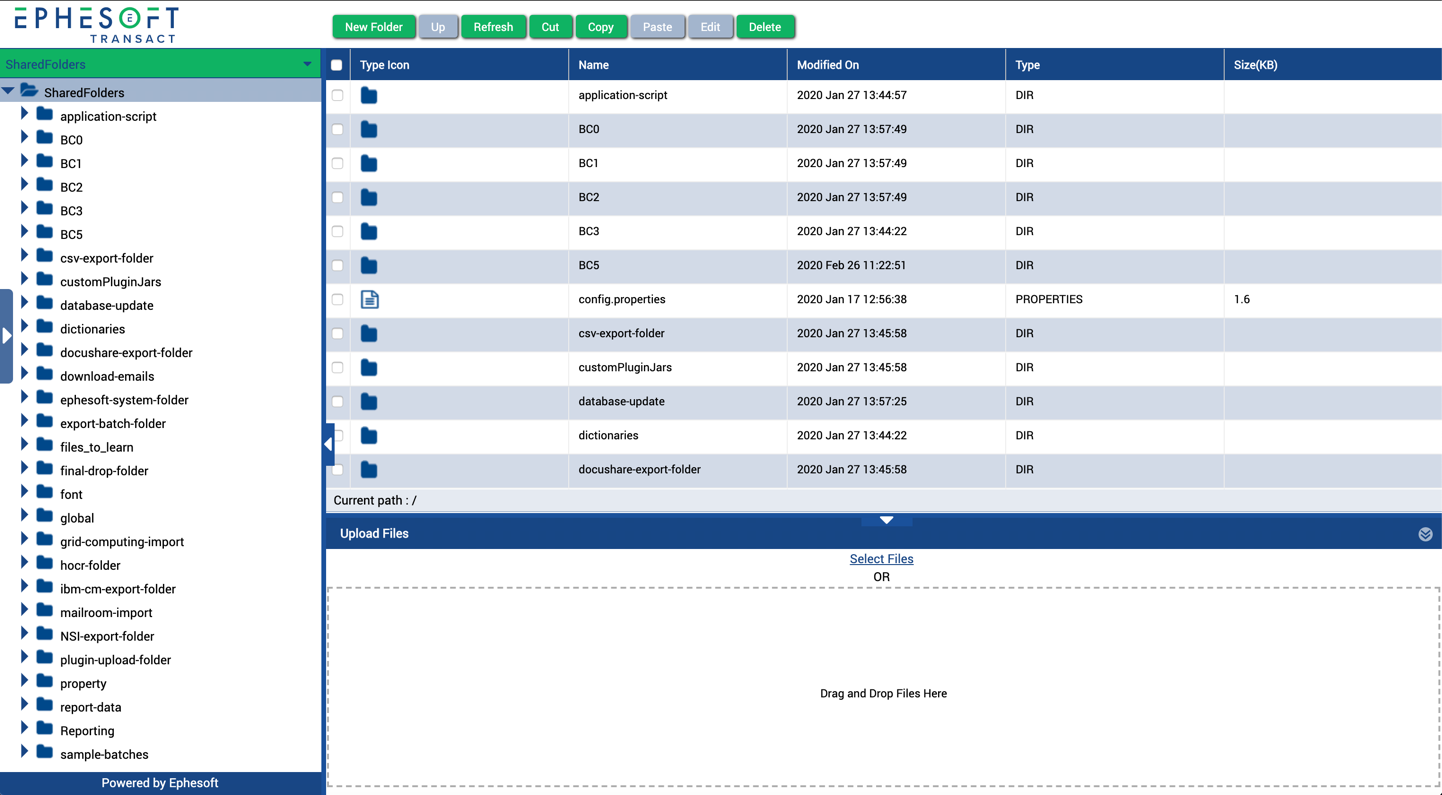
Figure 22. Folder Management Landing Page
The following image displays sample sub-folders found in a typical Ephesoft Transact environment:
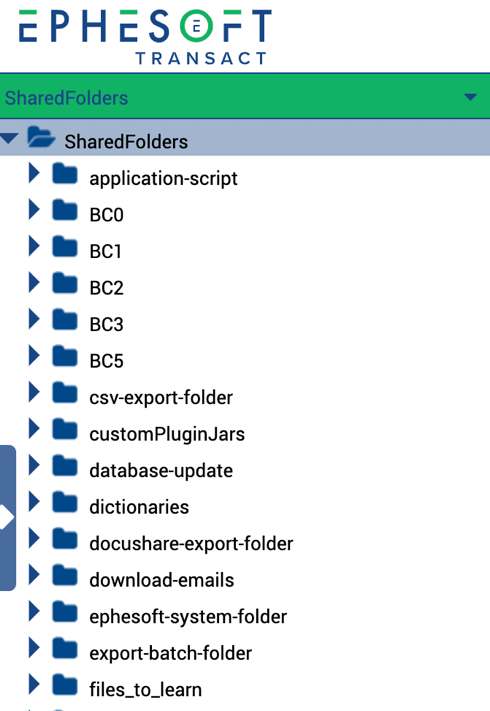
Figure 23. Sample Sub-Folders
Reports
This section provides administrators with the following types of reports.
Dashboard Reports
Dashboard reporting options include the following:
- System Health: displays server status for the specified date.
- System Reporting: displays overall batch processing metrics.
- Batch Processing: displays page processing metrics.
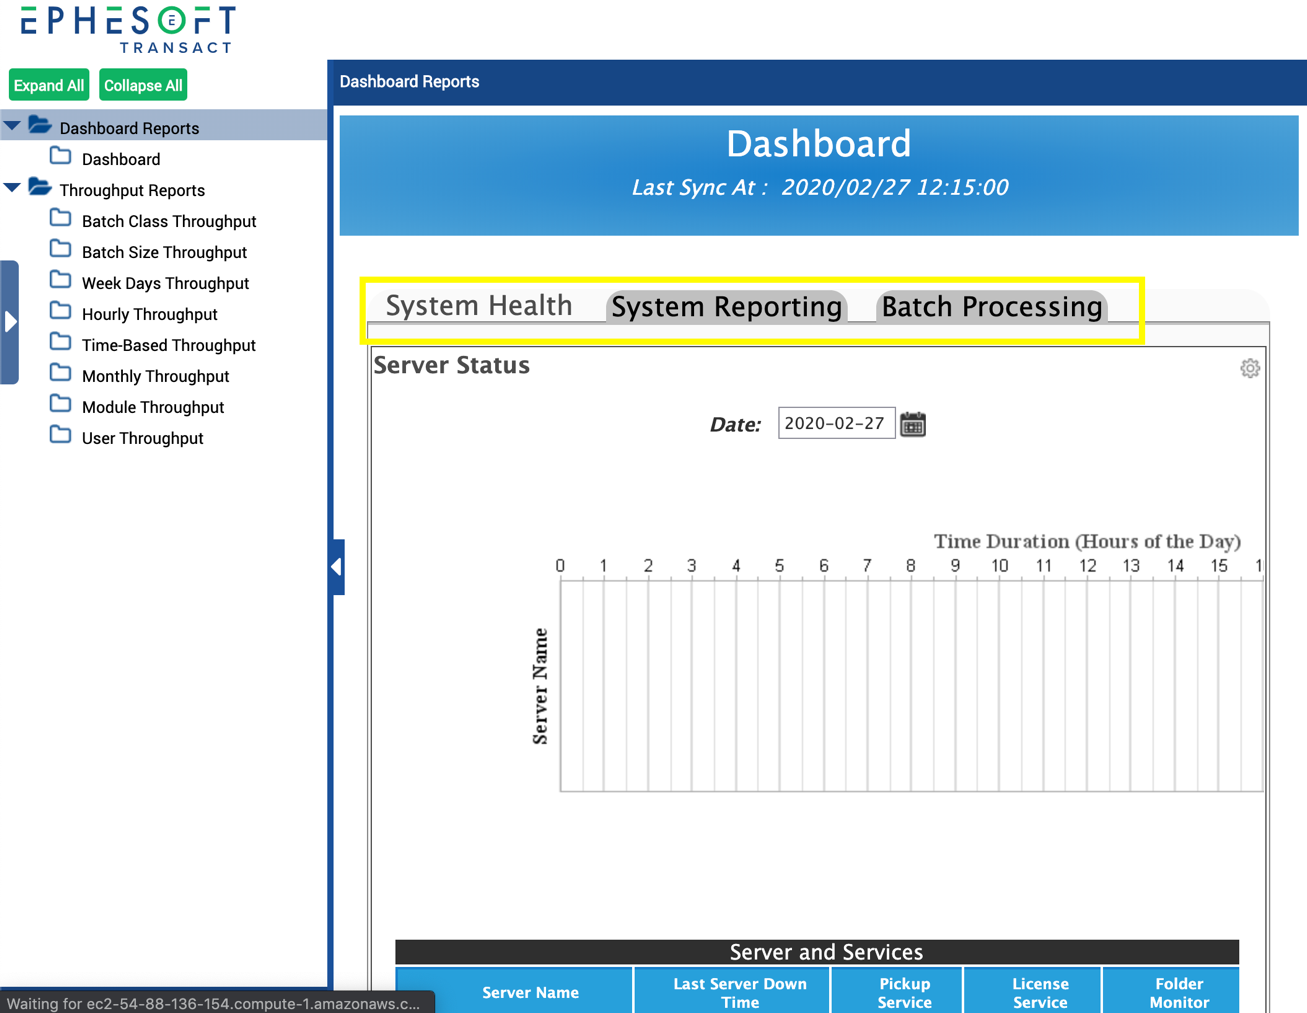
Figure 24. Dashboard Reports
Throughput Reports
Throughput reports summarize metrics per workflow variable including hourly throughput, user throughput, and batch size throughput.
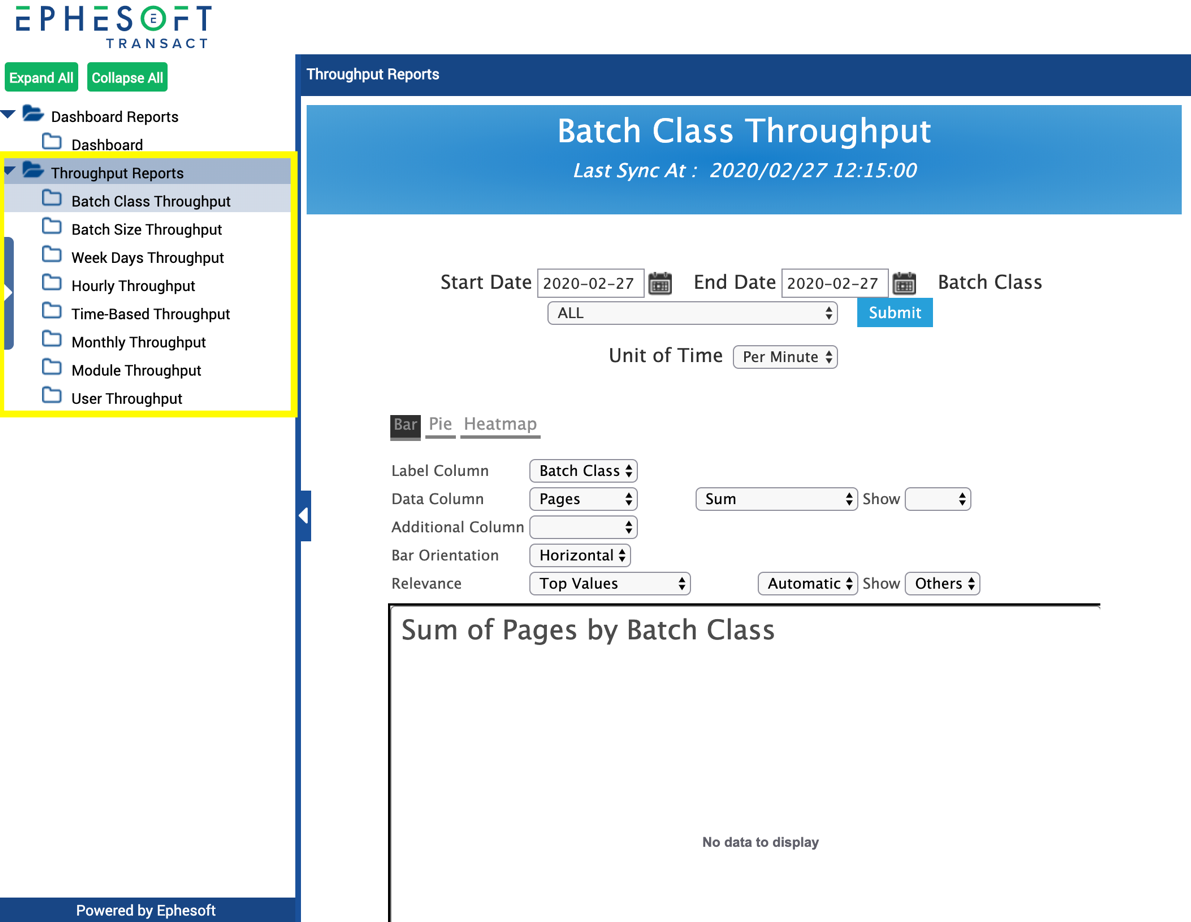
Figure 25. Throughput Reports
System Configuration
The System Configuration screen is enabled only for Super Administrators. For details on configuration options, reference the Glossary of Terms and Definitions.
Operator Functions
The following section describes the Operator role and responsibilities. Operators can perform tasks related to batch instances, such as uploading batches, reviewing document classification and separation, and reviewing index field extraction.
The Operator navigation menu options are displayed below.
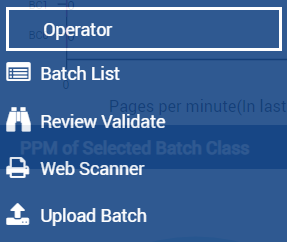
Figure 26. Operator Menu
The following table provides a brief overview of each page and its functions.
| Page | Features |
| Batch List | Displays all batch instances waiting for review or validation, and their priority as set by the administrator. |
| Review Validate | Allows operators to review document type classification and verify data that has been extracted from documents. |
| Web Scanner | Browser-based scanning interface that allows local TWAIN-based scanners to scan documents directly to the Ephesoft Transact server. |
| Batch Upload | Provides an interactive environment for the user to upload electronic documents into Transact for processing. |
Batch List
The Batch List screen shows the list of batch instances that are In either Review (document type classification) or Validation (data extraction verification) status, and is divided into 3 parts:
- Batch List Charts
- Batch List Option Panel
- Batch List Grid
By default, batches that are in Ready for Review status will be shown first. Clicking Validation will display all batches that are in the Ready for Validation status.
The following image illustrates the Batch List screen:
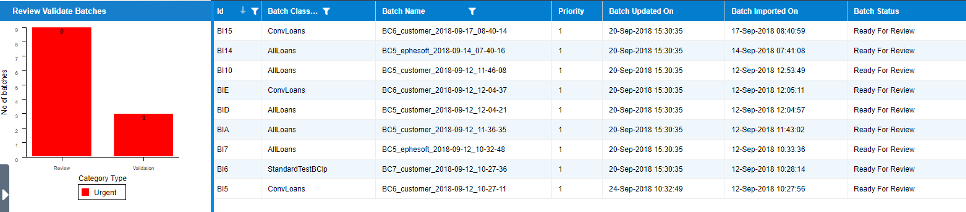
Figure 27. Sample Batch List Review Screen
Set Batch Instance Auto-Refresh
Administrators and operators can modify the auto-refresh interval in the Batch Instance Management and Batch List screens. To modify the auto-refresh interval, navigate to the Refresh Interval drop-down menu at the bottom of the screen and select the preferred option.

Figure 28. Batch Instance Auto-Refresh Screen
Review and Validate
The Review and Validate screens allow operators to review and verify data that has been extracted from the ingested documents through batch instance processing. If extracted data falls below the batch class confidence threshold, Ephesoft Transact alerts the operator of a potential wrong value, and directs them to the review and validation screens to verify the extracted data values and make necessary corrections. Operators can also perform various other modifications such as classifying the document type, splitting documents, merging pages to form a document, and deleting unnecessary pages from a document.
The following image is an example of the Validation screen.
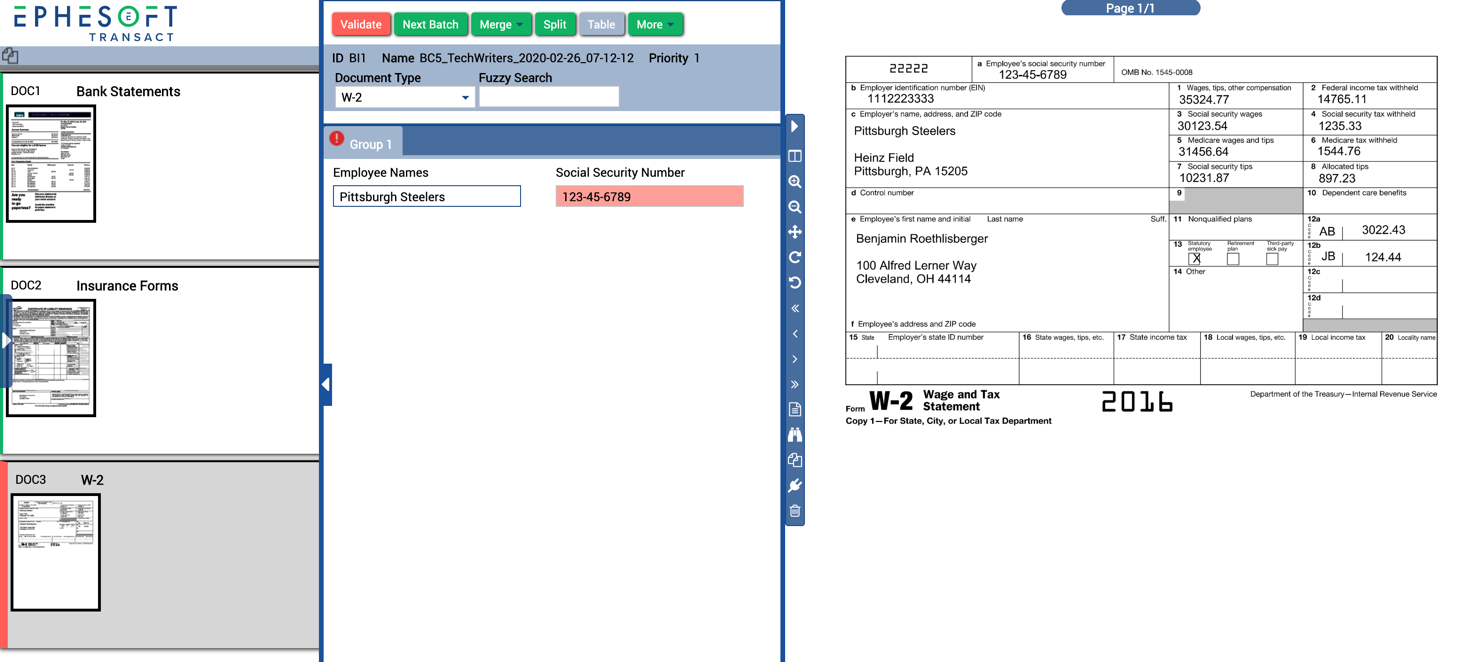
Figure 29. Sample Validation Screen
Web Scanner
With Web Scanner, users can scan documents directly into the Ephesoft Transact server using a web application interface allowing the user to preview, rotate and re-scan necessary images as part of the overall batch to submit to Ephesoft Transact.
For more information on web scanner features and operations, refer to the Web Scanner User Guide.
Upload Batch
The Upload Batch screen allows operators to upload files directly from their computer. The uploaded files will be processed as a single batch instance.
The following image illustrates the Upload Batch screen.
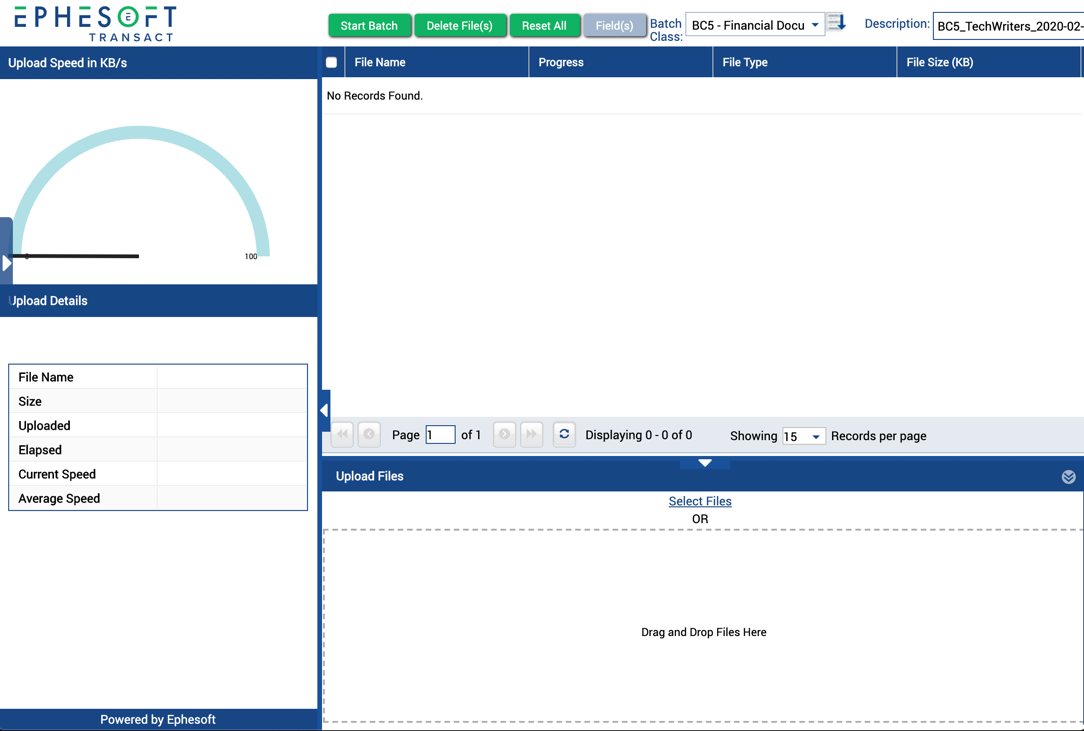
Figure 30. Upload Batch Screen
To upload a set of files for batch instance processing, drag and drop the files from your workstation into the lower panel. This will create a single batch instance. Once the upload is complete, select the batch instance and click Start Batch at the top of the screen to begin processing.
This completes the Quick Reference Guide for the basic features and user roles available in Ephesoft Transact. For more information, refer to Ephesoft Transact Features and Functions.
Glossary of Terms and Definitions
The following tables provide key terms and definitions that users may encounter while using Ephesoft Transact.
Ephesoft Transact Workflow
| Term | Definition |
| Document Capture | There are multiple ways to capture data: scanners, multi-function peripherals (MFPs), UNC folders (network folders), fax, email, mobile devices or through an outsourced business process organization (BPO). |
| Image Processing | Documents and images are normalized and rotated in preparation for classification. The system can apply filters to improve image quality and more easily identify documents for data extraction. |
| Document Classification and Review | Ephesoft Transact uses patented AI and ML algorithms that can “learn” document types and their extractable content. This workflow stage separates and classifies individual pages into separate documents.
If the system does not meet minimum confidence levels for pages it attempts to classify, the process will revert to the operator for review. |
| Data Extraction | Ephesoft Transact uses Optical Character Recognition (OCR), Intelligent Character Recognition (ICR) and Optical Mark Recognition (OMR) as well as AI and ML algorithms to extract data from ingested documents. |
| Data Validation | If any extracted data fall below pre-set confidence scores, the system prompts operator review. Validation may be needed when there are smudges, spills, blurry characters, or missing fields. The system alerts the operator of these documents and data values for manual verification and correction as necessary. |
| Data and Document Export | Once all documents have been validated, the exported documents and extracted data are moved to a repository or other business system. The exported documents and data can be stored on a local server or cloud-based storage, such as Alfresco, Box, or SAP. |
Module Functions
| Module | Function |
|---|---|
| Folder Import | Contains plugins that govern how documents, data or images are ingested or imported into Ephesoft Transact at the start of the workflow. Also defines additional compression, image optimization and image resolution attributes. |
| Page Process | Defines how Ephesoft Transact performs OCR. Plugins are available to, for example, create display and thumbnail images, or enable multidimensional classification. |
| Document Assembly | Responsible for separating and classifying single pages into documentsproduced in the Page Process module above. This module emphasizes two definitive plugins:
• DOCUMENT_ASSEMBLER • DOCUMENT_ASSEMBLER_SCRIPTING_PLUGIN |
| Review Document | Determines if batch instance contains documents with low confidence needing operator review and suspends workflow processing for this activity. The REVIEW_DOCUMENT plugin is the key component of this module. |
| Extraction | Locates and extracts defined data values from documents based on the OCR results produced in the Page Process module above. Extraction can entail key-value extraction, table extraction, fixed-form extraction, text extraction, and more. |
| Automated Validation | Automatically performs data type checks. This module contains all the extracted values for index fields, and checks index fields for matches in data type and appropriate values. It marks exceptions when they are present. |
| Validate Document | Determines if batch instance contains extracted values that were marked for exception and suspends workflow processing for operator validation. |
| Export | Defines how documents and the extracted data are distributed to external storehouses or other forms of output after all document processing and workflow operations are complete. |
Batch Class Management Functions
A batch class is a collection of document types. Each batch class has its own custom workflow. This table defines the buttons associated with this screen.
| Button | Function |
|---|---|
| Open | Opens the batch class and displays the configuration screen. |
| Apply | Saves all changes that have been made to the selected batch class or classes. |
| Add | Adds a new batch class. |
| Copy | Copies a batch class. |
| Export | Exports a batch class and creates a .zip file with the configurations and images used in document training. |
| Unlock | Batch classes can only be configured by one user at a time. If any administrator idles on a configuration screen, other administrators can use the unlock button to unlock the batch class. |
| Encrypt | Secures data from unauthorized access
Important: Only super administrators have permissions to encrpt a batch class. |
| Delete | Removes the batch class and any associated training documents from the Ephesoft Transact server. |
Batch Instance Management Functions
The batch instance processes ingested documents using an assigned batch class and its configurations. This table defines the buttons associated with this screen.
| Button | Function |
|---|---|
| Open | This button opens the selected batch instance that is in the processing queue. |
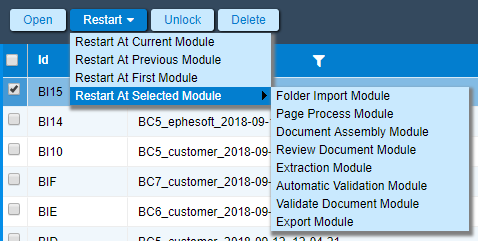
| Restart | Restart provides a precise way to execute specific workflow modules in batch instance processing. The following diagram illustrates the granular options.
Figure 31. Restart Menu Options: Administrator > Batch Instance Management |
| Unlock | To prevent multiple operators from reviewing the same documents, active batch instances are locked. An administrator can manually unlock batch instances. 
Figure 32. Unlock Batch Instance Administrator > Batch Instance Management
Figure 33. Unlock Confirmation |
| Delete | Deletes a selected batch instance from the processing queue. |
| Troubleshoot Batch Instance | Troubleshoots errors or failures that occur during batch instance processing. |

Batch Execution Details
| Field | Function |
|---|---|
| Batch Class Name | The name of the batch class to which the batch instance belongs. |
| Batch Identifier | The identifier of the batch instance. |
| Batch Name | The name of the batch instance. |
| Batch Description | The description for the batch instance. |
| Batch Priority | The priority of the batch instance. If the priority is edited, the batch must be restarted to reflect the new priority. |
| Current Status | The status of the batch instance. For example: RUNNING, ERROR, NEW, LOCKED, READY_FOR_REVIEW, READY_FOR_VALIDATION, DELETED, etc. |
| Drop Folder Path | The final export folder path for the batch class to which the batch instance belongs. |
| Workflow Start Time | Timestamp indicating when batch processing began. |
| Error Cause | This field will only be available in the grid if the batch instance is in ERROR state. It shows the details of the cause for the batch instance’s ERROR state. |
System Configuration Functions
| Button | Function |
|---|---|
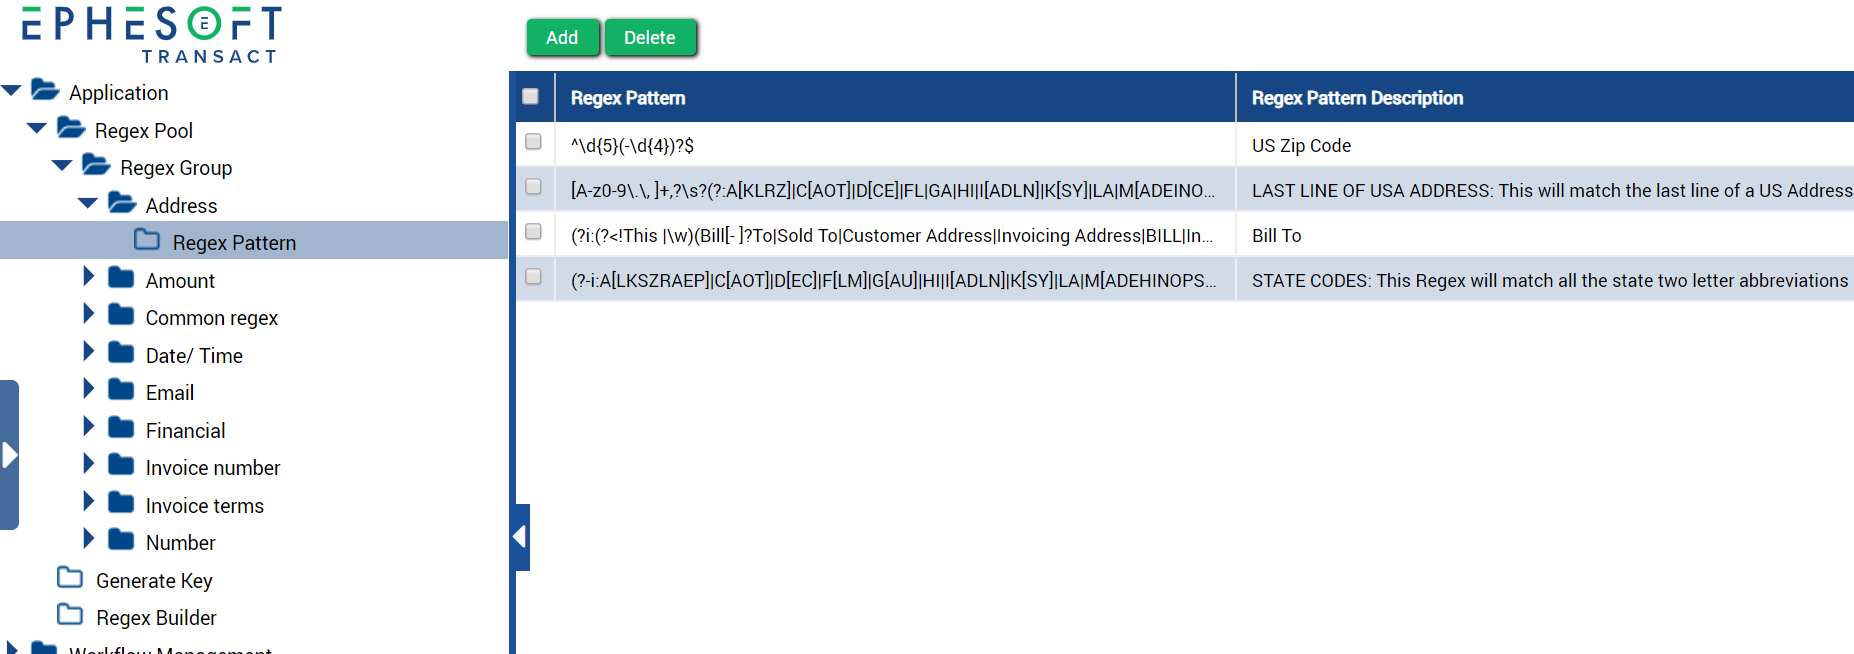
| Regex Group | All available regex groups in the database will be displayed as a grid and can be edited directly from the grid. |
| Regex Pattern | Accessed by expanding the Regex Group node to display each regex folder and its patterns.
Figure 34. Sample Regex Patterns for “Address” Regex Group |
| Generate Key | Used to generate an application-level key for image encryption.
Important: A key can only be generated once. |
| Regex Builder | Defines regular expressions used to process each document type. |
| Workflow Management | Displays plugins and their dependencies on other plugins in the workflow. |
| Ephesoft Cloud | Provides registration accessibility and configuration settings for the Ephesoft Cloud HyperExtender. |
| Connection Manager | Displays all connections to supported external databases. |
| License Details | Displays license details for the Ephesoft Transact host environment. |
| Access Manager | Allows super administrators to restrict each user’s visibility into the administrative and operational screens (ie. Batch Instance Management, Reports, etc). |
| Currency Configuration | Allows super administrators to configure for currencies found in the documents they process. |