Introduction
This document describes how to use the Ephesoft Transact AI Table Rule Builder in Ephesoft Transact. With the Ephesoft Transact AI Table Rule Builder, operators can create extraction rules for invoice table line items during the Validation stage in Ephesoft Transact. This feature also provides improved extraction accuracy by excluding rows that are not needed. With AI Table Rule Builder, users can configure and save extraction rules that are unique to vendor-specific invoices. The Ephesoft Transact AI Table Rule Builder is provided as an external application that is configured in the VALIDATE_DOCUMENT plugin and integrates with the Validation module.
Note: The Transact AI Table Rule Builder is currently limited to creating rules for single-page basic invoices. It was designed for invoice document types, and has not been tested with other document types.
Prerequisites
To use the Transact AI Table Rule Builder, the following prerequisites must be in place:
- Ephesoft Transact 2020.1.05 or above environment
- Install and enable the Transact AI Table Rule Builder. Follow the steps in the InstallationNotes.txt packaged with the ZIP file provided by Ephesoft.
- Ensure the TABLE_EXTRACTION plugin is added to the Extraction module and turned on.
- Add the table and table columns to your document type. Transact can only create extraction rules for existing tables. For steps, refer to Add Table Columns.
Important: Each Column Name must exactly match the column header for the table, or the table will not be extracted, and the rule will not be created.
Note: This plugin must be installed separately for the 2020.1.05 release.
Installation
Note: When upgrading Transact from version 2020.1.05 to version 2020.1.06, there is a known issue in which Transact will not run successfully if the AI Table Rule Builder is installed. As a workaround, you will need to re-install the AI Table Rule Builder after completing the upgrade.
- Download the current version of the Transact AI Table Rule Builder plugin from the Customer Support Portal.
- Stop the Transact server.
- Extract the ZIP file to a temporary location.
- For Windows:
- Navigate to the directory where you extracted the plugin files.
- Open a command prompt and run the command
install_auto_table_rule_builder.bat
- For Linux:
- Navigate to the directory where you extracted the plugin files.
- Open the terminal and run the command
./install_auto_table_rule_builder.sh - Note: If you are unable to run the command because of a permission issue, then run the following: chmod +x install_auto_table_rule_builder.sh
- Start the server.
Note: For Transact Cloud users, the Ephesoft Technical Operations Team will install the AI Table Rule Builder for you. However, you will need to configure the VALIDATE_DOCUMENT plugin. Please review the Configuring the VALIDATE_DOCUMENT Plugin section for more details.
Configuring the VALIDATE_DOCUMENT Plugin
You must configure the VALIDATE_DOCUMENT plugin to use the Transact AI Table Rule Builder. Once configured, the Transact AI Table Rule Builder will appear in the Validate screen as a selectable link from the More External Application menu.
-
- From the Batch Class Management page, select your batch class and click Open.
- Expand the Validate Document module and select the VALIDATE_DOCUMENT plugin.
- In the Plugin Configuration screen, set the External Application Switch to ON.
- Type
http://[Server_Name]:8080/dcma/autoTableor an HTTPS URL in one of the following fields:- URL1(Ctrl+4)
- URL2(Ctrl+7)
- URL3(Ctrl+8)
- URL4(Ctrl+9)
In Figure 1. VALIDATE_DOCUMENT plugin configuration, the URL1(Ctrl+4) field is used.
-
- In the corresponding URL Title field, type a name for the External Application link.
In Figure 1. VALIDATE_DOCUMENT plugin configuration, the name is AI Table Rule Builder.
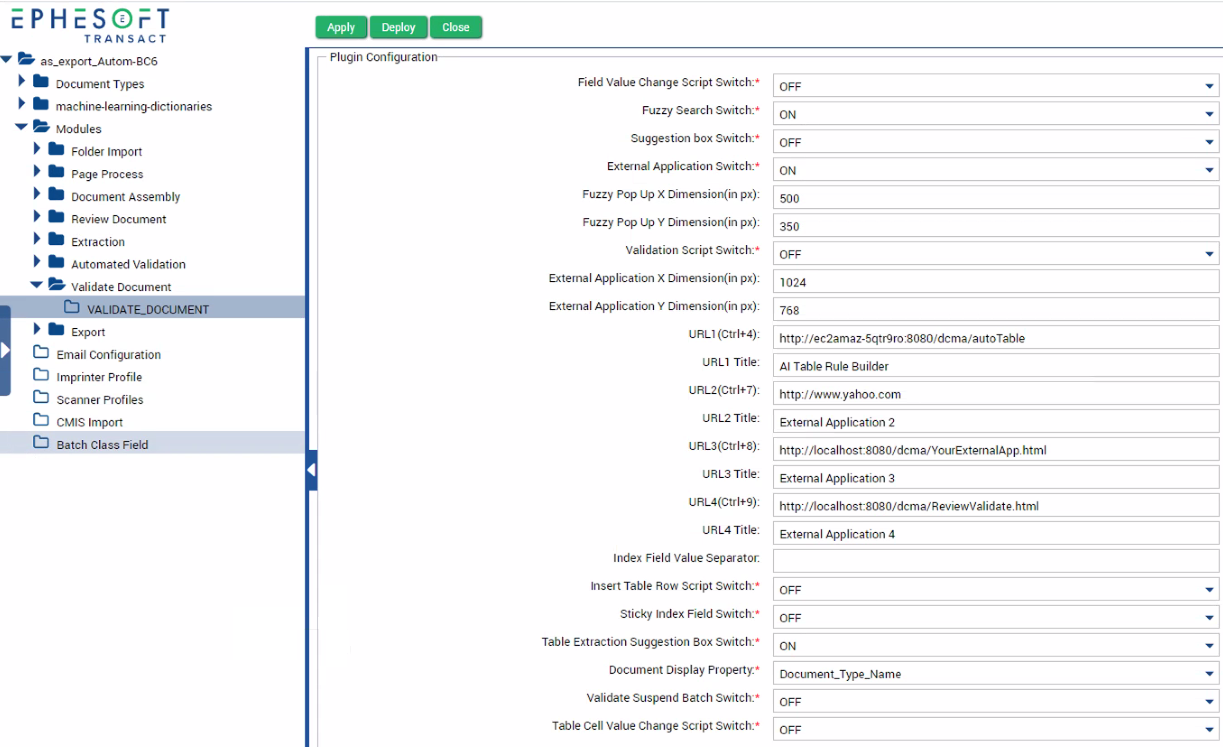 Figure 1. VALIDATE_DOCUMENT plugin configuration
- Click Deploy.
Launching the Application
Operators can launch the application from the Validation page for a batch instance by clicking More > External Application and then selecting the link assigned to the AI Table Rule Builder. In Figure 2. Launch Application, the name is AI Table Rule Builder but the name may vary depending on how the VALIDATE_DOCUMENT plugin is configured.
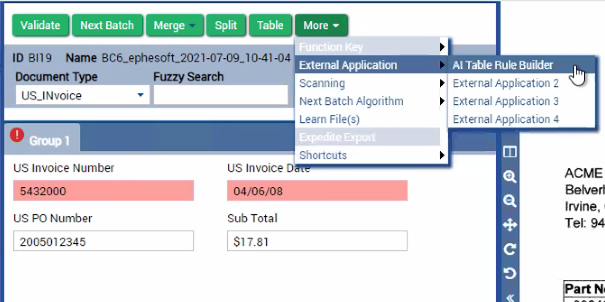 Figure 2. Launch Application
Note: Operators can use shortcuts to launch the AI Table Rule Builder. The shortcut is dependent on which External Application URL is associated with the AI Table Rule Builder. For example, if it is registered as the first External Application URL for the batch class, then the shortcut CTRL+4 will open it. Other shortcuts are as follows:
| External Application URL | Shortcut |
| URL1 | Ctrl+4 |
| URL2 | Ctrl+7 |
| URL3 | Ctrl+8 |
| URL4 | Ctrl+9 |
Overview
Using 1 of 4 modes (Automatic, Standard, Advanced or Manual), operators can choose the configuration mode that best suits their skill level. A new guided in-app configuration screen helps users identify line item information to extract. Transact then creates the extraction rules and uses them to extract data from any subsequent invoices submitted by the same vendor.
The Table Extraction Rule builder includes multiple modes depending on your needs.
| Extraction Mode | Description |
| Automated Mode | This is the AI Table Rule Builder default mode. If you need to edit the extraction results or rule, you can select one of the remaining modes to make changes. |
| Standard Mode | Recommended edit mode for most use cases. This wizard will walk you through each step in configuring an extraction rule. |
| Advanced Mode | Alternative edit mode for operators, administrators, or developers familiar with regular expressions. |
| Manual Mode | Manual Mode allows users to extract table data without creating new table extraction rules. |
Automated Mode
Automated Mode is the default configuration mode for AI Table Rule Builder. Operators define the location of the table data on the document using an overlay, select a table name from a menu, and click Next. Then, Transact uses an AI engine to extract and analyze the data and generate extraction rules. If needed, operators can manually adjust column names or select an alternative mode (Standard, Advanced, or Manual) to refine the new extraction rule. Once configured, Transact will populate the table Validation screen using the new table extraction rule. Operators can then finish validating the extracted data.
To create an extraction rule using the wizard, perform the following steps.
-
- From the dropdown, select the table you want to build a rule for.
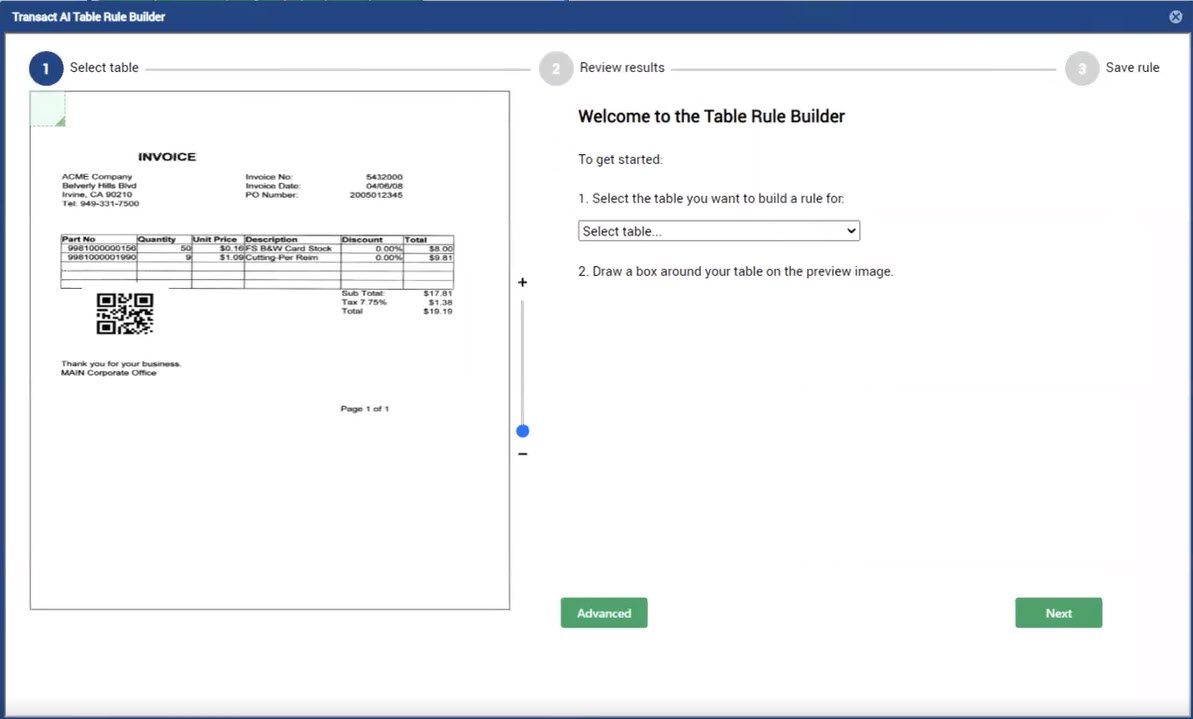
Figure 3. Select Table
Note: If no tables are listed, or if your desired table is missing, ensure you have satisfied all Prerequisites.
- Use the overlay to draw a box around your table on the preview image. This should include the header row, and span the full height and width of the table.
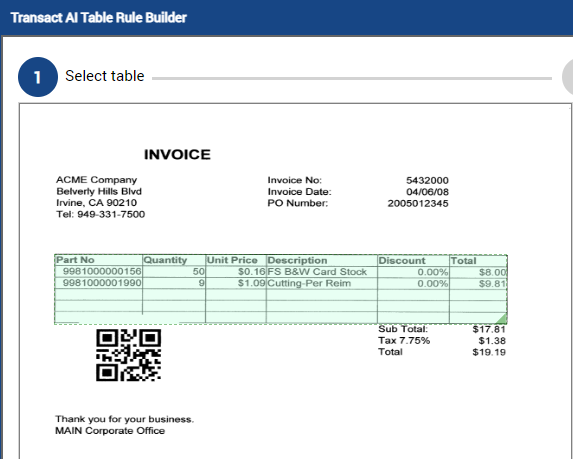
Figure 4. Draw Overlay
- Click Next.
- Review the extracted results.
- If you are satisfied with the results, click Next to review the extraction rule, then click Save. Your extraction rule will be created, and the wizard will close.
- If the columns contain the correct data, but are mapped incorrectly, select the correct header name using the label button and proceed as normal.
Important:
- When adding a new table and table columns for a document type, the Column Name must exactly match the column header, or the table will not be extracted, and the rule will not be created. Alternatively, the dictionary synonyms should be defined to properly match the column header. Please see the Automated Mode Dictionary section of this document for more information on configuring the dictionary synonyms.
- When using Automated Mode, column data may merge together if data in columns are closely aligned. Please see the Known Issues and Workarounds document for more information.
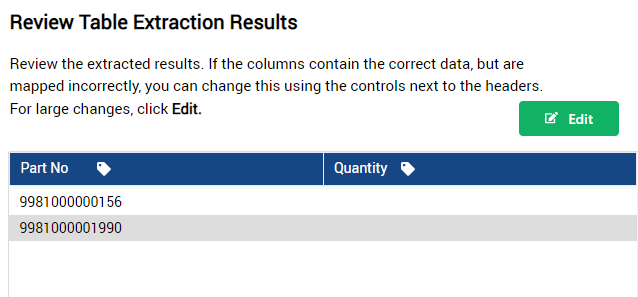
Figure 5. Map Incorrect Headers
- If the columns do not contain the correct data, or are missing data, click Edit and select your edit mode.
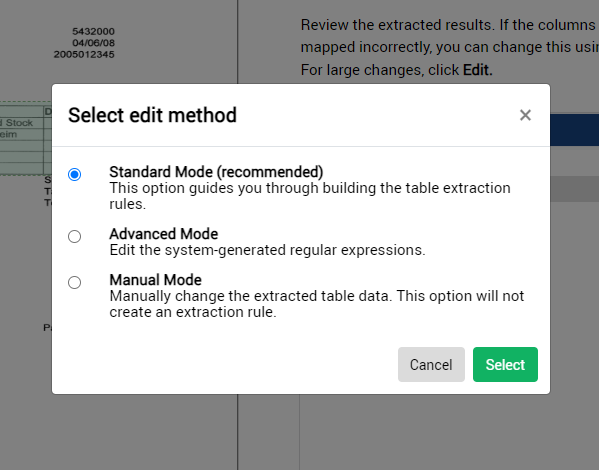
Figure 6. Select Edit Mode
Select one of the following edit modes based on your use case:
- Standard Mode (recommended)
- Advanced Mode
- Manual Mode
Automated Mode Dictionary
The Automated Mode Dictionary allows batch class administrators to define a set of table header synonyms. AI Table Rule Builder will use synonym-based detection if it is unable to detect headers by matching column names using the Transact table header detection algorithm.
Configuring the Automated Mode Dictionary
-
- From the Batch Class Management page, select your batch class and click Open.
- Go to Document Types > [Document_Type_Name] > Tables > [Table_Name] > Table Columns.
- In the Column Synonym column, create regex patterns for each synonym.
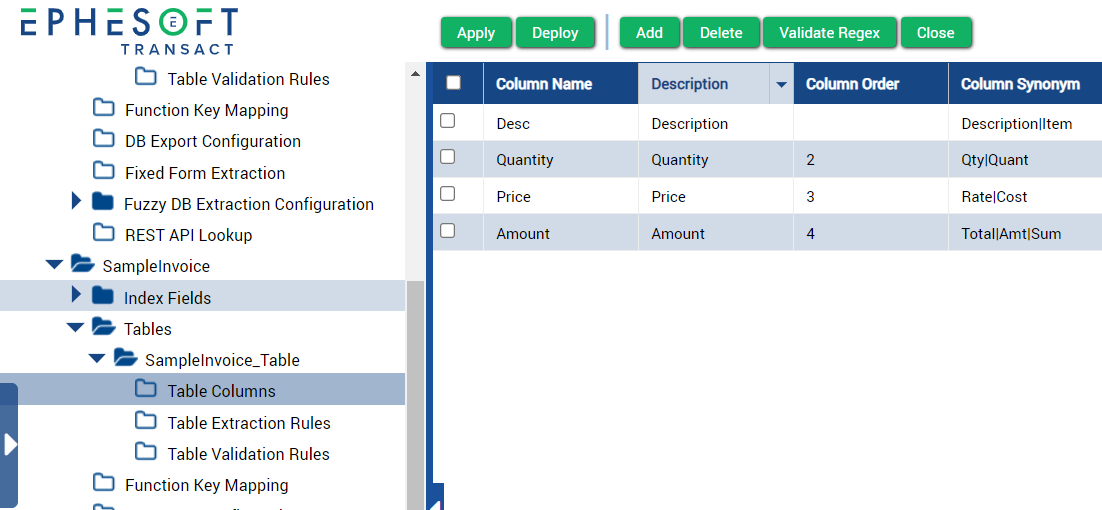
- Click Deploy once you have created the synonyms.
Standard Mode
Standard Mode is the recommended edit mode for most use cases. Standard Mode uses a guided wizard to dynamically build table extraction rules. Once the rule is created, operators can review the rule and tune it for improved extraction results. Standard Mode also includes the option to select any rows in the table that should be excluded from the extraction rule.
This wizard will walk you through creating an extraction rule for your table step by step. To access this wizard, click Edit when available and select Standard Mode (recommended).
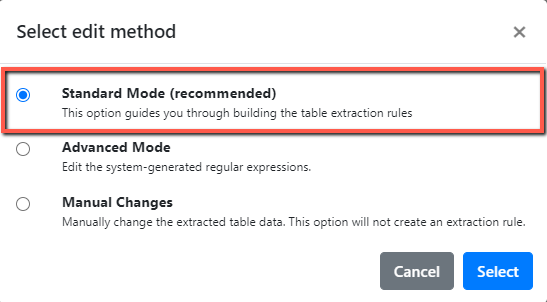 Figure 7. Select Standard Mode
The wizard separates creating an extraction rule into the following steps:
| Step in Wizard | Action |
| Step 1: Header Row | Select whether a header row exists for this table or not. If yes, draw the provided overlay over the full height and width of the header row. The header row is the preferred option when creating an extraction rule. |
| Step 2: Preceding Text | Select whether the table has preceding text (text immediately before the table). If yes, draw the overlay over a single line of preceding text. Note: The system needs some header row or preceding text to create an extraction rule. If both header row and preceding text are selected, then Transact will default to using the header row text to create the extraction rule. For help, refer to the section Note on Preceding and Trailing Text. |
| Step 3: Trailing Text | Select whether the table has trailing text (text immediately after the table rows). If yes, draw the provided overlay over a single line of trailing text. For help, refer to the section Note on Preceding and Trailing Text. |
| Steps 4 and up: Columns (varies depending on number of columns) |
Select whether the table has the mentioned column. If yes, draw the overlay over the full height and width of the column, not including the header. This step will repeat based on the number of columns configured for the selected table. |
| Final step: Ignore Rows | Select whether any extracted rows should be ignored using the sample extracted table. For example, on an invoice you may want to ignore the subtotal rows. Note: If you reach this step and no data is populated in the sample table, Transact will not be able to create an extraction rule. Try the wizard again, or use the Advanced Mode. Otherwise, you can perform a one-time extraction using Manual Mode. |
Note on Preceding and Trailing Text
Identifying preceding and trailing text helps Transact determine where a table begins and ends. Use the following guidelines to select the best preceding and trailing text:
- This text should be immediately before or after your table. If anything is between your text and the table it will be treated as part of the table, and may result in incorrect extraction results.
- This text should be static, which means it will not change from document to document.
- This text should only span a single line.
Examples
Good: The following example shows a sample invoice with the line “Sub Total” selected as the trailing text. This works well for this invoice because:
- There is nothing between the table and the highlighted text.
- The text is an invoice field name, which means it will not change.
- The text only spans a single line.
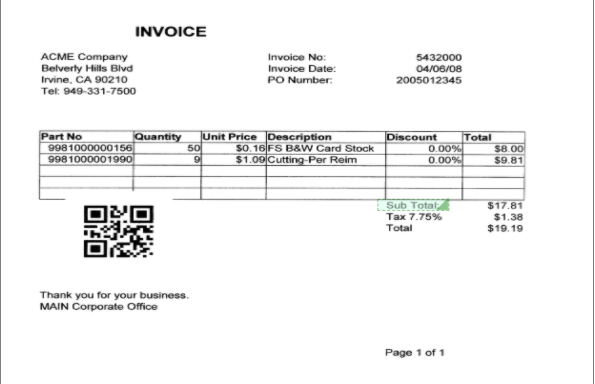 Figure 8. Good Trailing Text
Poor: The following example shows the same sample invoice with the line “Thank you for your business” selected as the trailing text. This is a poor selection because there are multiple lines between this line and the table, including a QR code.
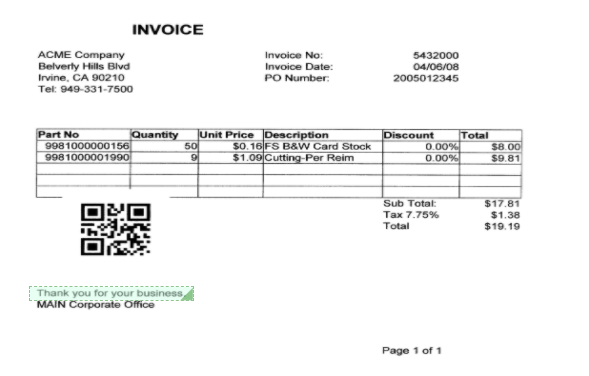 Figure 9. Poor Trailing Text
Advanced Mode
Advanced Mode provides operators with additional flexibility to create extraction rules using column overlays and custom regex patterns. Operators can also test regex patterns within the rule builder or exclude rows from the rule for additional fine tuning. This mode is ideal for users with advanced knowledge of regex.
To access this mode, click Edit when available and select Advanced Mode.
 Figure 10. Select Advanced Mode
To create an advanced rule using regular expressions, perform the following steps:
-
- Create the following regular expressions (regex):
- Start Pattern Regex: Defines the starting point of the table. This must be unique across all extraction rules in a document type. A good choice for a start pattern is often part of the table column headers. For example “Code Description Price”.
- End Pattern Regex: Defines the end point of the table. Refer to the section Note on Preceding and Trailing Text for guidance.
- Column Regex: Defines the pattern for the column data. You will need to define a regular expression for each available column.
- Create the following regular expressions (regex):
Note: Each column includes selectable Anchor and Required checkboxes.
| Checkbox | Description |
| Anchor | This checkbox allows you to indicate the start of a new row if a value from this column is extracted. This is useful when table rows span more than a single line (i.e. “wrap”). For best results, select a single value from the end of the wrapped line that will always be present. You can only select one Anchor checkbox at a time. |
| Required | Selecting the required checkbox will make the column mandatory for operator validation. The extraction algorithm will always expect this column to be present in the document. |
-
- Row Exclusion Regex: Define a pattern for table rows that should be ignored, such as the subtotal row in an invoice. If a row is extracted that fully or partially matches the regex, that row will be removed from the table results.
- Resize the provided overlays over the full height and width of each column. These overlays are color-coded and labeled to match each column.
- Click Test Extraction and review the extracted results. You may need to test multiple times as you fine-tune your rule.
- When you’re satisfied, click Save. The extraction rule will be created and you will return to the Validation screen.
Manual Mode
Manual Mode allows users to extract table data without creating new table extraction rules. It is ideal to use when operators need to quickly extract and validate data but no rule exists, documents have poor OCR quality, or contain a complex table layout. Although Manual Mode will extract and save data to the batch instance, it does not create and save extraction rules to the batch class.
Important: Using this mode will not create an extraction rule for the table.
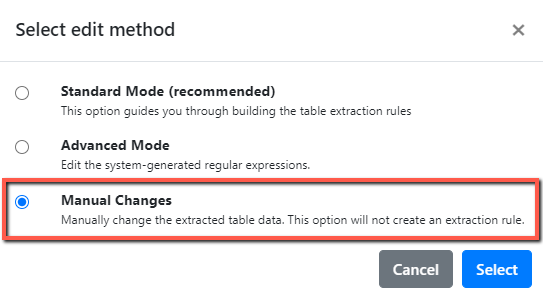
Figure 11. Select Manual Mode
Refer to the following section for help performing manual edits. When you’re satisfied with your changes, click Update Batch to return to the Validation screen.
Performing Manual Edits
The following section provides a summary of the table editing tools and how to use them.
- Edit cells — Click any non-header cell to enter edit mode and begin typing.
Figure 12. Edit Cells
- Map incorrect headers — Fix any incorrect headers by clicking the label icon and selecting a header from the dropdown.
Figure 13. Map Incorrect Headers
Note: A header can only be mapped to one column at a time. Selecting a header that is already mapped to another column will swap the mapping with the existing column.
You can also insert, merge, or delete rows.
- Insert a row — Click the three-dot icon to the right of a row and select either Insert row above or Insert row below.
- Merge rows — Click the three-dot icon to the right of a row and select either Merge row above or Merge row below.
- Delete a row — Click the three-dot icon to the right of the row you want to delete and select Delete row.

Figure 14. Insert, Merge, or Delete Rows
You can also clear an entire column.
- Clear column — Click the three-dot icon to the right of a row and select Clear column.
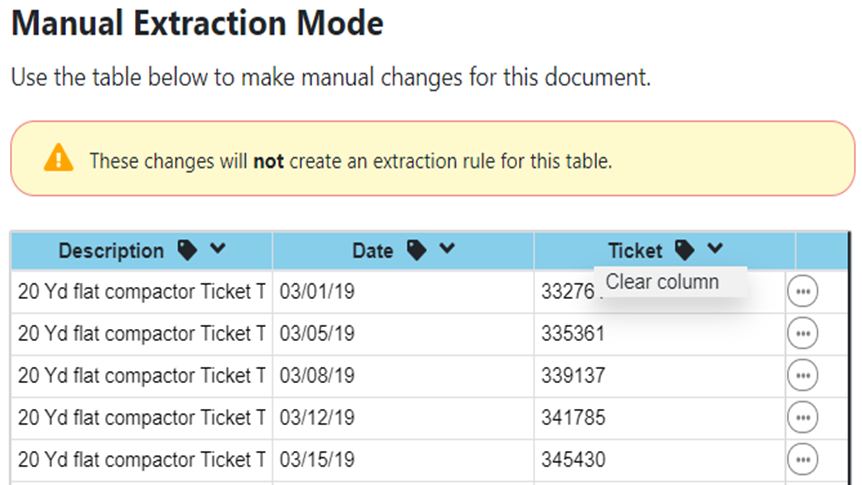
Figure 15. Clear column
Limitations
The following types of tables are not good candidates for the AI Table Rule Builder, and may receive inaccurate results:
- Tables with overlapping columns
- Tables with closely packed column data
- Tables within the cell of another table (i.e. “nested” tables)
- Tables with hidden columns
- Tables that span more than one page
Conclusion
This completes an overview of how to use the Transact AI Table Rule Builder in Ephesoft Transact.