Available: Cloud
Introduction
This document outlines the setup and configuration for the Ephesoft Cloud HyperExtender (CHE) plugin in Ephesoft Transact. CHE accommodates spikes in batch class volume by offloading document splitting and optical character recognition (OCR) to the Ephesoft Cloud.
Global CHE service is centrally hosted in the following four locations. For best performance, Ephesoft recommends registering Ephesoft Cloud accounts with the data center most proximate to your location.
- United States
- Germany
- Singapore
- Australia
- Canada*
Note: As of the 2020.1.04 release, support for the Canadian region is available as a configuration option. Versions 2020.1.02 and 2020.1.03 require additional setup to display the Canadian region for configuration. Setup instructions can be found in Configuring Canadian Support for the Cloud HyperExtender Plugin.
The following image illustrates the CHE plugin workflow within Ephesoft Transact.
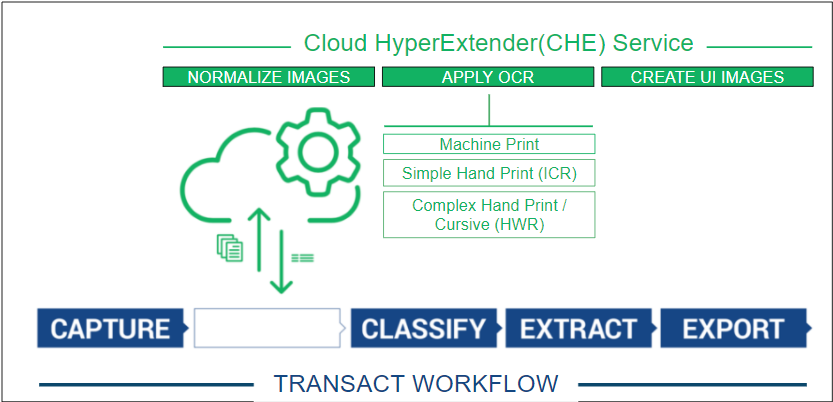
Figure 1. Cloud HyperExtender Workflow
Prerequisites
The Cloud HyperExtender (CHE) plugin requires:
- A licensed version of Ephesoft Transact 2019.2 or above
- A license for the Ephesoft Cloud HyperExtender service
Note: In order to use CHE’s Handwriting Recognition+ feature, you will need to have a licensed version of Transact 2020.1.05 installed.
Functional Limitations
Below are key functional limitations for the CHE plugin:
- Supports file sizes up to 250MB.
- PDF files uploaded in color will be returned with thumbnails in black-and-white.
- Does not support the following Ephesoft Transact functions:
- eText extraction
- Web scanner imprint
- Does not support the following Ephesoft Transact Batch Class Configuration Functions:
- Batch Class Level Test Classification
- Batch Class Level Test Extraction
- Learn files operations
- Search Classification operations
- Only supports PDF and TIFF files in non-zip format, and the following import file types:
- Searchable
- Tabbed
- PDF/A-1B
- PDF/A-2b
- PDF/E
- PDF/X-4
- Only supports the following web services:
- uploadBatch
- advancedUploadBatch
- copyBatchClass
- exportBatchClass
- importBatchClass
- Batch class encryption not supported.
Note: Web services that directly communicate with the OCR process (OcrClassify, OcrClassifyExtract, v2/ocrClassifyExtract, and v2/ocrClassifyExtractBase64, etc.) cannot interact with a batch class that has been configured to use CHE. For additional information about Ephesoft Transact web services, refer to Web Services Explorer.
Registration and Configuration
An Ephesoft Cloud account is required to use the Cloud HyperExtender (CHE) plugin. Follow these instructions to register for an account and configure CHE with the Ephesoft Cloud.
You will get 1,000 images per month as a trial for the first year (up to 12,000 images) when you self-register for CHE. If you purchase the Professional or Enterprise bundle, please submit a license request to expand your CHE tenant to the amount that was purchased.
Note: You must be logged in to Ephesoft Transact as a super administrator to complete the steps below.
Registering for the Ephesoft Cloud
- In Ephesoft Transact, hover over the floating menu on the left side of the application. The Administrator menu displays.
- Select System Configuration > Ephesoft Cloud > Register.
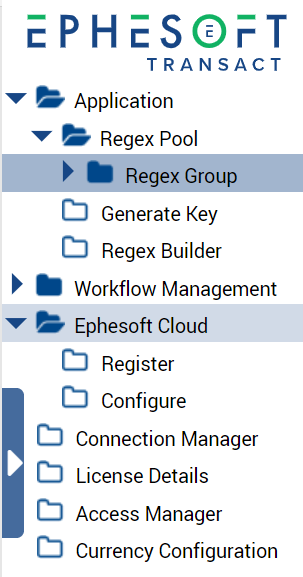
Figure 2. Ephesoft Cloud Components
The Registration screen displays.
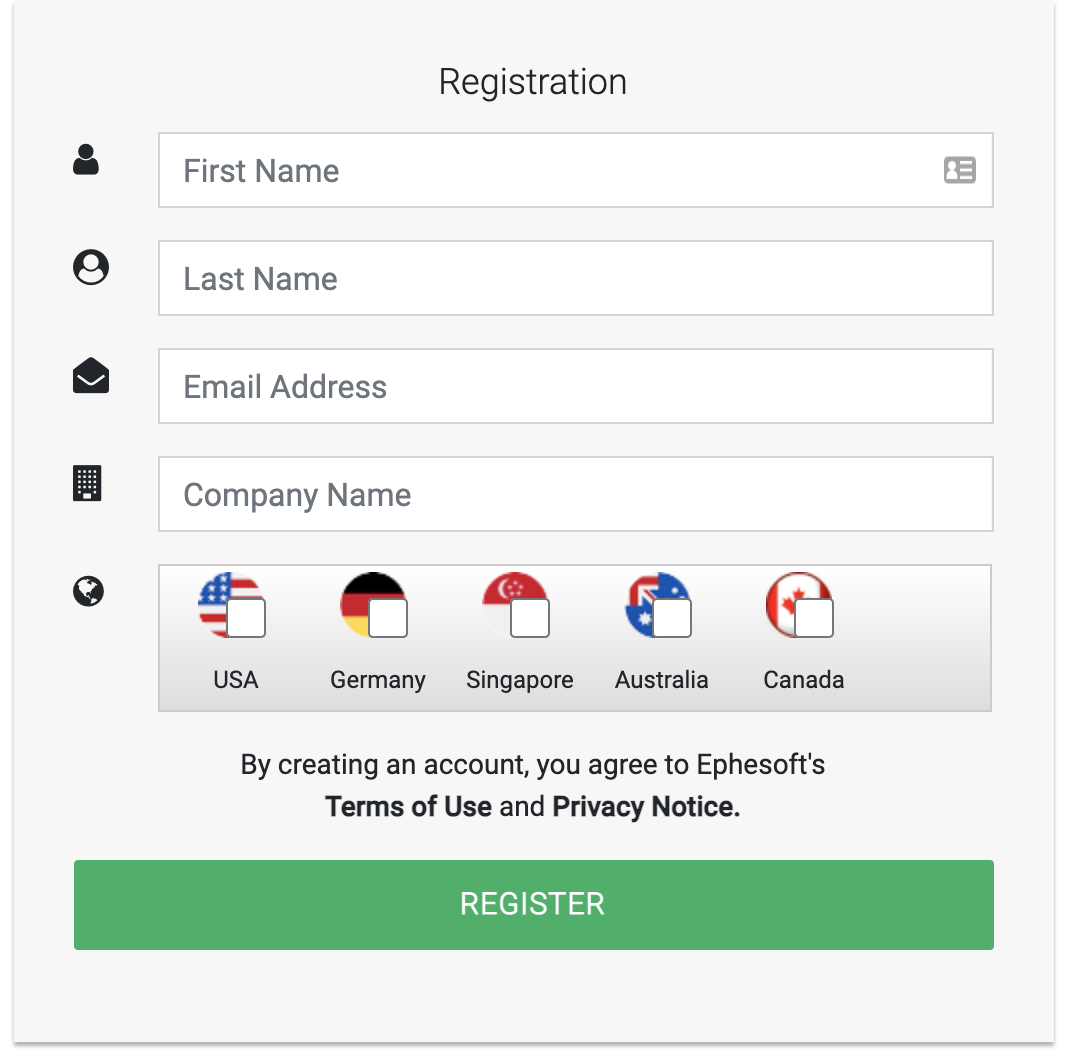
Figure 5. Ephesoft Cloud Registration Screen
- Complete all blank fields and select your location from the countries displayed. Only one country can be selected per registration.
Note: Registering to a data center outside of the USA (Germany, Singapore, Australia) requires installing the 2020.1 service pack. This service pack is available for download at the Customer Support Portal. For best performance, Ephesoft recommends registering to the data center closest to where CHE batch instances are processed. The Canadian region is only available for Transact 2020.1.04 and above.
- Click Register. An email containing a temporary password will be sent to the email address provided.
Note: An email address can only be registered once for an account.
- From the email, click the Complete Registration link and use the above credentials to register.
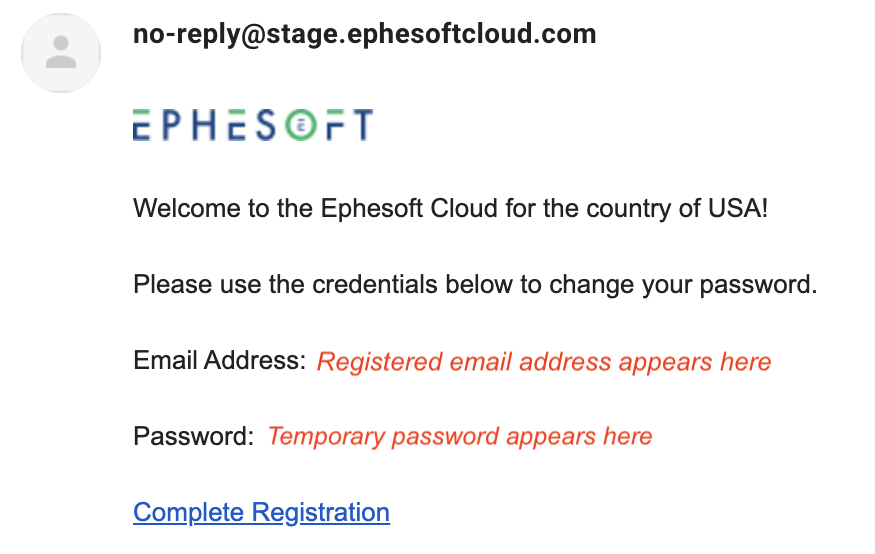
Figure 6. Sample Temporary Password Email
- Follow the instructions on the registration page to set a new password using the temporary password from step 4.
- Verify that you received an email containing all the information necessary to configure your connection to the Ephesoft Cloud: Tenant ID, Email Address, and Application Key.
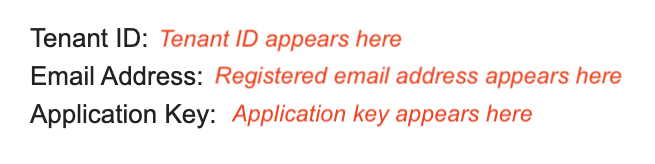
Figure 7. Account ID, Email Address and Application Key Dialog
Note: If prompted with the error message “Ephesoft Cloud registration is incomplete,” please confirm all configuration details were entered correctly. If the error persists, contact your System Administrator.
This completes your Ephesoft Cloud registration.
Connecting CHE with the Ephesoft Cloud
Once you have received your Ephesoft Cloud credentials, follow these steps to configure Ephesoft Transact to communicate with the Ephesoft Cloud.
- In Ephesoft Transact, hover over the floating menu on the left side of the application and select System Configuration > Ephesoft Cloud > Configure. The Cloud Connection Details screen displays.
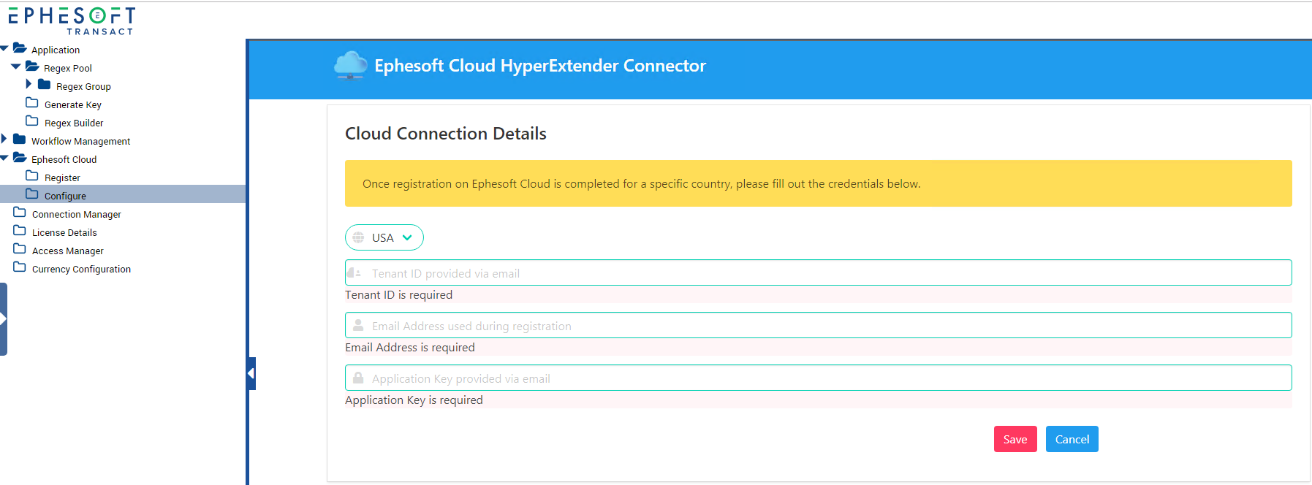
Figure 8. Ephesoft Cloud HyperExtender Connector screen
-
- In the Cloud Connection Details screen, select your country from the drop-down menu and complete the fields using the credentials that were sent via email: Tenant ID (or Account ID), email address, and application key.
Note: Registering to a data center outside of the USA (Germany, Singapore, Australia) requires installing the 2020.1.01 service pack. This service pack is available for download at the Customer Support Portal. For best performance, Ephesoft recommends registering to the data center closest to where CHE batch instances are processed. The Canadian region is only available for Transact 2020.1.04 and above.
- Click Edit if additional changes are needed, otherwise click Save.
Note: Once CHE is configured, you can log in to the Ephesoft Cloud portal to view the number of images you have processed using CHE.

Figure 9. Ephesoft Cloud Portal
This completes the steps required to connect CHE with Ephesoft Cloud. CHE is now ready to be configured within Ephesoft Transact.
Configuring a Batch Class to Use CHE
The Cloud HyperExtender (CHE) plugin replaces several existing plugins in the Folder Import and Page Processing modules. Follow these steps to configure a batch class to use CHE.
Note: Search Classification cannot be configured within the CHE plugin, but extraction rule configuration is now supported.
- Log in to Ephesoft Transact as an administrator (or super administrator) and navigate to the Batch Class Management screen.
- Open the desired batch class for editing.
- On the left sidebar, navigate to Modules.
- Edit the Page Process and Folder Import modules as follows:
- Remove the following plugins from the Page Process landing screen:
-
-
- CREATE_OCR_INPUT
- OCR engine plugins: RECOSTAR_HOCR / NUANCE_HOCR / TESSERACT_HOCR
- CREATE_DISPLAY_IMAGE
- CREATE_THUMBNAILS
-
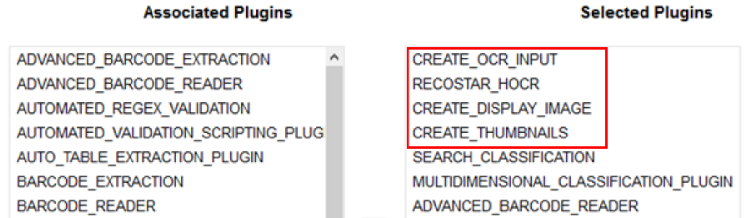
Figure 10. Page Process Module Plugins
- Remove the following two plugins from the Folder Import landing screen:
-
- IMPORT_MULTIPAGE_FILES
- IMPORT_BATCH_FOLDER

Figure 11. Folder Import Module Plugins
- Add the CLOUD_HYPEREXTENDER_PLUGIN to the Folder Import module.
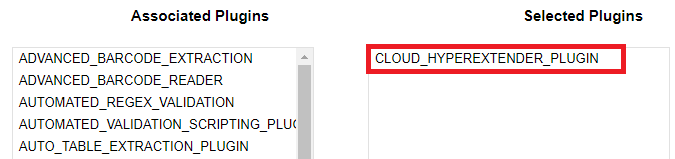
Figure 12. CLOUD_HYPEREXTENDER_PLUGIN
- Click Deploy to apply and deploy your changes.
- Expand the CLOUD_HYPEREXTENDER_PLUGIN component and click Configure. The Ephesoft Cloud HyperExtender configuration screen displays.
Important: For customers using Ephesoft Transact 2020.1, the Auto Rotate feature is set to ON by default. Auto Rotate can be turned off to improve CHE performance. To disable Auto Rotate in batch classes that will use CHE, open the CHE plugin in the Folder Import module and switch Auto Rotate to OFF.
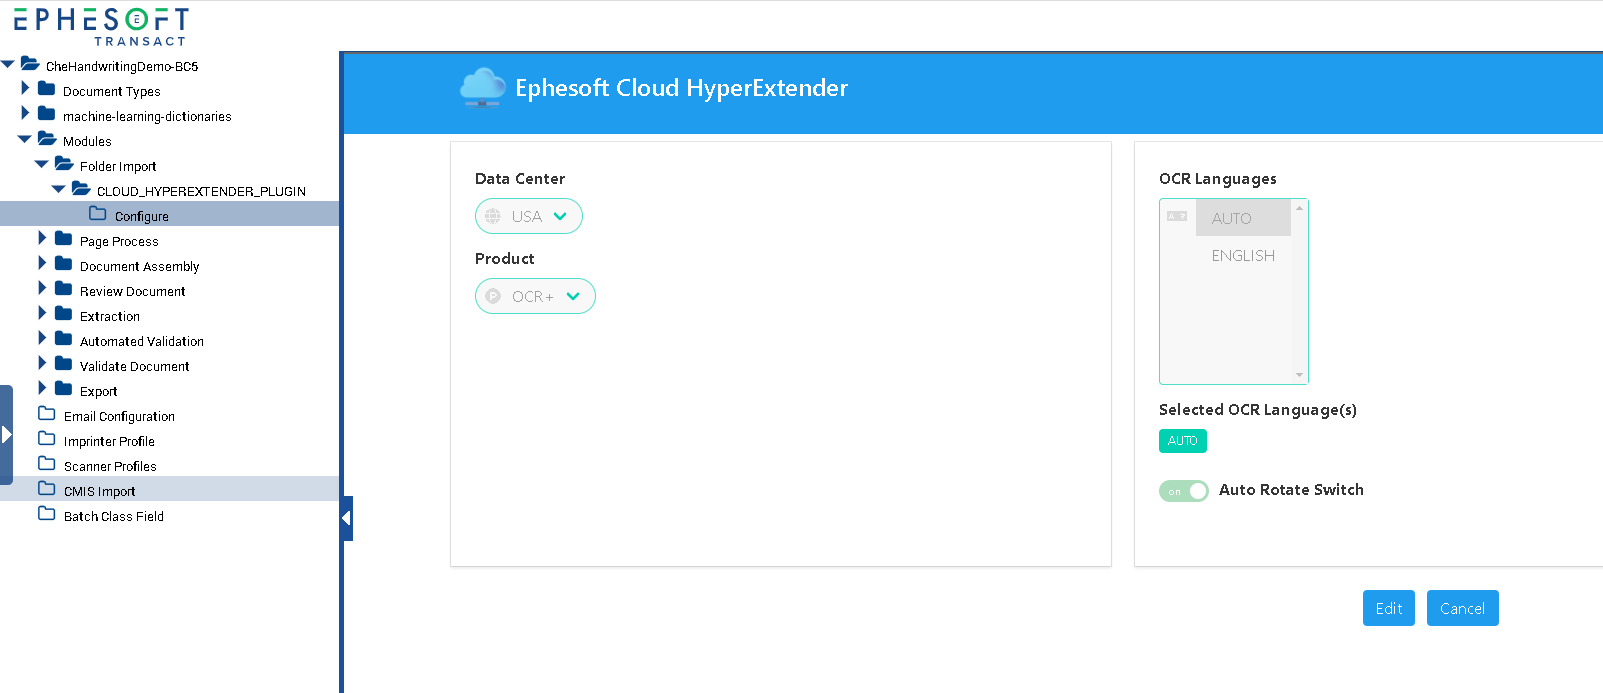
Figure 13. Ephesoft Cloud HyperExtender 2020.1.05 Configuration Screen
Note: The AUTO option allows CHE to automatically detect the language of the extracted text, while ENGLISH allows CHE to extract text in English. For a full list of supported languages, please refer to the Global Languages page of the Ephesoft Documentation site.
- Select your registered data center from the drop-down menu. OCR+ is the only option available in the Product list. Click Save to enable CHE.
- Verify the Batch Class priority settings. To preserve CHE’s processing speed, ensure all CHE batch classes are set to a priority that is at least one level higher than all other non-CHE batch classes. For more information on setting batch class priorities, refer to the Batch Instance Priority guide.
This completes the CHE configuration within Ephesoft Transact. Your batch class is now ready to process documents using the CHE plugin.
Machine Print or Handwriting Extraction for CHE
In Transact 2020.1.05 and above, you can create extraction rules for your machine-printed or handwritten documents using CHE with Handwriting Recognition+.
Note: If you are upgrading from a previous version of Transact to 2020.1.05, CHE Handwriting Recognition+ requires manual configuration in order to work effectively. This feature does not require configuration if you are installing a new version of Transact with 2020.1.05.
This works in combination with the key-value extraction plugin, allowing you to create extraction rules that use the underlying CHE OCR engine. This results in significantly increased accuracy for handwritten extraction compared to traditional on-premise extraction.
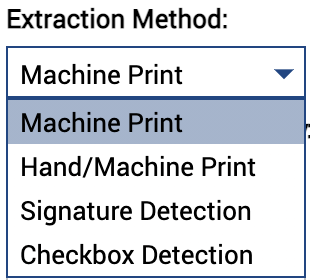
The existing dropdown options cater to Transact on-premise plugins. However, when using CHE you will use Machine Print to extract both machine-printed and handwritten text.
- Extraction Method: Machine Print
Note: These instructions are for configuration using Windows. For Linux, configure index fields as normal.
Prerequisites
To configure handwriting recognition for CHE, the following prerequisites must be in place:
- You must have added the KEY_VALUE_EXTRACTION plugin to your batch class, and it must be turned on.
- You must use a Transact instance 2020.1.05 or above.
- You must have added index fields to your batch class.
- You must use a document with a minimum DPI of 200.
Configuring CHE KV Extraction
Before continuing, make sure you have added index fields. For more information about creating index fields, refer to Add a New Index Field.
- Select an index field and open the KV Extraction Rule folder.
- Click Add.
The following screen displays.
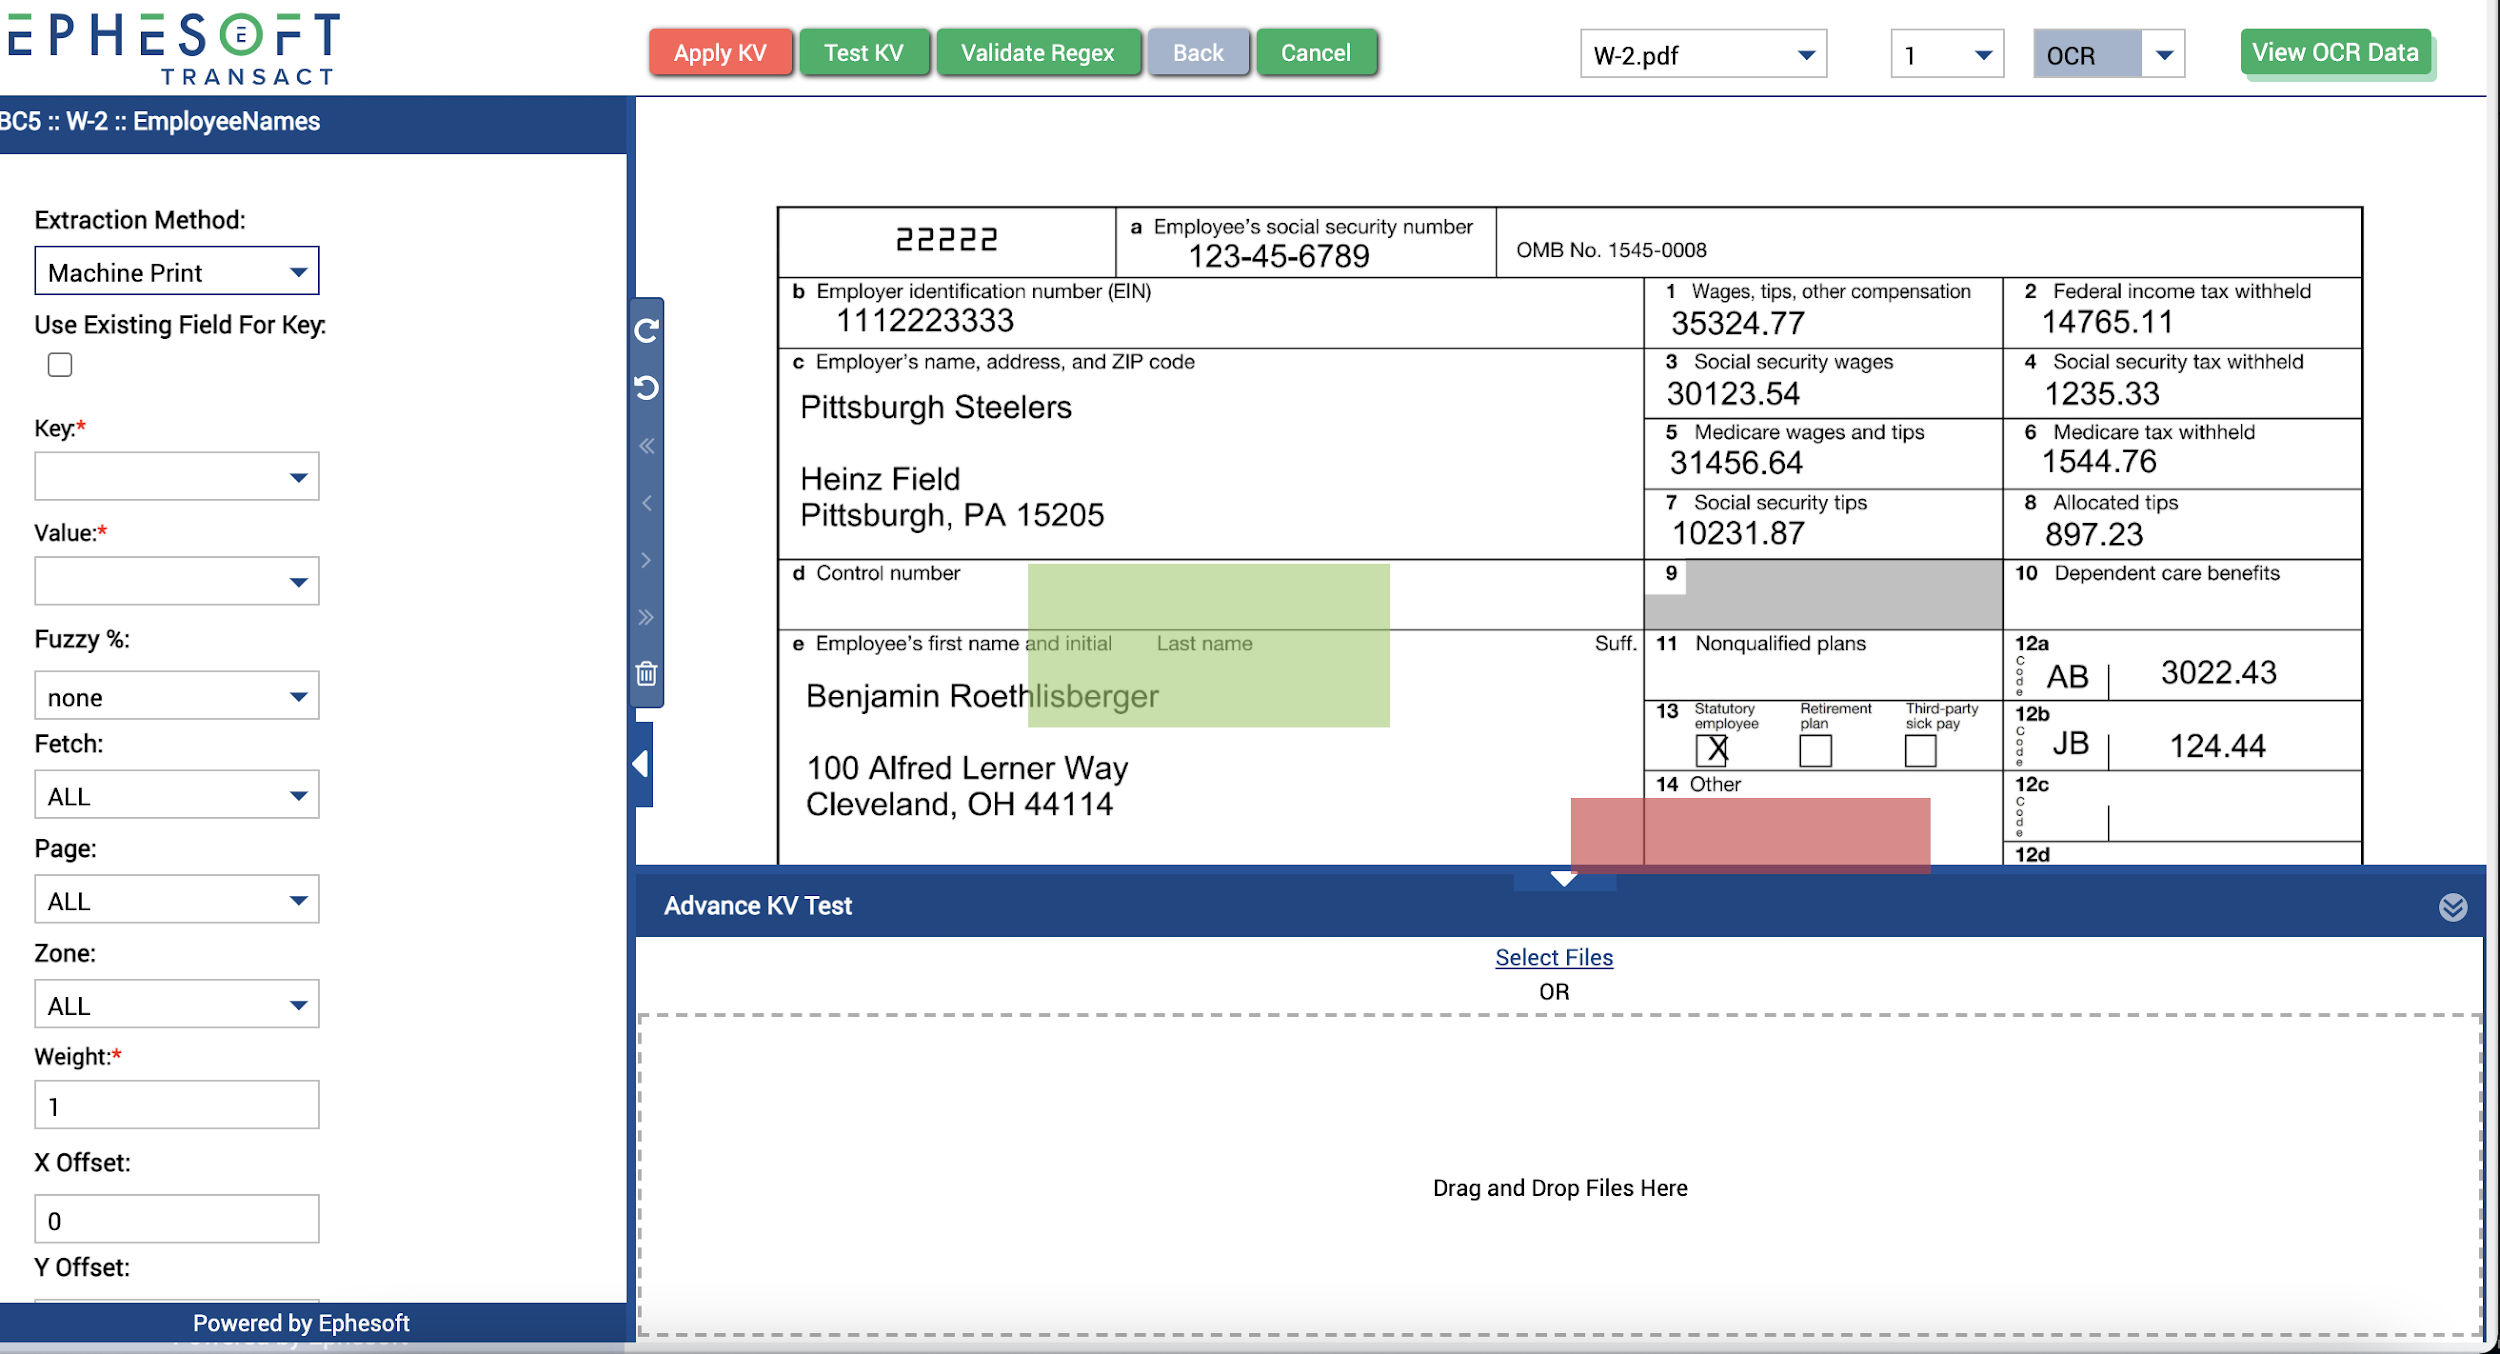
- Add a sample file to the Advance KV Test section by either selecting the sample file or dragging and dropping it into the section that says Drag and Drop Files Here.
- Under the Extraction Method: drop-down, select Machine Print.
- Refer to the Key Value Extraction document for instructions to configure the remaining fields.
-
- TIP: You may need to reduce your lasso’d VALUE height or width if neighboring values are being incorrectly extracted with your results.
- Click Apply, and then click Deploy.
Processing Batches with CHE
- Refer to the following article for instructions on How to Process Batches Using Ephesoft Transact.
Batch classes configured to use CHE will follow the standard Ephesoft Transact workflow. To complete batch OCR processing, CHE will automatically communicate with the Ephesoft Cloud, with no additional action required by the operator.
If a batch fails during the OCR process, the images in that failed batch will not be consumed from the image quota specific to your CHE license.
- For troubleshooting purposes, the cloud-client.log (CHE log) file can be found at [Ephesoft_Directory]/JavaAppServer/webapps/ephesoft-cloud-client/WEB-INF/classes/log/cloud-client.log.
Optional Feature: Bring Your Own Key for Amazon S3
This section provides an overview of Bring Your Own Key (BYOK), an optional feature for the Cloud HyperExtender (CHE) plugin. To add this feature to your version of CHE, contact Ephesoft Support.
The Bring Your Own Key (BYOK) feature provides increased security protection, as it ensures that encrypted files can only be decrypted by the customer.
Important:
- Once the BYOK feature is enabled, the feature cannot be disabled. The option to have Ephesoft provide a key will no longer be available.
- DO NOT lose the encryption key. If the encryption key is lost, you cannot decrypt your files. Ephesoft will not have the ability to decrypt files on your behalf.
Enabling BYOK
- Generate an AES 256-bit security key. Ensure it is encoded as a Base64 string.
- Go to [Ephesoft_Directory]/JavaAppServer/webapps/ephesoft-cloud-client/WEB-INF/classes.
- Open the application.properties file to edit.
Note: If you have a clustered Ephesoft Transact environment with multiple processing servers, ensure that you edit this file on each processing server.
- Enter the security key from step 2 in this string of text after the equal (=) sign: cloud.workflow.encryption-key=<your security key> on each of the processing servers application.properties.
- Restart the Ephesoft Transact service.
This completes the plugin configuration and user instructions for the Ephesoft Cloud HyperExtender.