Introduction
This article provides information about upgrading to Ephesoft Transact Version 2019.1 in the following method of deployment:
- Environment — Single-server
- Operating System — Windows®
- Installation type — Upgrade
IMPORTANT: This document has been updated to describe how to install the Ephesoft Transact 2019.1 Hotfix.
For additional information about this Hotfix, refer to the following article:
This step-by-step procedure describes how to upgrade to Ephesoft Transact 2019.1 on a Microsoft® Windows machine. Supported Windows versions include the following:
- Windows 7 SP1
- Windows 10
- Windows Server 2012
- Windows Server 2012 R2
- Windows Server 2016
- These Windows versions are also supported for fresh and silent installations.
This article contains the following topics to support upgrade to Ephesoft Transact 2019.1 on Windows:
- Restrictions when Upgrading to Ephesoft Transact 2019.1 on Microsoft® Windows
- Prerequisites and Preparation for Upgrade to Ephesoft Transact 2019.1
- Upgrading to Ephesoft Transact 2019.1 in a Multi-server Environment
- Performing the Upgrade to Ephesoft Transact 2019.1
For additional information about Ephesoft Transact Versions, supported operating systems, and supported databases refer to the following resources:
- Ephesoft Transact Release Support
- Platform Configuration and Third-Party Integrations – Transact version 2019.1
Restrictions when Upgrading to Ephesoft Transact 2019.1 on Microsoft® Windows
- Ephesoft Transact Version 2019.1 requires a new license file
- Ephesoft Transact Versions previous to Transact 4.1.1.0 are not supported for an upgrade to Version 2019.1
- Contact your Sales representative if an upgrade from an earlier version is required.
- MariaDB Version 10.2.1 is required (for deployments that use MariaDB)
- MariaDB version 10.2.1 is the minimum version required for Ephesoft Transact Release 2019.1.
- Effective with Transact Release 2019.1, the Transact Installer upgrades MariaDB from version 10..2.1 to version 10.3.8.
- Fresh Transact installations, and Transact upgrades that have MariaDB integrated with Transact as a part of the bundled product, are both supported without additional manual configuration.
- Customers who have a MariaDB version older than version 10.2.1 must upgrade their MariaDB version to version 10.2.1 or later, install or upgrade to Ephesoft Transact Release 2019.1, then import existing batch classes.
- Microsoft® SQL Server 2008 R2 is not supported in Ephesoft Transact Version 2019.1
- Effective with Transact Release 2019.1, Ephesoft does not support this version of MS SQL Server.
- MySQL 5.5. is not supported in Ephesoft Transact Version 2019.1 installer
- Effective with Transact Release 2019.1, Ephesoft does not support this version of MySQL 5.5
- Microsoft® SQL Server Express is no longer included with the Ephesoft Transact Version 2019.1 installer
- Microsoft® SQL Server Express is no longer bundled with Ephesoft Transact and does not get installed from the Transact installer as of Transact Release 2019.1 and beyond.
Prerequisites and Preparation for Upgrade to Ephesoft Transact 2019.1
Review the prerequisites and licensing requirements for your version of Ephesoft Transact prior to beginning the upgrade. Refer to the following additional resources for more information:
NOTE: To use CJKT languages in OCR, or to use the Subscription license, you must obtain a license from the new Ephesoft Transact license generation process. This is recommended.
In order to use the Ephesoft Transact 2019.1 upgrade installer, the user needs to install the following prerequisites:
NOTE: Some prerequisites may have been installed with an earlier version of Transact (such as Transact 4.0.0.0, for example). Items 9 through 11 below were introduced with Ephesoft Transact 4.5.0.0. If you are performing a silent installation, it is important to ensure all prerequisites are installed. Otherwise, the installer produces third-party item prompts with their own licenses to which the user must agree.
- Microsoft Visual C++ 2010 Redistributable
- Microsoft Visual C++ 2012 Redistributable
- Microsoft Visual C++ 2013 Redistributable (x86 version) – Download
- Microsoft Hotfix KB2919355 – Download
- Microsoft Visual C++ 2015 Redistributable (x64 version)
- Microsoft Visual C++ 2015 Redistributable (x86 version) – Download
- Microsoft .Net Framework 4.5.1
- Microsoft® Windows OS should be updated to the latest version
- Microsoft® SQL Server® 2012 Native Client – QFE* (Version 11.4.7001.0) – Download
- Microsoft® ODBC Driver 13.1 for SQL Server® – Windows, Linux, & macOS (Version 13.1.4413.46) – Download
- Microsoft® Command Line Utilities 13.1 for SQL Server® – Windows, Linux, & macOS (Version 13.811.168) – Download
*See Installing Ephesoft Transact v4.5.0.0 on Windows Server 2012 R2 – Windows 8 and Higher for more information on this specific installation.
Upgrading to Ephesoft Transact 2019.1 in a Multi-server Environment
There are additional steps for upgrading a multi-server environment as compared to a single-node environment as outlined in this procedure.
NOTE: The installer must be executed on all servers.
- The license server must be the first installation and the user must check the Execute database patch checkbox in step 12.
- Start the Ephesoft Transact service. The post-upgrade process initiates. The installation time depends on the number of batch classes and instances.
- The installer must be executed on the remaining servers and the user must uncheck the Execute database patch checkbox in step 12.
Perform before Upgrade
Single and Multi-server
- Close Ephesoft Transact if it is running and stop Transact services before performing the upgrade.
- Any file and folder inside existing Ephesoft install directory (the path where the previous installation exists), such as dcma-all.log and other such files and folders, must be closed before upgrade.
- Ensure that the Windows installation drive has enough free space so that the installer setup file can be properly extracted. This space requirement also applies in the case with the drive where the previous Ephesoft application is installed.
- Ephesoft recommends that you back up your Ephesoft and report databases and shared folders. Refer to the article Ephesoft Backup for more information.
Perform the Upgrade to Ephesoft Transact 2019.1
Complete these steps when upgrading to Ephesoft Transact 2019.1, after all prerequisite conditions are met:
1. Extract the zip file WINDOWS_Ephesoft_Transact_2019.1 and install Ephesoft Transact 42019.1.
NOTE: The new install package is a ZIP file and the four files included need to be extracted prior to running the installer. This way of delivering an install package was introduced with Ephesoft Transact Version 4.5.0.0 and continues with Version 2019.1.
EXAMPLE:
a. The following snapshot illustrates the ZIP file and extracted folder in the same directory. This example illustrates Ephesoft Transact version 2019.1:

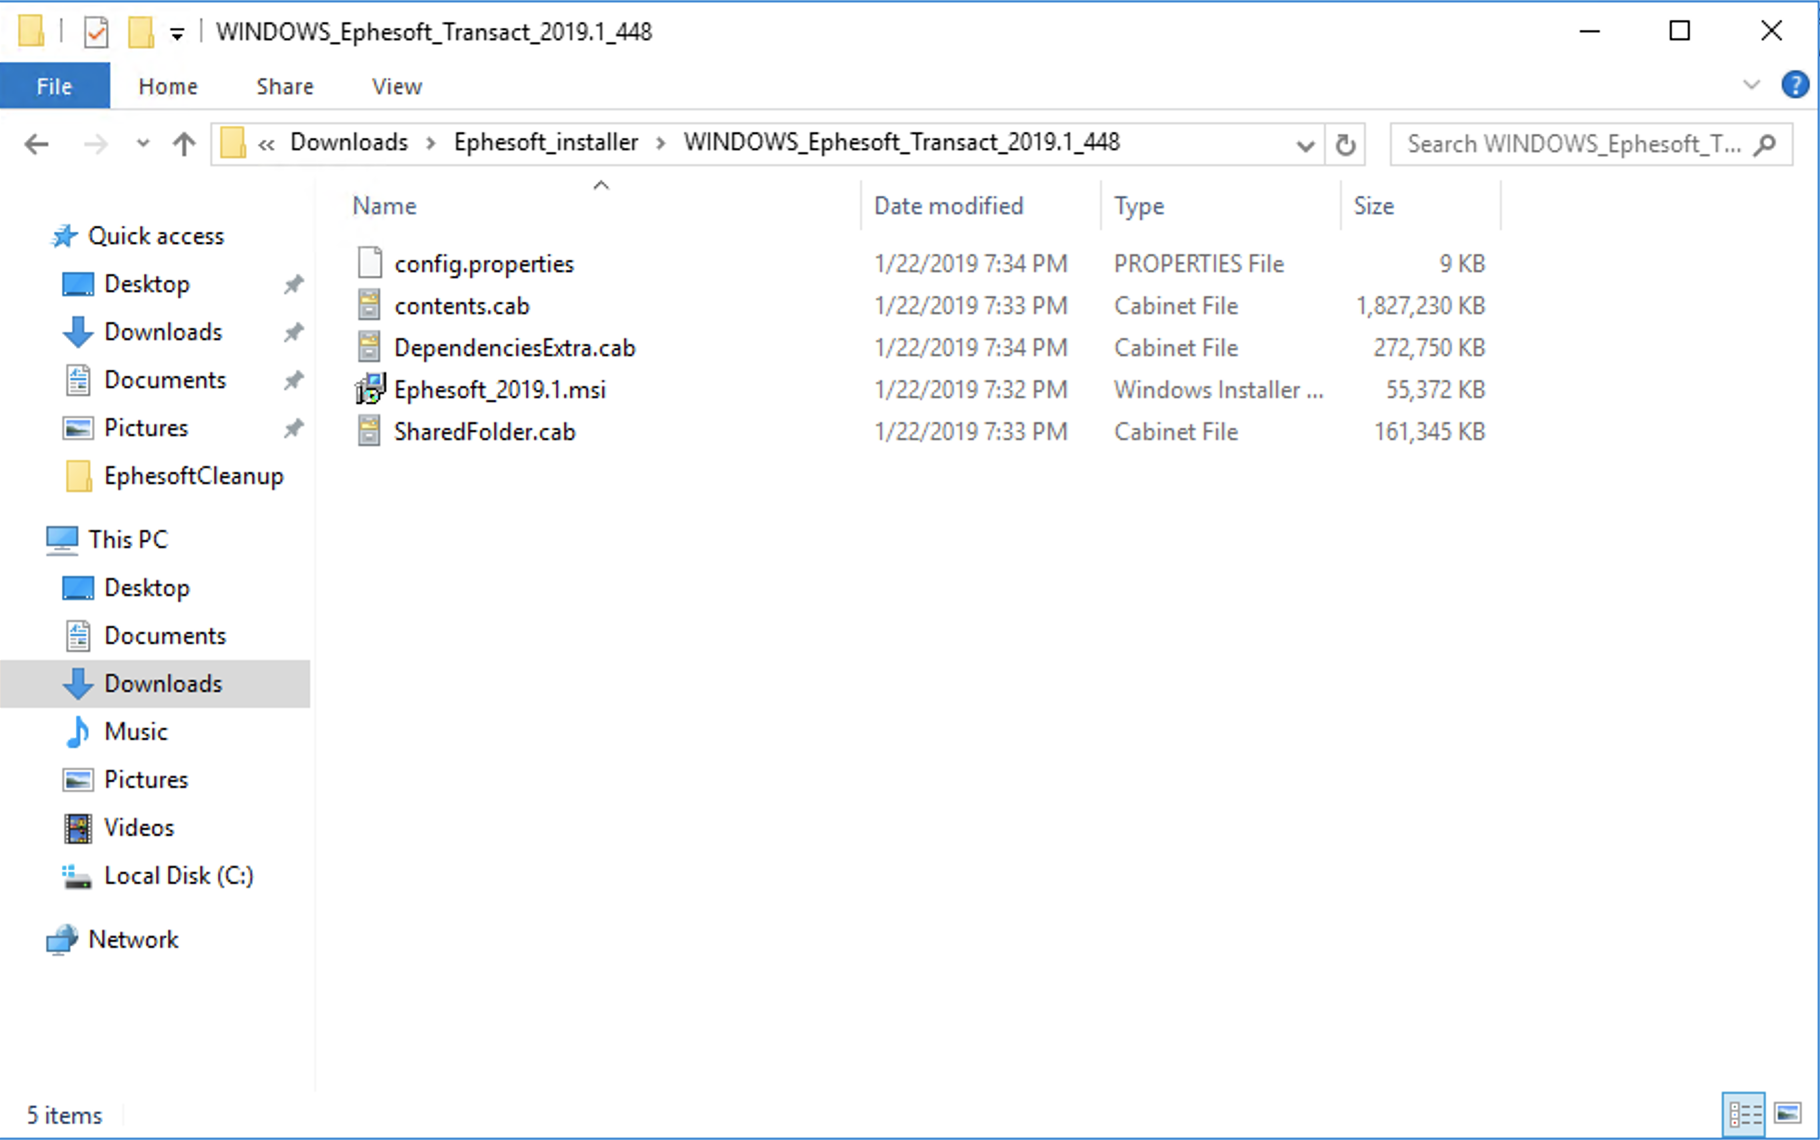
b. The following example illustrates the contents of the zip file for Ephesoft Transact version 2019.1:
Once the files are extracted, open a Command Prompt using Run as administrator and execute the command as shown in the following screenshot from the same path where the extracted .msi file is located:
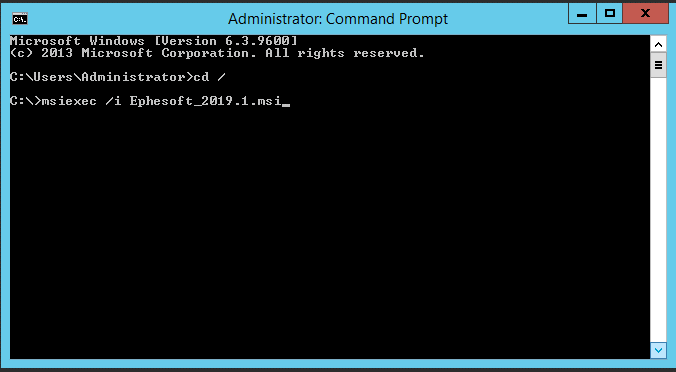
In the example command, C:\>msiexec.exe /i C:\Ephesoft_2019.1.msi is the path of Ephesoft installer setup.
This command initiates the Ephesoft installer setup.
The installer displays the following screen:
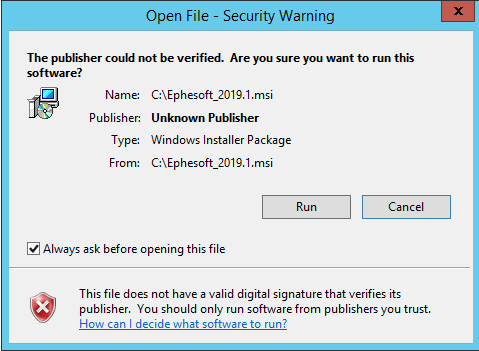
2. Click Run and initiate the Ephesoft installer.
3. Follow the onscreen instructions as prompted.
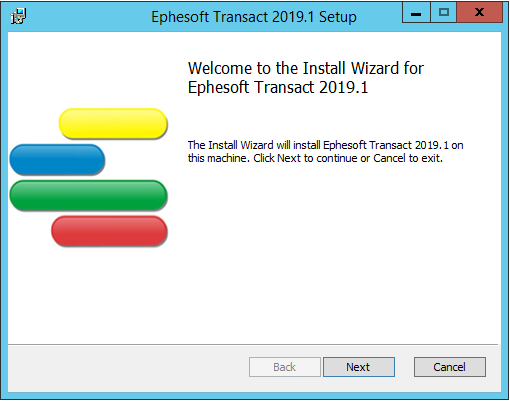
4. Click Next.
The End-User License Agreement is displayed.
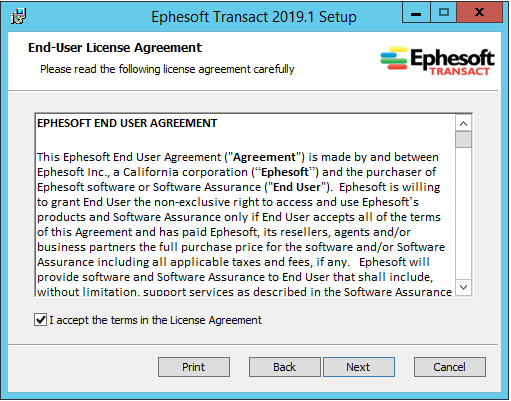
5. Read and understand the terms of the license agreement and click Next if acceptable. Ephesoft Prerequisites Check is displayed.
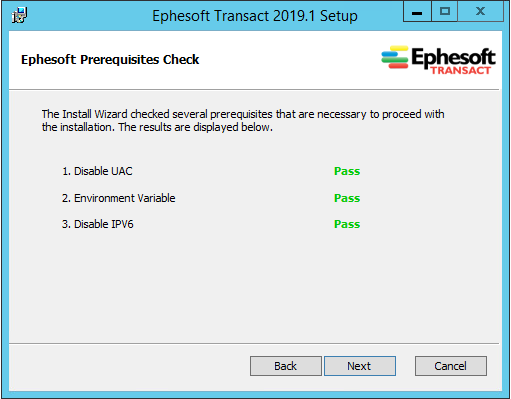
Ephesoft Transact performs a prerequisite check. The most important check is to make sure UAC is disabled.
Please ensure this has been verified and completed before continuing.
6. Click Next. Transact performs a preliminary check to see if .NET Framework 4.5.1 is installed.
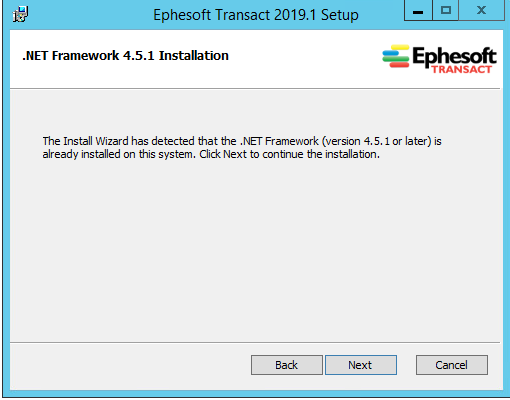
If .NET Framework 4.5.1 is installed on the system, the Next button is enabled. Click Next to continue.
If .NET Framework 4.5.1 is not installed on the system, the Next button is disabled. Instead, a Download button appears.
- Click the Download button to navigate to the appropriate web link to download .NET Framework.
- Download and install, then re-initiate the Transact installer.
- Repeat this step by clicking Next once .NET Framework 4.5.1 has been successfully detected by the installer.
Transact performs a prerequisites check of Microsoft® Visual C++ Redistributables.
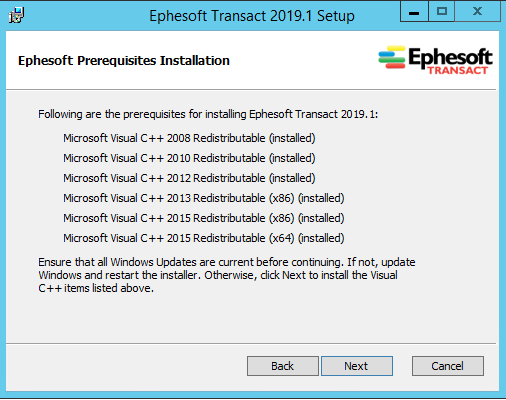
8. Click Next if they have been installed successfully (This will happen in the background).
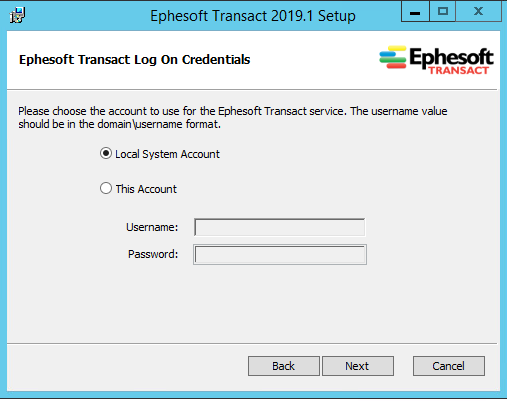
9. Select the appropriate service log in account. Click Next once complete.
10. Ephesoft Upgrade Installation is displayed.
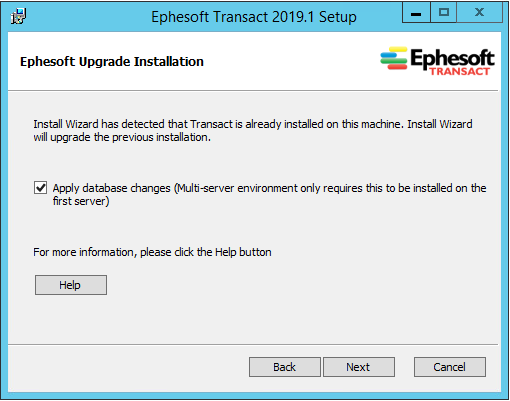
For a single server Ephesoft application, this checkbox must be checked before clicking the Next button.
IMPORTANT NOTE: Only perform this update on the first node when upgrading servers that are part of a multi-server environment.
Uncheck this checkbox if upgrading an Ephesoft Transact installation in a multi-server environment and the database patch has already been executed on a common database by another Ephesoft installation.
If the checkbox is checked before clicking Next, the database patch is executed after a successful upgrade and the user starts the Ephesoft server. If this checkbox is unchecked before clicking Next, then the database patch is not executed.
11. The Database Backup dialog is displayed.
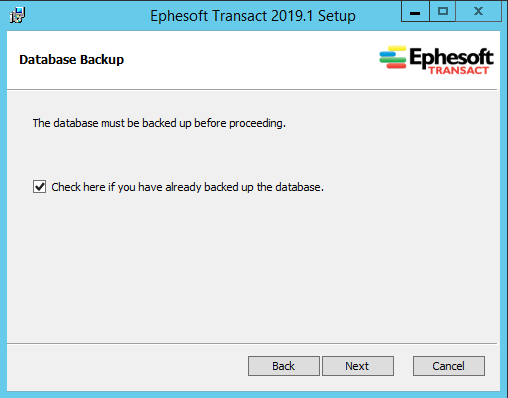
12. Confirm that you have performed a backup of your Ephesoft Installation Folder, SharedFolders and Databases by checking the checkbox in this Wizard Dialogue

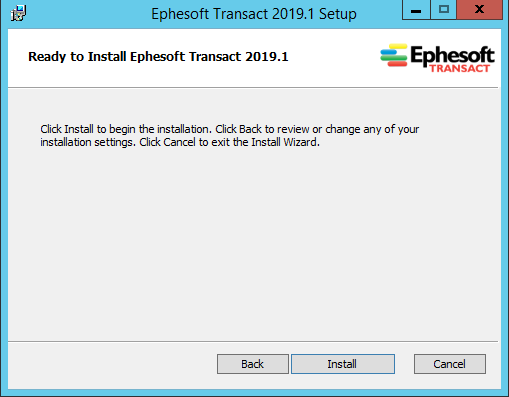
13. Click Install and the Installer performs the installation.
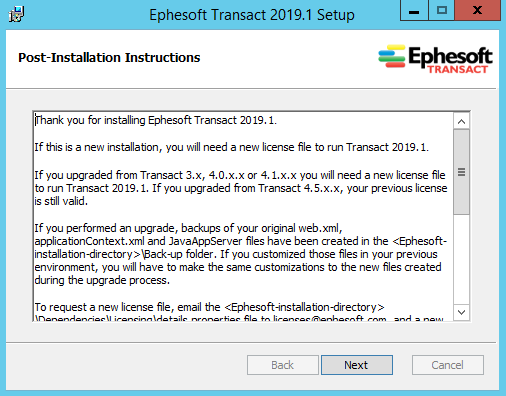
14. Read through the Post Installation Instructions and then select Next.
15. Ephesoft Transact 2019.1 setup is complete. The Setup Complete dialog appears.
IMPORTANT: Do not click (enable) Restart my computer.
This is a new requirement associated with the Ephesoft Transact 2019.1 Hotfix.
Instead, disable (uncheck) this setting, then click Finish to close the Install Wizard without restarting the computer.
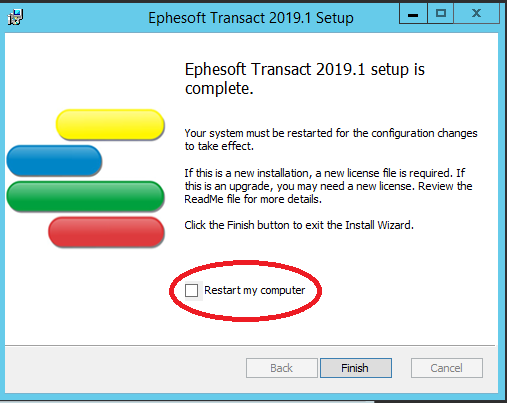
Please proceed to the next procedure without restarting the computer.
Complete the Hotfix Installation
After the initial release on January 31, 2019, Ephesoft discovered certain critical issues that impacted performance and reliability in Ephesoft Transact 2019.1.
Ephesoft created a Hotfix to address these issues. This Hotfix must be installed immediately after you complete the Install Wizard, as described in the previous section.
IMPORTANT: install the Hotfix immediately after completing the Install Wizard, and then restart your computer.
Perform the following steps to install the Hotfix for Ephesoft Transact 2019.1:
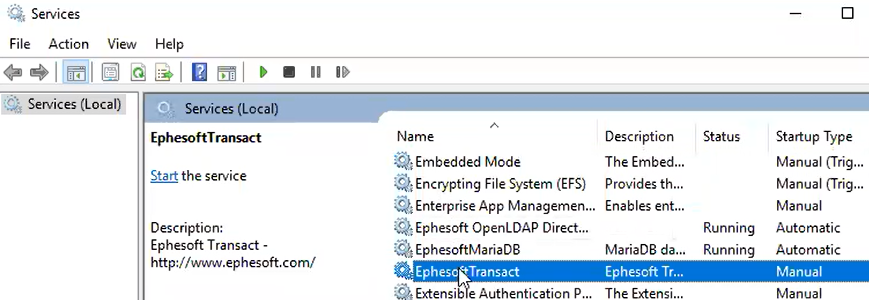
1. Stop the Ephesoft Transact service.
a. In the Windows start menu, or the Windows Control Panel, search for Services | Desktop App.
b. Right click the Services utility and run as administrator. The Services (Local) screen appears. Scroll down to EphesoftTransact.

c. If the EphesoftTransact service is running, right click EphesoftTransact, and click Stop. The status will display nothing, as the service is no longer running.
d. Close the Windows Service Control utility.
2. Obtain the Hotfix, HOTFIX_2019.1_Generic_04_Apr_2019.zip, and copy this file to a temporary location. Extract all contents of this file.
This Hotfix is available for download from the following location:
http://download.ephesoft.com/Ephesoft_Product/2019.1/Hotfix/2019.1_Fix_Pack.zip
3. Copy the following extracted JAR files:
- dcma-batch-*
- dcma-util-*
- dcma-recostar-*
- gxt-core-*
- gxt-review-validate-*
Copy these JAR files to the following directory:
{Ephesoft-installation-directory}\Application\WEB-INF\lib\HOT-FIXES
4. Back up the existing reviewValidate and bm folders in the following directory:
{Ephesoft-installation-directory}\Application\
5. Copy the extracted reviewValidate and bm folders to the following directory:
{Ephesoft-installation-directory}\Application\
6. Restart the computer now.
7. Start the Ephesoft Transact service.
a. In the Windows start menu, or the Windows Control Panel, search for Services | Desktop App.
b. Right click the Services utility and run as administrator. The Services (Local) screen appears. Scroll down to EphesoftTransact.
c. If the EphesoftTransact service is not running, right click EphesoftTransact, and click Start. The service starts with the following progress indicator:
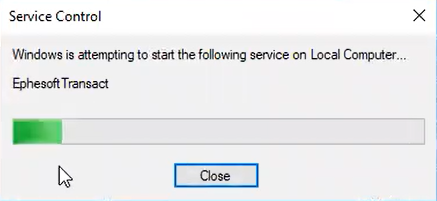
Upon successful startup of the EphesoftTransact service, the status will display Running.
![]()
d. Close the Windows Service Control utility.
8. Upon reboot, start the Ephesoft Transact service (from the Control Panel) which kicks off the post-upgrade process.

NOTE: The post-upgrade process takes some time based on the number of batch classes and instances. Once the post-upgrade is complete, the application is available.
The Ephesoft Transact 2019.1 home page appears.
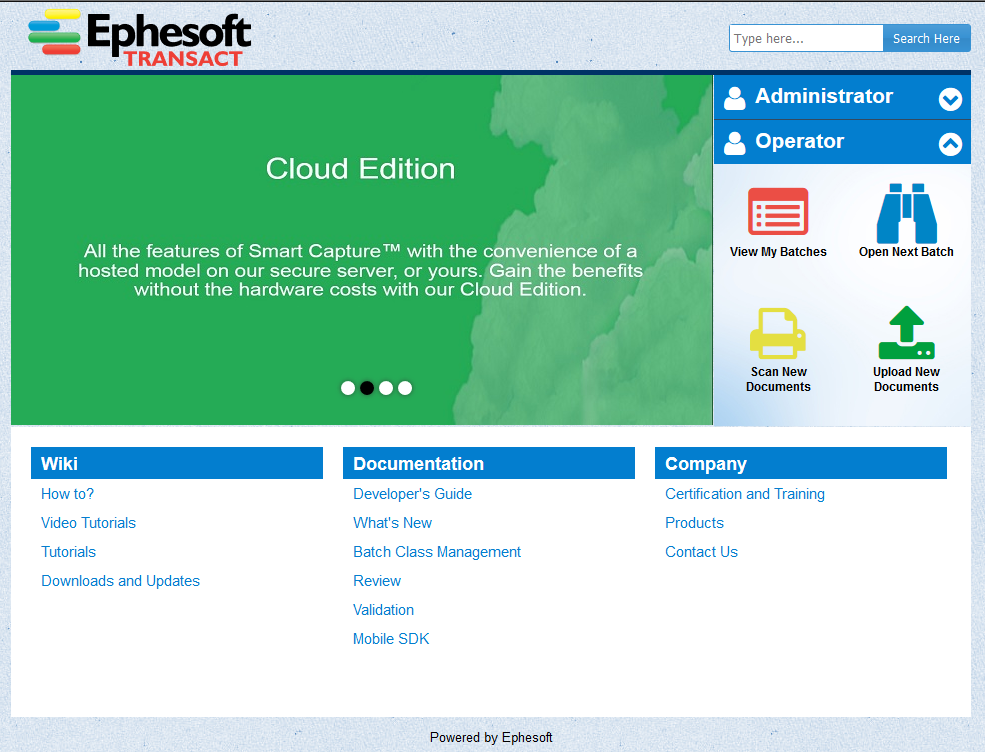
9. Select Administrator or Operator, and an option from either menu to log in. Enter the Username and Password.
Conclusion
The application is ready for you to setup your batch classes and process your files.
For additional information about using Ephesoft Transact, refer to the Ephesoft Transact Getting Started Tutorial: